In this tutorial, you will learn how to use the Keycloak REST API to create a new user for your application.
For video lessons on how to secure your Spring Boot application with OAuth 2.0. and Spring Security 5, please checkout my complete video course OAuth 2.0. in Spring Boot applications.
There are a few ways you get to register a new user:
- You can create a new user using the Keycloak Web Administration Console,
- You can let users register a new account themselves,
- Or you can use a REST API to create a new user account. In this tutorial, we will use the REST API.
Acquire Admin Access Token. Password Grant.
There are a couple of ways you can request an admin access token:
- Using Password Grant,
- User Client Credentials Grant(Recommended)
I will show you how to request an admin access token using both grant types. In this section, we will request an account token using a Password Grant. This will require us to include the admin username and password in the request. I usually do not feel comfortable using the master username and password and feel that using a Client Credentials grant time will be a better approach. Please see the following section to learn how to use the Client Credentials Grant type to request an admin access token.
To be able to create a new user account using REST API, we will need to first acquire an access token from the Keycloak server. To acquire an access token, we can use the admin user name and password of the master realm.
curl --location --request POST 'http://localhost:8080/realms/master/protocol/openid-connect/token' \
--header 'Content-Type: application/x-www-form-urlencoded' \
--data-urlencode 'username=admin2' \
--data-urlencode 'password=admin2' \
--data-urlencode 'grant_type=password' \
--data-urlencode 'client_id=admin-cli'
Where:
- http://localhost:8080 – is a host and a port number on which the Keycloak server is running. Update these values to be relevant to your setup.
- /realms/master/protocol/openid-connect/token – is a URL path to request an access token. Notice that this URL path is using the “master” realm. Do not change this URL path.
- username, and password – Should be the username and password you use to login to a Keycloak Administration console “master” realm. Update these values to be relevant to your configuration.
- The grant_type – Must be “password“. Do not change this value,
- and the client_id – Must be “admin-cli“. Do not change this value as well.
If the request is successful, in response you should get an access token.
{
    "access_token": "eyJhbGciOiJSUzI1NiIsInR5cCIgOiAiSldUIiwia2lkIiA6ICJFY2dlX3Y0c09fZUZ0TnhqYWJjT19QLTBhQ3p6S2VfMW02OU5mRjlBc1VzIn0.eyJleHAiOjE1OTI1Njc1OTAsImlhdCI6MTU5MjU2NzUzMCwianRpIjoiN2I0ODYwY2EtNmQ4NS00NGJjLWJjNGMtZjZjNDYyOTNhMjRhIiwiaXNzIjoiaHR0cDovL2xvY2FsaG9zdDo4MDgwL2F1dGgvcmVhbG1zL21hc3RlciIsInN1YiI6IjNmYjc1YTM4LTA4NjctNGZlYi04ZTBlLWYzMTkxZTZlODZlMSIsInR5cCI6IkJlYXJlciIsImF6cCI6ImFkbWluLWNsaSIsInNlc3Npb25fc3RhdGUiOiI0MGJkYmExMS03ODRiLTQ0ODMtODY0Ny1jMzQ4MjU0YmMwYWMiLCJhY3IiOiIxIiwic2NvcGUiOiJlbWFpbCBwcm9maWxlIiwiZW1haWxfdmVyaWZpZWQiOmZhbHNlLCJwcmVmZXJyZWRfdXNlcm5hbWUiOiJhZG1pbjIifQ.RuFnq3pRIOtHcAq3mX9472S9XU_NSf1y4KDsP9oCGnO38rh40mFRaPJKOO8bUbPjbz7UzQFgfG94w4t79SmatqtTixQwvZlAP-W0xlnKS3iUwn8AQIckKtSJhHz_JsyUS5iedJ_cCiCP6IoGWAO99zdl1OsJP_HVRaeBD6OJ3bP9LUd5etUCUA9v08J_2gqb83XkHrV_O9HWobXQK500NXDE8hr4Yt5BhpvHE68nGB0WZzkVKqVJ6wGsO5YR1_eKzfQ6kUZsP3Y8I3fHYbHCUU_OrQQgbxWpjkhPal3guodvRr6-0WuHc3Up6UQeRiIh7WlRwnZCO-tJZWiM43kt7w",
    "expires_in": 60,
    "refresh_expires_in": 1800,
    "refresh_token": "eyJhbGciOiJIUzI1NiIsInR5cCIgOiAiSldUIiwia2lkIiA6ICI1ODE5OTNhZS0xMDk4LTQ4NzQtYjRmOC1kZDRiMDYyNzRiY2IifQ.eyJleHAiOjE1OTI1NjkzMzAsImlhdCI6MTU5MjU2NzUzMCwianRpIjoiOWQ5ODQwMDMtOWYwMi00NzUwLWI5M2ItZThlNzA1ZTg2YzYzIiwiaXNzIjoiaHR0cDovL2xvY2FsaG9zdDo4MDgwL2F1dGgvcmVhbG1zL21hc3RlciIsImF1ZCI6Imh0dHA6Ly9sb2NhbGhvc3Q6ODA4MC9hdXRoL3JlYWxtcy9tYXN0ZXIiLCJzdWIiOiIzZmI3NWEzOC0wODY3LTRmZWItOGUwZS1mMzE5MWU2ZTg2ZTEiLCJ0eXAiOiJSZWZyZXNoIiwiYXpwIjoiYWRtaW4tY2xpIiwic2Vzc2lvbl9zdGF0ZSI6IjQwYmRiYTExLTc4NGItNDQ4My04NjQ3LWMzNDgyNTRiYzBhYyIsInNjb3BlIjoiZW1haWwgcHJvZmlsZSJ9.bsBjJw3sqRQGEzImffUZjRIfkRqvqtLay9uRCD5yhnw",
    "token_type": "bearer",
    "not-before-policy": 0,
    "session_state": "40bdba11-784b-4483-8647-c348254bc0ac",
    "scope": "email profile"
}
You can use this access token in the following request to create a new user account for any other existing Realm. To learn how to create new Keycloak Realms, look at the following tutorial – Keycloak: Creating a New User.
Acquire Admin Access Token. Client Credentials Grant.
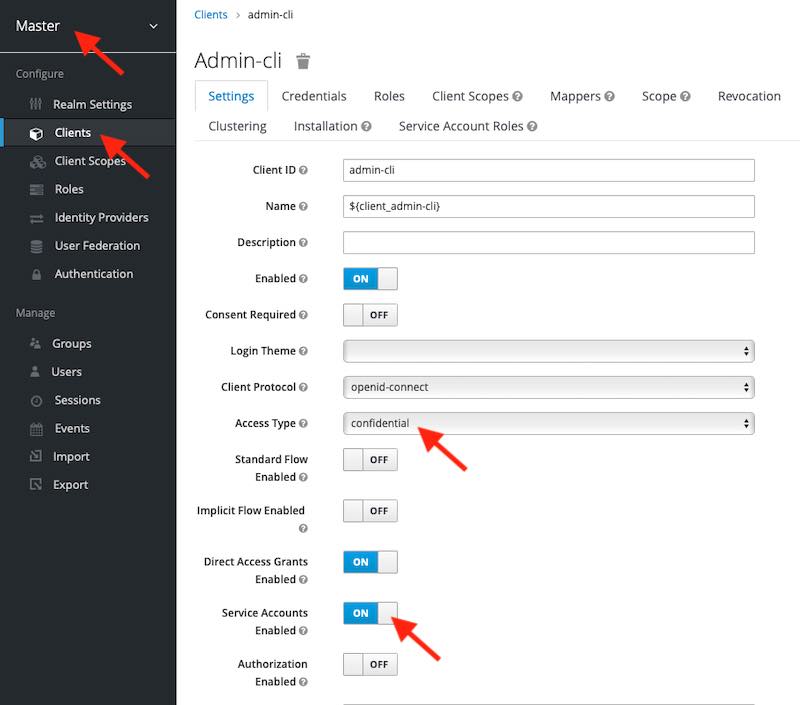
Client Credentials grant type allows us to request an admin access token by providing client-id and client-secret instead of an admin username and password. To be able to use this approach, the OAuth 2 Client application called “admin-cli” which is in the “master” Keycloak realm needs to be set to “confidential“.
To change the “admin-cli” client Access Type property from Public to Confidential, and save the settings. You will need to login to “master” Realm, switch to OAuth 2 “Clients” list, and edit the “admin-cli“. Change the Access Type property from Public to Confidential and make sure that the “Service Accounts Enabled” option is turned on.
Once you are done making the above changes, click on the Save button. The page will reload and at the top, you will see a new tab called “Credentials“. Click on the Credentials tab and copy the value of client_secret.
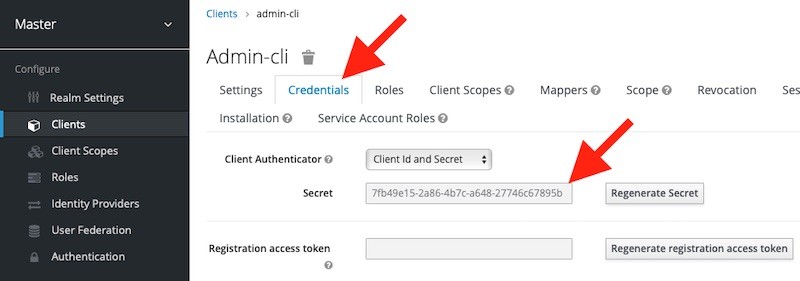
Now when you have the client secret value for OAuth 2 Client “admin-cli“, you can request an admin access token using the “client-credentials” grant type.
curl --location --request POST 'http://localhost:8080/realms/master/protocol/openid-connect/token' \
--header 'Content-Type: application/x-www-form-urlencoded' \
--data-urlencode 'grant_type=client_credentials' \
--data-urlencode 'client_id=admin-cli' \
--data-urlencode 'client_secret=7fb49e15-2a86-4b7c-a648-27746c67895b'
In response, you will get an access token that you can use with Keycloak REST API.
REST API Call to Create a New User Account
Now that you have an access token, you can use the REST API Keycloak provides to create a new user account.
To create a new user account, you will need to send an HTTP POST request to a /users web service endpoint. Please note that in the request URL, you will need to provide a Realm name under which the new user should be created.
curl --location --request POST 'http://localhost:8080/admin/realms/appsdeveloperblog/users' \
--header 'Content-Type: application/json' \
--header 'Authorization: Bearer eyJhbGciOiJSUzI1NiIsInR5cCIgOiAiSldUIiwia2lkIiA6ICJFY2dlX3Y0c09fZUZ0TnhqYWJjT19QLTBhQ3p6S2VfMW02OU5mRjlBc1VzIn0.eyJleHAiOjE1OTI1Njc4OTEsImlhdCI6MTU5MjU2NzgzMSwianRpIjoiNjJiMWRlODEtNTBhMS00NzA2LWFmN2MtYzhhZTc1YTg1OTJhIiwiaXNzIjoiaHR0cDovL2xvY2FsaG9zdDo4MDgwL2F1dGgvcmVhbG1zL21hc3RlciIsInN1YiI6IjNmYjc1YTM4LTA4NjctNGZlYi04ZTBlLWYzMTkxZTZlODZlMSIsInR5cCI6IkJlYXJlciIsImF6cCI6ImFkbWluLWNsaSIsInNlc3Npb25fc3RhdGUiOiJhMDMwNGNiMS0xMzViLTQzODItYjYwMi0xNjNmNzgzYWNlN2IiLCJhY3IiOiIxIiwic2NvcGUiOiJlbWFpbCBwcm9maWxlIiwiZW1haWxfdmVyaWZpZWQiOmZhbHNlLCJwcmVmZXJyZWRfdXNlcm5hbWUiOiJhZG1pbjIifQ.G9-OiyrGWk8cY4S3Ho255Y_euk_gTKDgYmGmU8RPBSeBNtFb_A68tuPFJxFKbzhZ1lipKJCXQsHbStoihvXAmmRsKzud5hDIvvnrD7CcVxAIpbd2wV5i6mB2wVLocV0_FCrE0-DNi_GPAKnazjFiVu3TxxM2L8Zsw7PHN9sb8Ux_lRvAFyNY5bT7NTbmEmt6LsO2An7iTZdBLScK9Lk9ZW8_0WG4eLMy9fatrpVV3MXhINW56gZD8WsWISY0m-cbIftDreZ1f2lzIjMGfkDrgCjy-VZjeIpbmffN-YGrUVywziymBRwA7FFLAxcf6jS5548HVxxKeMPIvNEfDG7eWw' \
--data-raw '{"firstName":"Sergey","lastName":"Kargopolov", "email":"[email protected]", "enabled":"true", "username":"app-user"}'
If the request is successful, you will get back a 201 Created status code.
Keycloak User Account Login
Once a new user is created, if needed, they can log in to their Keycloak account and manage their credentials. To let user login into their Keycloak account you can share with them an account login URL:
http://localhost:8080/realms/appsdeveloperblog/account
Where:
- appsdeveloperblog – is the name of the Keycloak Realm a user was registered in. Change this value to be relevant to your setup.
I hope this tutorial was of some help to you. Check out other Keycloak tutorials on this site; hopefully, you will find them helpful too.
Happy learning!