In this blog post, you will learn how to write a string value into a file in the Documents directory on an iOS device using Swift. This tutorial is designed for beginners who are interested in learning how to interact with the file system on iOS devices.
By the end of this tutorial, you should be able to understand how to perform basic file operations in Swift, including creating files and writing data to them.
Step 1: Locating the Documents Directory
The first step is to find the Documents directory on an iOS device. This directory is a good place to store user-generated content or app-specific data that doesn’t need to be shared with other apps. You can locate the Documents directory using the FileManager class provided by Swift. Here’s how you can get the URL for the Documents directory:
let urls = FileManager.default.urls(for: .documentDirectory, in: .userDomainMask)
let documentsDirectory = urls[0]
print(documentsDirectory)
In the above code, .documentDirectory is passed as the first argument to specify that you want to get the location of the Documents directory. .userDomainMask is passed as the second argument to indicate that you are looking for the Documents directory in the user’s home directory.
The urls(for:in:) method returns an array of URLs, since there is only one Documents directory in the home directory of the application container, you can get the URL of the Documents directory by accessing the first item in the array.
For more details about document directory structure, you can read the official Apple Developer Documentation on File System Basics.
Step 2: Writing a String Value into a File in the Documents Directory
Once you have the URL for the Documents directory, you can write a string value into a file in this directory. Here’s how you can do it:
let fileName = "myFile.txt"
let filePath = documentsDirectory.appendingPathComponent(fileName)

do {
  let content = "Hello, World!" // Your input String
  try content.write(to: filePath, atomically: true, encoding: .utf8)
} catch {
  print("Error writing file: \(error)")
}
In the above code, you first create the full path of the file by appending the filename to the path of the Documents directory. Then, you write the string “Hello, World!” to this file. The write(to:atomically:encoding:) method is a throwing method, which means you need to handle any errors that may occur during the writing process using a do-catch block.
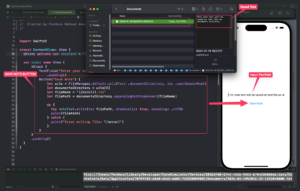
Real-Life Example Using iOS and SwiftUI
Let’s consider a real-life example where you have a note-taking app. When a user creates a new note, you want to save this note into a file in the Documents directory. For the below code example, I am using SwiftUI for the app UI. You can use UIKit or Storyboard for your design. Here’s how you can implement this feature:
import SwiftUI

struct ContentView: View {
  @State private var noteText = ""

  var body: some View {
      VStack {
          TextField("Enter your note", text: $noteText)
              .padding()
          Button("Save Note") {
              let urls = FileManager.default.urls(for: .documentDirectory, in: .userDomainMask)
              let documentsDirectory = urls[0]
              let fileName = "\(Date()).txt"
              let filePath = documentsDirectory.appendingPathComponent(fileName)

              do {
                try noteText.write(to: filePath, atomically: true, encoding: .utf8)
                print(filePath)
              } catch {
                print("Error writing file: \(error)")
              }
          }
      }
      .padding()
  }
}
In the above code, you have a TextField for the user to enter their note and a Button to save the note. When the button is clicked, you get the URL for the Documents directory, create the full path of the file by appending the current date and time as the filename to the path of the Documents directory, and write the note to this file.
After writing the file to the Documents directory, you might want to verify whether the file was successfully saved or not. To do this, you can check the file path in Xcode’s output section.
To navigate to the specific folder location quickly, you can use a keyboard shortcut. Press CMD + Shift + G to open a dialog box for specifying the folder location. Simply paste the copied file path from Xcode’s output section into this dialog box and press Enter. This will take you directly to the folder where the file is located
Conclusion
In this tutorial, you learned how to find the Documents directory on an iOS device and how to write a string value into a file in this directory.
Please note that the Documents directory is a good place to store user-generated content or app-specific data that doesn’t need to be shared with other apps. However, you should avoid storing large amounts of data in this directory as it may affect the performance of your app.
You can also store string values in NSUserDefaults. Have a look at this code example to learn how to write and read values of different data types from NSUserDefaults.
If you are interested in video lessons on how to write Unit tests and UI tests to test your Swift mobile app, check out this page: Unit Testing Swift Mobile App