In this tutorial, you will learn how to implement a very simple OAuth2 Resource Server that will validate the JWT token it has earlier acquired from a Keycloak authorization server.
For video lessons on how to secure your Spring Boot application with OAuth 2.0. and Spring Security 5, please checkout my complete video course OAuth 2.0. in Spring Boot applications.
I this tutorial I will not show how to acquire the JWT access token but if you are interested to learn how to do it, please follow the below tutorials.
- Keycloak: Starting a Standalone Server,
- Keycloak: Creating a new user,
- Keycloak: Requesting Token with a Password Grant flow,
- Keycloak: Authorization Code Grant Example.
Creating a New Spring Boot Project
The Resource Server will be a Spring Boot project that I will create with Spring Initializr. You can call it a Resource Server or a Microservice or simply a RESTful Web Service application.
If you need help recalling how to create a simple Spring Boot RESTful Web Service application, please follow this tutorial – Create a Simple Web Service Project with Spring Boot (includes video tutorial).
Adding OAuth2 Dependency
For our new Spring Boot project to work as a Resource Server, and be able to communicate with the Keycloak server to validate the JWT we will need to add to it one very important dependency – spring-boot-starter-oauth2-resource-server.
Open the pom.xml file and add to it the following dependency.
<dependency>
    <groupId>org.springframework.boot</groupId>
    <artifactId>spring-boot-starter-oauth2-resource-server</artifactId>
</dependency>
The above dependency will already contain Spring Security libraries, so no need to add any other Spring Security dependencies to this pom.xml file.
Other Dependencies
The only additional dependency I needed to add to make my Spring Boot project to work as a RESTful Web Service application is the spring-boot-starter-web.
<dependency>
    <groupId>org.springframework.boot</groupId>
    <artifactId>spring-boot-starter-web</artifactId>
</dependency>
Below is a complete pom.xml file of my Resource Server project.
<?xml version="1.0" encoding="UTF-8"?>
<project xmlns="http://maven.apache.org/POM/4.0.0" xmlns:xsi="http://www.w3.org/2001/XMLSchema-instance"
    xsi:schemaLocation="http://maven.apache.org/POM/4.0.0 https://maven.apache.org/xsd/maven-4.0.0.xsd">
    <modelVersion>4.0.0</modelVersion>
    <parent>
        <groupId>org.springframework.boot</groupId>
        <artifactId>spring-boot-starter-parent</artifactId>
        <version>2.3.0.RELEASE</version>
        <relativePath/> <!-- lookup parent from repository -->
    </parent>
    <groupId>com.appsdeveloperblog.keycloak</groupId>
    <artifactId>KeycloakResourceServer2</artifactId>
    <version>0.0.1-SNAPSHOT</version>
    <name>KeycloakResourceServer2</name>
    <description>Demo project for Spring Boot</description>

    <properties>
        <java.version>1.8</java.version>
    </properties>

    <dependencies>
        <dependency>
            <groupId>org.springframework.boot</groupId>
            <artifactId>spring-boot-starter-oauth2-resource-server</artifactId>
        </dependency>
        <dependency>
            <groupId>org.springframework.boot</groupId>
            <artifactId>spring-boot-starter-web</artifactId>
        </dependency>

        <dependency>
            <groupId>org.springframework.boot</groupId>
            <artifactId>spring-boot-starter-test</artifactId>
            <scope>test</scope>
            <exclusions>
                <exclusion>
                    <groupId>org.junit.vintage</groupId>
                    <artifactId>junit-vintage-engine</artifactId>
                </exclusion>
            </exclusions>
        </dependency>
    </dependencies>

    <build>
        <plugins>
            <plugin>
                <groupId>org.springframework.boot</groupId>
                <artifactId>spring-boot-maven-plugin</artifactId>
            </plugin>
        </plugins>
    </build>

</project>
Creating a RestController Class
To make my Spring Boot application work as a RESTful Web Service application, I will create a very simple Rest Controller. Inside of this Rest Controller class I will create a very simple web service endpoint that will return a plain text in response.
import org.springframework.web.bind.annotation.GetMapping;
import org.springframework.web.bind.annotation.RequestMapping;
import org.springframework.web.bind.annotation.RestController;

@RestController
@RequestMapping("/users")
public class UsersController {

    @GetMapping("/status/check")
    public String status() {
        return "working";
    }
}
If I run this Spring Boot application now and attempt to access this web service endpoint at http://localhost:8080/users/status/check, I will get a 401 Unauthorized status code. This is because we have added the spring-boot-starter-oauth2-resource-server dependency to our project. The web service endpoint is now secured and to access it, I will need to provide a valid access token.
Configure the JWT Issuer URI
For client applications to be able to communicate with my Resource Server, they will need to include a valid JWT token that was generated by an Authorization Server. In this tutorial, I am using the Keycloak server and the JWT token I am going to use was issued by a Keycloak server.
To configure my Resource Server to validate the JWT with it issuer, I will need to add one property to an application.properties file of my project.
spring.security.oauth2.resourceserver.jwt.issuer-uri = http://localhost:8080/auth/realms/appsdeveloperblog
The issuer-uri value here is pointing to an “appsdeveloperblog” Realm that I have created in the Keycloak server. To learn how to set up a new Realm and users in the Keycloak server, please refer to this tutorial – Keycloak: Creating a new user.
Another way to configure our Resource Server to validate the JWT token with the Authorization Server is to use the following property.
spring.security.oauth2.resourceserver.jwt.jwk-set-uri = http://localhost:8080/auth/realms/appsdeveloperblog/protocol/openid-connect/certs
The above jwk-set-uri value is pointing to the public key endpoint. If you open this web service endpoint in the browser window, you will see a JSON containing information that will be used to validate the JWT.
You can use either spring.security.oauth2.resourceserver.jwt.issuer-uri or spring.security.oauth2.resourceserver.jwt.jwk-set-uri and even both of them at the same time. If both properties are used and the value of one is incorrect, the validation of JWT will fail.
spring.security.oauth2.resourceserver.jwt.issuer-uri = http://localhost:8080/auth/realms/appsdeveloperblog
spring.security.oauth2.resourceserver.jwt.jwk-set-uri = http://localhost:8080/auth/realms/appsdeveloperblog/protocol/openid-connect/certs
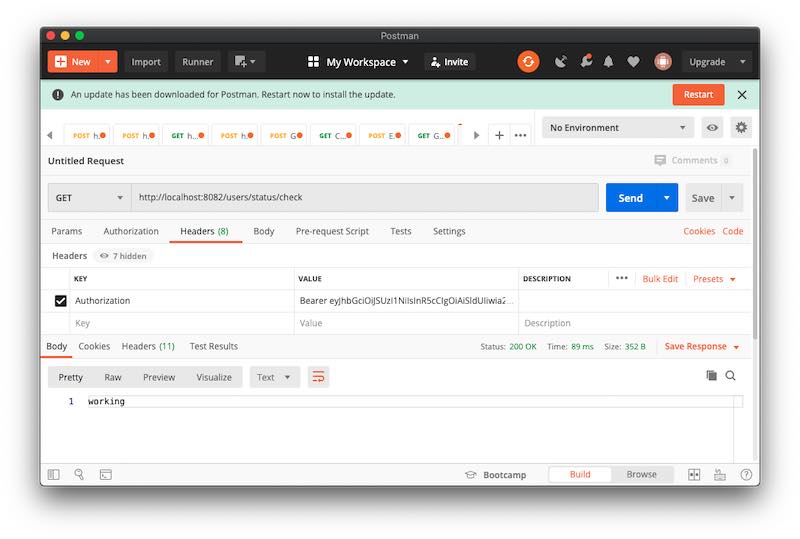
Accessing Protected Web Service Enpoints
To access any web service endpoints that I have in my resource server, I will need to include a valid JWT in the authorization header of the HTTP request. Below is an example of a curl command I have used to access the web service endpoint created in this tutorial.
curl --location --request GET 'http://localhost:8082/users/status/check' \
--header 'Authorization: Bearer eyJhbGciOiJSUzI1NiIsInR5cCIgOiAiSldUIiwia2lkIiA6ICItNUlsX2I0cUktdWFvaEI3d244UHY3WEM2UEktU3BNbmZCRnlJZUx6QTJNIn0.eyJleHAiOjE1OTI0MTc4MTcsImlhdCI6MTU5MjQxNzUxNywiYXV0aF90aW1lIjoxNTkyNDE3Mzk5LCJqdGkiOiIwOTIyNmExMS03MGM5LTQ2MjItOTkwMS04MWJmYzczM2JkZGQiLCJpc3MiOiJodHRwOi8vbG9jYWxob3N0OjgwODAvYXV0aC9yZWFsbXMvYXBwc2RldmVsb3BlcmJsb2ciLCJzdWIiOiIxZGRlM2ZjMy1jNmRiLTQ5ZmItOWIzZC03OTY0YzVjMDY4N2EiLCJ0eXAiOiJCZWFyZXIiLCJhenAiOiJwaG90by1hcHAtY29kZS1mbG93LWNsaWVudCIsInNlc3Npb25fc3RhdGUiOiI1ZTczMjcxMy1jMGZhLTRjYjUtYjJlNi00ZjUxMWI5YTI2MWMiLCJhY3IiOiIwIiwic2NvcGUiOiJwcm9maWxlIiwibmFtZSI6IkthcmdvcG9sb3YiLCJwcmVmZXJyZWRfdXNlcm5hbWUiOiJzZXJnZXkiLCJmYW1pbHlfbmFtZSI6IkthcmdvcG9sb3YifQ.O7w5TljmIoKqmDY1_zA0N06C7t2LBOYdclCVGQJzwScKZw6kymSnKcSAeA_Gg7tjKDrYYHgpDQtfSQXbuSKDk4R3vz-k4fAV7LFCcxdhRiH_R5NEd0FfJkBJN_eaS6HLSf-0PlUUuv8sQqng_xdRIY7_a9znYbMUO-NXvdogRubJseCEb25HUsD3vOrO4R0E0mQUks3Sl5lUAxMBRsX-4TwsXaWc9JswhaBSWyMjmPQgpepU9IdCyzgW5cyYFdNxoMlS58kGRvZpdNr5Eh31mgmbsADN7cTfuJzZ3jHfYRFf1vBP6bpY8wzmFejAWzms0E2CpdEbA0wx3RuAHdThtg'
I hope this tutorial was of some help to you. But before you go, check out other tutorials on this site. You might find other helpful ones.
Happy learning! 🙋🏻♂️
Great, how can i integrate global method security in the resource server, i.e.
@PreAuthorize(“hasAuthority(‘admin’)”)