In this tutorial, we will have a deeper look into the “Model View ViewModel” (MVVM) architecture of Flutter.
The MVVM pattern provides a uniform distribution of data with the benefits of flexibility and reusability of the code as well as data. Looking at the definition of MVVM it is the abbreviation of three words namely Model, View, and View Model. The concept of MVVM is to build a view model that can represent the data through a view.
The “View Model” occupies the central position which sends and receives the data from the model and provides the data to the view, it also observes the data changes that occurred at the view and responds accordingly using the model to the view. The most essential element of MVVM architecture is “ViewModel”, which presents the View part separately from the Model. This element makes the Model hold the actual data, and the View part holds the formatted or updated data while keeping the controller as an interface between them.
The “Model” in the MVVM design pattern represents the actual data(real-time) that will be used in application development. For example, we could understand with the help of a real-time scenario of the bank where this element will be the account number, having a person’s name and address.
The “View” in the MVVM design pattern represents the UI that the user gets to interact with the application. This element utilizes a set of libraries to present the data more accurately and appropriately.
In order to better understand it we will follow the following steps:
- Create a new Flutter app,
- Get Dependencies,
- Create the Model
- Create the UI.
- Create the Web Service
- Create The View Model
- Create a Widget
- Create main.dart
- Benefits of MVVM
1. Create a New Flutter Project
Go ahead and create a new Flutter app. If you don’t know how to create a project you can refer to the “Hello World App in Flutter” tutorial. Remove all the code as we will add a custom main.dart further down the tutorial. For this project, we will make use of a movie search app.
2. Get Dependencies
For this tutorial, we will use two dependencies, provider and HTTP. Go ahead in your “pubspec.yaml” file and under dependencies add the following:
  http: latest
  provider: latest
// use the latest dependencies version from pub.dev
Run “pub get” and let’s go to the next step.
3. Create the Model
Since we will be building a movies search app the model will be the Movie. In your “lib” folder create a new folder and name its models. Inside the model folder create a dart file and name it “movie.dart”. Enter the following code:
class Movie {

  final String title;
  final String posterUrl;

  Movie({this.title, this.posterUrl});

  factory Movie.fromJson(Map<String, dynamic> json) {
    return Movie(
        title: json["Title"],
        posterUrl: json["Poster"]
    );
  }

}
We created a class movie that will take on two parameters: a string “title” and a string “posterUrl”(since we will get a string from the API further down).
4. Create the UI
For this step create a new folder in your lib folder and name it “screens”. Create a “dart” file and name it “movies_screen.dart”. Enter the following code in it:
import 'package:flutter/material.dart';
import 'package:flutter_app_tutorial/viewModel/movies_list_view_model.dart';
import 'package:flutter_app_tutorial/widgets/movies_list.dart';

import 'package:provider/provider.dart';

class MovieListPage extends StatefulWidget {
  @override
  _MovieListPageState createState() => _MovieListPageState();
}

class _MovieListPageState extends State<MovieListPage> {

  final TextEditingController _controller = TextEditingController();

  @override
  void initState() {
    super.initState();
    Provider.of<MovieListViewModel>(context, listen: false).fetchMovies("iron man");
//you can use anything you like or not use anything here. I call it just to have a content on the screen rather than having a blank screen
  }

  @override
  Widget build(BuildContext context) {

    final vm = Provider.of<MovieListViewModel>(context);

    return Scaffold(
        appBar: AppBar(
            title: Text("Movies MVVM Example")
        ),
        body: Container(
            padding: EdgeInsets.all(10),
            width: MediaQuery.of(context).size.width,
            height: MediaQuery.of(context).size.height,
            child: Column(children: <Widget>[
              Container(
                padding: EdgeInsets.only(left: 10),
                decoration: BoxDecoration(
                    color: Colors.grey,
                    borderRadius: BorderRadius.circular(10)
                ),
                child: TextField(
                  controller: _controller,
                  onSubmitted: (value) {
                    if(value.isNotEmpty) {
                      vm.fetchMovies(value);
                      _controller.clear();
                    }
                  },
                  style: TextStyle(color: Colors.white),
                  decoration: InputDecoration(
                      hintText: "Search",
                      hintStyle: TextStyle(color: Colors.white),
                      border: InputBorder.none
                  ),

                ),
              ),
              Expanded(
                  child: MovieList(movies: vm.movies))//we will create this further down
            ])
        )

    );
  }
}
As you can see it’s a very simple UI in which you will see the MVVM in action.
5. Create the Web Service
For the web service, we will use an API endpoint to omdbapi.com. Here is the code:
import 'dart:convert';
import 'package:flutter_app_tutorial/models/movie.dart';
import 'package:http/http.dart' as http;

class Webservice {

  Future<List<Movie>> fetchMovies(String keyword) async {

    final url = "http://www.omdbapi.com/?s=$keyword&apikey=eb0d5538";
    final response = await http.get(url);
    if(response.statusCode == 200) {

      final body = jsonDecode(response.body);
      final Iterable json = body["Search"];
      return json.map((movie) => Movie.fromJson(movie)).toList();

    } else {
      throw Exception("Unable to perform request!");
    }
  }
}
Once you paste this code you will get errors. Just remember to import ‘dart:convert”, your model from “movie.dart” and ‘package:http/http.dart’. As you can see we are making an API call to the URL and waiting for a response. If we get a response it will be in a JSON format and we need to decode it. Once decoded we can map it out and send it to a list. And of course, we have error handling at the end of the function.
6. Create the View Model
In your “lib” folder create another folder and name it “viewModel”. In this folder, we will create two files. One will be the “movie_view_model” which will have the following content:
import 'package:flutter_app_tutorial/models/movie.dart';

class MovieViewModel {

  final Movie movie;

  MovieViewModel({this.movie});

  String get title {
    return this.movie.title;
  }

  String get poster {
    return this.movie.posterUrl;
  }

}
As you can see we created a new class “MovieViewModel” that will take in the model “Movie” as a parameter and return the values from that model inside the View Model.
The next file will be “movies_list_view_model” and will have the following code:
import 'package:flutter/material.dart';
import 'package:flutter_app_tutorial/service/web_service.dart';
import 'package:flutter_app_tutorial/viewModel/movie_view_model.dart';

class MovieListViewModel extends ChangeNotifier {

  List<MovieViewModel> movies = List<MovieViewModel>();

  Future<void> fetchMovies(String keyword) async {
    final results =  await Webservice().fetchMovies(keyword);
    this.movies = results.map((item) => MovieViewModel(movie: item)).toList();
    notifyListeners();
  }

}
7. Create a Widget
The widget we will create will be inside a new folder we will create in the “lib” folder. Inside this folder create a file and name it “movies_list.dart”. This is just to continue with the MVVM reusability of the code. Here is the code for it:
import 'package:flutter/material.dart';
import 'package:flutter_app_tutorial/viewModel/movie_view_model.dart';


class MovieList extends StatelessWidget {

  final List<MovieViewModel> movies;

  MovieList({this.movies});

  @override
  Widget build(BuildContext context) {
    return ListView.builder(
      itemCount: this.movies.length,
      itemBuilder: (context, index) {

        final movie = this.movies[index];

        return ListTile(
          contentPadding: EdgeInsets.all(10),
          leading: Container(
            decoration: BoxDecoration(
                image: DecorationImage(
                    fit: BoxFit.cover,
                    image: NetworkImage(movie.poster)
                ),
                borderRadius: BorderRadius.circular(6)
            ),
            width: 50,
            height: 100,
          ),
          title: Text(movie.title),
        );
      },
    );
  }
}
Very simple ListTile widget that will display the data we get from our view model/
8. Create main.dart
Finally, we will create the main.dart file:
import 'package:flutter/material.dart';
import 'package:flutter_app_tutorial/screens/movies_screen.dart';
import 'package:flutter_app_tutorial/viewModel/movies_list_view_model.dart';

import 'package:provider/provider.dart';

void main() => runApp(App());

class App extends StatelessWidget {

  @override
  Widget build(BuildContext context) {
    return MaterialApp(
        title: "Movies MVVM Example",
        debugShowCheckedModeBanner: false,
        theme: ThemeData(primarySwatch: Colors.teal),

        home:
        ChangeNotifierProvider(
          create: (context) => MovieListViewModel(),
          child: MovieListScreen(),
        )
    );
  }

}
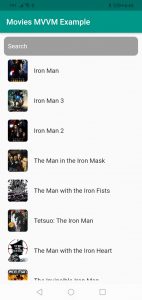
We will use a “ChangeNotifierProvider” as home and create the “MovieListViewModel()” and as a child pass the only screen we have. Here is the output:
9. Benefits of MVVM
Some of the benefits are as follows:
- Tight Coupling:- Only View(Activity) holds the reference to View Model and not vice versa, this solves a tight coupling issue. A single view can hold a reference to multiple View Models. Here, the reference to any View Model is kept only by the View. As a result, the problem with tight coupling will remain solved.
- Testability: View Models can easily represent the data or the state. Hence, they can be tested independently without requiring to know how data is processed. This happens because View Models are independent of the Views.
- Code Sharing and Usability:- MVVM architecture allows this objective to get fulfilled with the help of Models. This layer can be utilized for building design patterns in other applications as well, without modifying codes.
On the downside its a bit harder to learn, but once you get the hang of it, you will truly see the benefits of it.
I hope this Flutter tutorial was helpful for you. If you are interested in learning Flutter, please check other Flutter tutorials on this site. Some of them have video tutorials included.
Happy learning Flutter!