In this tutorial, you will learn how to secure access to User’s Data in RDS using Lambda Authorizer.
- First, the Lambda Authorizer function will authenticate the caller by validating JWT using nimbus-jose-jwt library.
- After that, the Lambda Authorizer function will return an output object containing an IAM policy.
- The Authorizer will also return additional information i.e. sub which corresponds to the user-id in the context object.
- After evaluating the policy if access is allowed then API Gateway will execute the method and call Lambda function that contains implementation to access user data from RDS.
- In our Lambda function, first, we will check whether the user-id provided in the path parameter and the one returned by the Lambda Authorizer i.e sub is the same.
- If yes, then user data can be accessed from the database.
Now let’s get started with the implementation!
Create an RDS database instance
- First, we will go to the Services tab then type RDS.
- Then we will click on Create Database.
- In Choose a database creation method, we will select Standard Create.
- In Engine Option, we will select Engine Type to be MYSQL.
- Then in Templates, we will select Free tier for now. Note that RDS Free Tier is used to develop new applications, test existing applications, or gain hands-on experience with Amazon RDS.
- After that, we will provide Password under Credentials Settings.
- Under Connectivity, we will make our RDS instance to be publicly accessible so that we can access our RDS instance from MYSQL Workbench from our PC.
- In VPC Security Group, we will select Create New and provide a name for our Security Group.
- Under Additional Information, we will provide a database name i.e mylambdadb. Now we will click on Create Database.
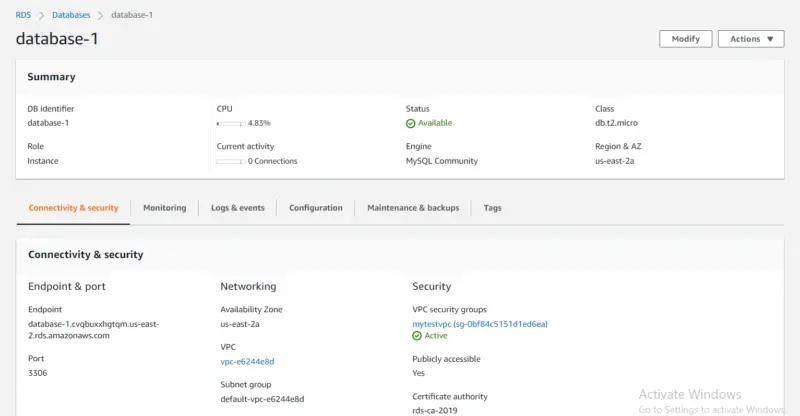
Here we can see our newly created RDS instance.
Security Group
Here we can see the inbound rules of our RDS security group. Note that we will add an entry for the security group of our Lambda function so that it can access the database to get user data.
Create an API using API Gateway
For creating an API,
- We will go to the Services tab then type API Gateway.
- After that, we will click on Create API.
- Then we will choose an API type i.e. REST API and then click on Build.
- After that, we will provide the name of our API and then click on Create API.
- Under Actions we will click on Create Resource then we will provide the Resource name i.e. users and then click on Create Resource.
- Then we will select /users and then under Actions, we will again click on Create Resource.
- We will provide the Resource name i.e. user-id and in Resource Path, we will add curly braces to user-id i.e {user-id} so that we can pass it as a path parameter.
- Now we will select /{user-id} and then under Actions, we will click on Create Method.
- Then we will select Get and click on the checkmark.
- After that, we will provide the name of our Lambda function and then click on Save.
- From the left pane, we will click on Authorizers and then create Authorizer for our lambda function.
- After that, we will attach the Authorizer to our Lambda function. In the previous tutorial, we discussed in detail how we can create a Lambda Authorizer in Java.
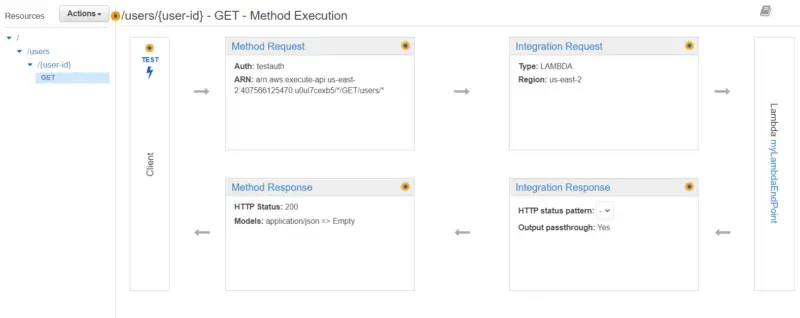
- After configuring Authorizer we will click on Integration Request then we will expand Mapping Templates.
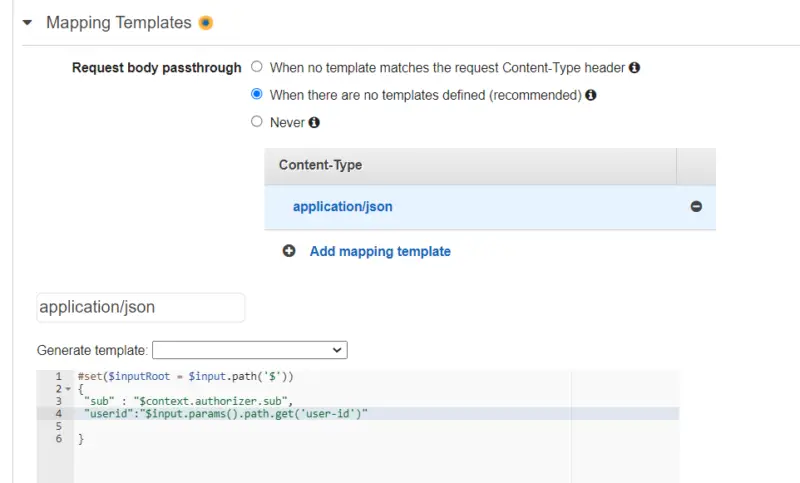
- Here we will select When there are no templates defined, then we will click on Add mapping template in which we will define Content-Type to be application/json.
- Now we will select Empty in Generate template and get sub from the context object returned by Lambda Authorizer and the user-id from path parameter.
- In the end, we will click on Deploy API under the Actions tab.
Lambda Authorizer Response
Here we can see that Lambda Authorizer has returned the sub attribute along with the Policy Document.
GetUserDetailsHandler
Following is our Handler class in which we will get the value of sub that Lambda Authorizer decoded from the Authorization token and user-id passed as a path parameter using Map<String, String>. First, we will compare them, if they are not the same then it means that the user has provided an invalid user-id. If both of them are the same, then we will invoke UserDetailsService.
import java.util.Map;
import com.amazonaws.services.lambda.runtime.Context;
import com.amazonaws.services.lambda.runtime.RequestHandler;

public class GetUserDetailsHandler implements RequestHandler<Map<String, String>, Object> {

    public Object handleRequest(Map<String, String> request, Context context) {
        String INVALID_ID = System.getenv("INVALID_ID");
        String SUCCESS = System.getenv("SUCCESS");
        String NOT_FOUND = System.getenv("NOT_FOUND");

        Response response = new Response();

        try {

            if (request.get("userid").equals(request.get("sub"))) {

                UserProfile userProfile = UserDetailsService.getUserDetails(request.get("userid"));

                if (userProfile == null) {

                    response.setMessage(NOT_FOUND);

                    return response;
                }

                response.setMessage(SUCCESS);
                response.setUserProfile(userProfile);

                return response;

            }

            response.setMessage(INVALID_ID);
            return response;

        } catch (Exception ex) {

            response.setMessage(ex.getMessage());
            return response;

        }

    }
}
UserDetailsService
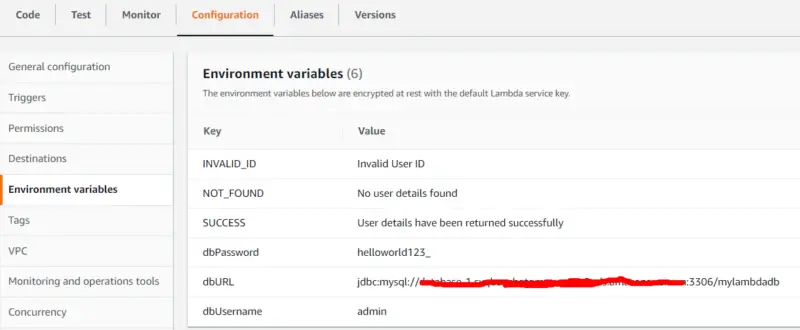
Following is the service class for our lambda function. It takes the username, password, and database URL from the environment variables defined in Lambda function configuration then passes them to UserDetailsDao constructor in order to create a connection to the database.
import java.sql.SQLException;

public class UserDetailsService {

    public static UserProfile getUserDetails(String userId) throws SQLException {
        String username = System.getenv("dbUsername");
        String password = System.getenv("dbPassword");
        String url = System.getenv("dbURL");
        UserDetailsDao userDetailsDao = new UserDetailsDao(username,password,url);

        UserProfile userProfile = userDetailsDao.getUserDetails(userId);
        return userProfile;

    }


}
UserDetailsDao
In the following class, we access user data from the database based on the user-id provided to the getUserDetails function.
import java.sql.Connection;
import java.sql.DriverManager;
import java.sql.ResultSet;
import java.sql.SQLException;
import java.sql.Statement;

public class UserDetailsDao {

    Connection connection;

    public UserDetailsDao(String username, String password, String url) throws SQLException {

        if (connection == null || connection.isClosed()) {

            connection = DriverManager.getConnection(url, username, password);

        }

    }

    public UserProfile getUserDetails(String userId) throws SQLException {

        Statement stmt = connection.createStatement();
        String query = "SELECT * FROM userprofile where user_id=\"" + userId + "\"";
        ResultSet rs = stmt.executeQuery(query);

        if (rs.next()) {

            UserProfile userProfile = new UserProfile();

            userProfile.setFirstName(rs.getString("first_name"));
            userProfile.setLastName(rs.getString("last_name"));
            userProfile.setAge(rs.getInt("age"));
            return userProfile;

        }
        return null;

    }

}
UserProfile
public class UserProfile {

    String firstName;
    String lastName;
    int age;
    public String getFirstName() {
        return firstName;
    }
    public void setFirstName(String firstName) {
        this.firstName = firstName;
    }
    public String getLastName() {
        return lastName;
    }
    public void setLastName(String lastName) {
        this.lastName = lastName;
    }
    public int getAge() {
        return age;
    }
    public void setAge(int age) {
        this.age = age;
    }


}
Response
public class Response {

    String message;
    UserProfile userProfile;
    public String getMessage() {
        return message;
    }
    public void setMessage(String message) {
        this.message = message;
    }
    public UserProfile getUserProfile() {
        return userProfile;
    }
    public void setUserProfile(UserProfile userProfile) {
        this.userProfile = userProfile;
    }


}
pom.xml
<project xmlns="http://maven.apache.org/POM/4.0.0"
    xmlns:xsi="http://www.w3.org/2001/XMLSchema-instance"
    xsi:schemaLocation="http://maven.apache.org/POM/4.0.0 http://maven.apache.org/xsd/maven-4.0.0.xsd">
    <modelVersion>4.0.0</modelVersion>

    <groupId>aws-lambda-access-db</groupId>
    <artifactId>access-db</artifactId>
    <version>0.0.1-SNAPSHOT</version>
    <packaging>jar</packaging>

    <name>access-db</name>
    <url>http://maven.apache.org</url>

    <properties>
        <project.build.sourceEncoding>UTF-8</project.build.sourceEncoding>
    </properties>
    <build>

        <plugins>
            <plugin>
                <groupId>org.apache.maven.plugins</groupId>
                <artifactId>maven-compiler-plugin</artifactId>
                <version>3.6.0</version>
                <configuration>
                    <source>1.8</source>
                    <target>1.8</target>
                    <encoding>UTF-8</encoding>
                    <forceJavacCompilerUse>true</forceJavacCompilerUse>
                </configuration>
            </plugin>
            <plugin>
                <artifactId>maven-shade-plugin</artifactId>
                <version>3.0.0</version>
                <executions>
                    <execution>
                        <phase>package</phase>
                        <goals>
                            <goal>shade</goal>
                        </goals>
                    </execution>
                </executions>
            </plugin>
        </plugins>
    </build>

    <dependencies>
        <dependency>
            <groupId>mysql</groupId>
            <artifactId>mysql-connector-java</artifactId>
            <version>8.0.27</version>
        </dependency>
        <dependency>
            <groupId>com.amazonaws</groupId>
            <artifactId>aws-lambda-java-core</artifactId>
            <version>1.2.0</version>
        </dependency>
        <dependency>
            <groupId>com.amazonaws</groupId>
            <artifactId>aws-lambda-java-events</artifactId>
            <version>2.2.5</version>
        </dependency>
        <dependency>
            <groupId>junit</groupId>
            <artifactId>junit</artifactId>
            <version>3.8.1</version>
            <scope>test</scope>
        </dependency>
    </dependencies>
</project>
Testing
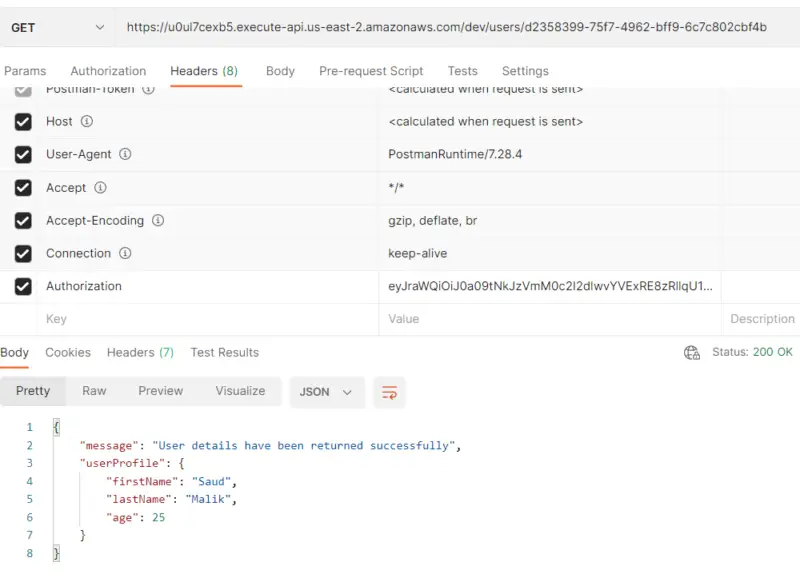
Now let’s do some testing. When we provide a valid user-id in the path parameter along with a valid token, we can access user data from the database.
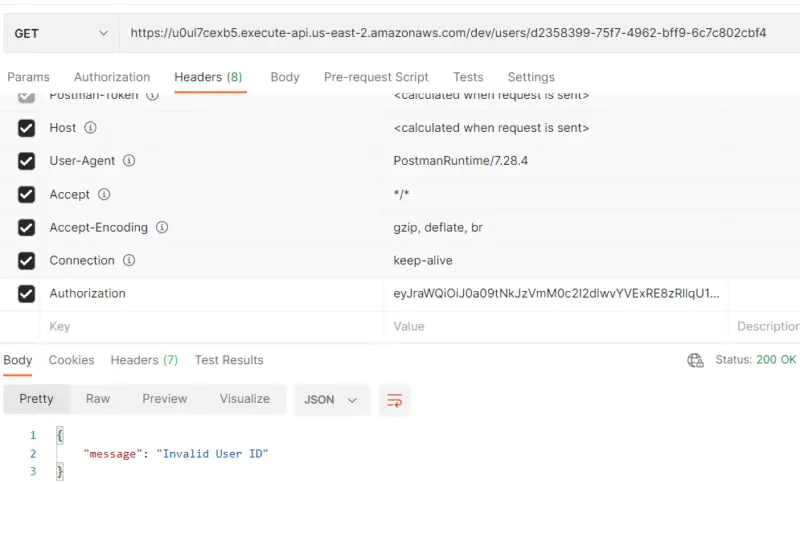
Here you can see that on providing an invalid user-id in the path parameter we get “Invalid User ID” as a response. Note that here we have provided a valid token with an invalid user-id.
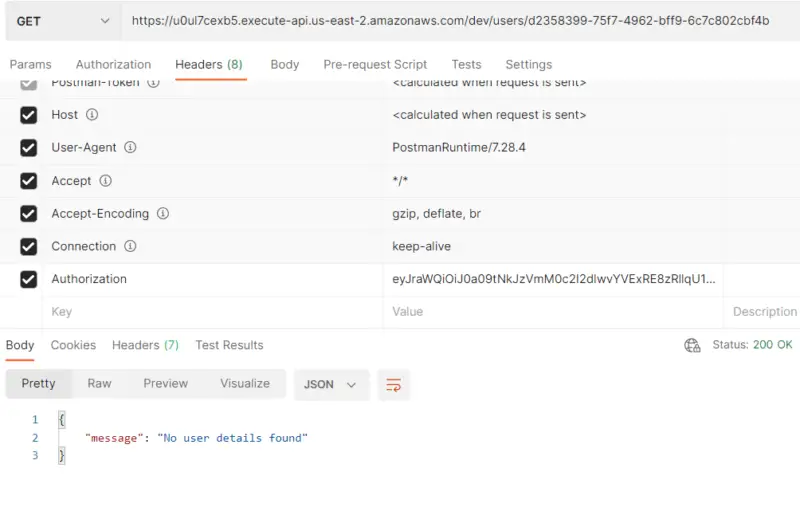
Here you can see that we have provided a valid user-id along with a valid token. But since there is no data in the database for the user, hence the Lambda function returns “No user details found”.
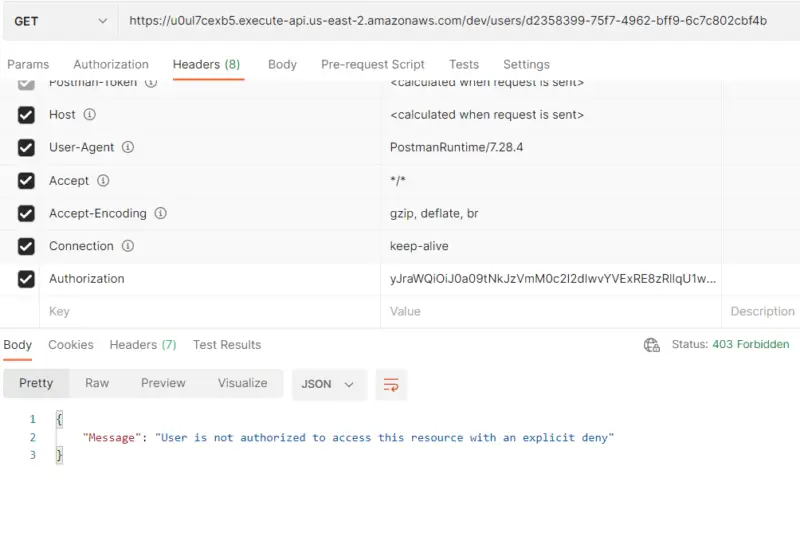
Here we can see that the Authorization token is invalid hence the message is “User is not authorized to access this resource with an explicit deny”. Note that the Lambda Authorizer never forwards this request to the Lambda function after validating JWT.
Conclusion
With this, we have come to the end of our tutorial. In this tutorial, we learned how we can secure access to users’ data in RDS using Lambda Authorizer. First, we walked through the process of the creation of an RDS database instance. Then we learned to create an API using API Gateway. After that, we walked through the code of our Lambda function that accesses user data from RDS. And in the end, we tested our implementation using Postman Client.
Stay tuned for some more informative tutorials coming ahead and feel free to leave any feedback in the comments section.
Happy learning!
