In this tutorial, you will learn how to implement the API Gateway Lambda Authorizer in Java. You will also learn how to make Lambda Authorizer validate Authorization JWT. First, we will create an API using API Gateway then we will make lambda function as an integration point for the GET method of our resource. After that, we will configure Lambda Authorizer for our GET method. But before moving ahead let’s see what Lambda Authorizer is
A Lambda authorizer (formerly known as a custom authorizer) is an API Gateway feature that uses a Lambda function to control access to your API. It is useful if you want to implement a custom authorization scheme that uses a bearer token authentication strategy such as OAuth or SAML, or that uses request parameters to determine the caller’s identity.
Lambda authorizer Auth workflow
Let’s have a look at the Lambda authorizer Auth workflow for our tutorial.

- The client calls a method on an API Gateway API method, passing JWT.
- API Gateway checks whether a Lambda Authorizer is configured for the method. If it is, API Gateway calls the Lambda Authorizer function.
- The Lambda Authorizer function authenticates the caller by validating JWT using nimbus-jose-jwt library.
- If the call succeeds, the Lambda Authorizer function grants access by returning an output object containing at least an IAM policy and a principal identifier.
- The authorizer will also return additional information i.e. sub in Policy Document.
- API Gateway evaluates the policy.
- If access is denied, API Gateway returns a suitable HTTP status code, such as 403 ACCESS_DENIED.
- In case of access is allowed, API Gateway executes the method. If caching is enabled in the authorizer settings, API Gateway also caches the policy so that the Lambda Authorizer function doesn’t need to be invoked again.
Let’s get started with the implementation!
Create API using API Gateway
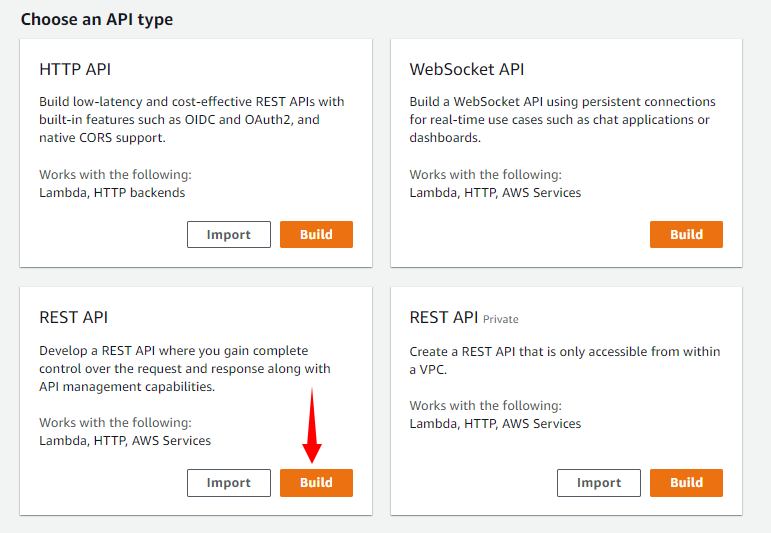
First, we will log in to our AWS account and type API Gateway under the Services tab. Note that Amazon API Gateway is an AWS service for creating, publishing, maintaining, monitoring, and securing REST, HTTP, and WebSocket APIs at any scale. We will click on Create API. Under Choose an API type we will select REST API and click on Build.
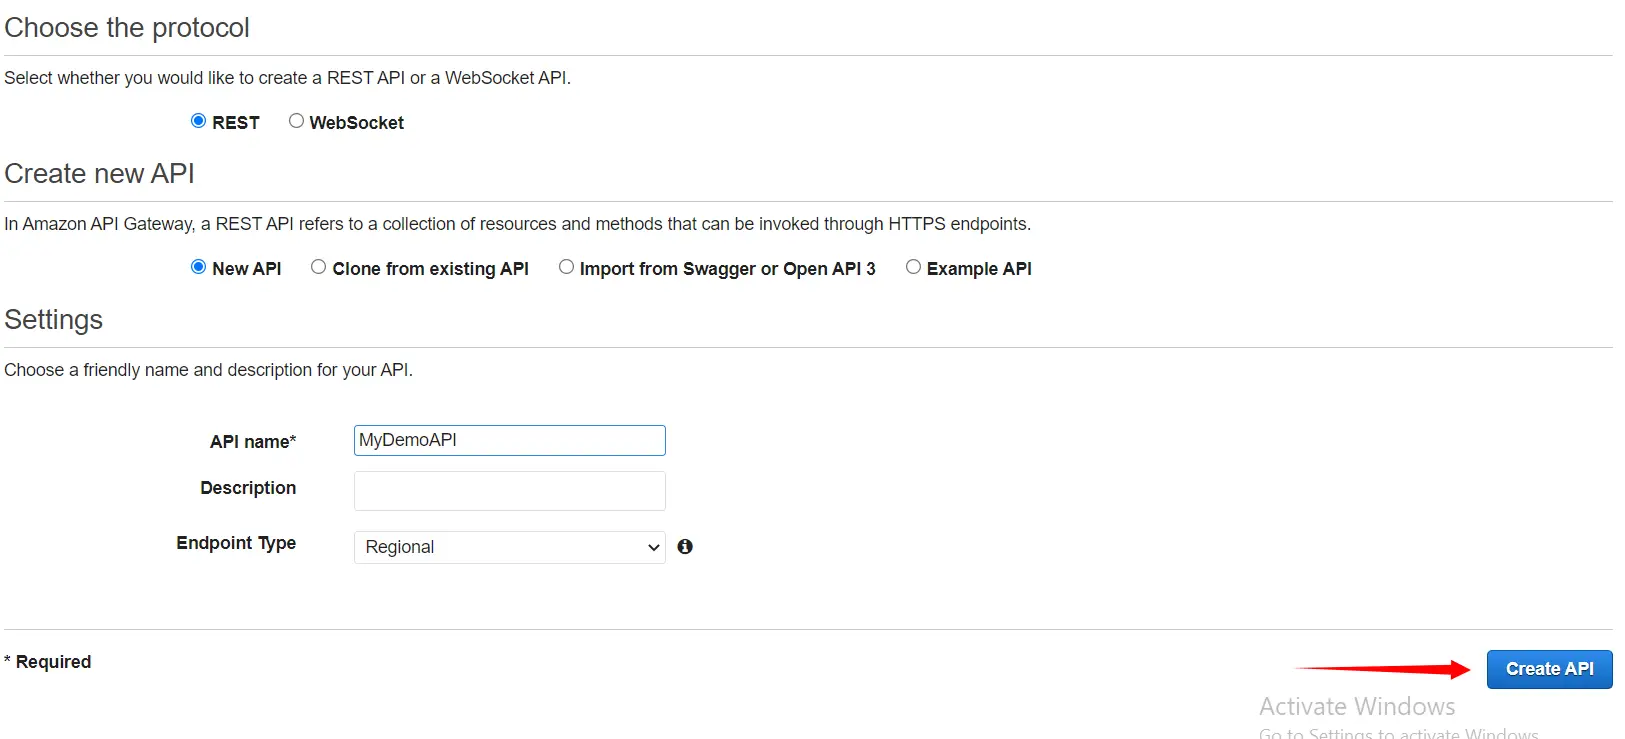
Here we will provide our API name i.e. MyDemoAPI and then click on Create API.
Create Resource
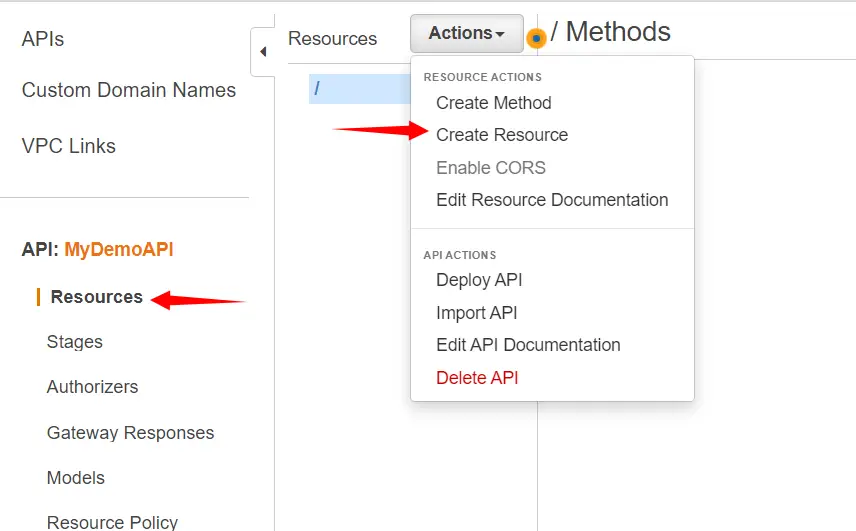
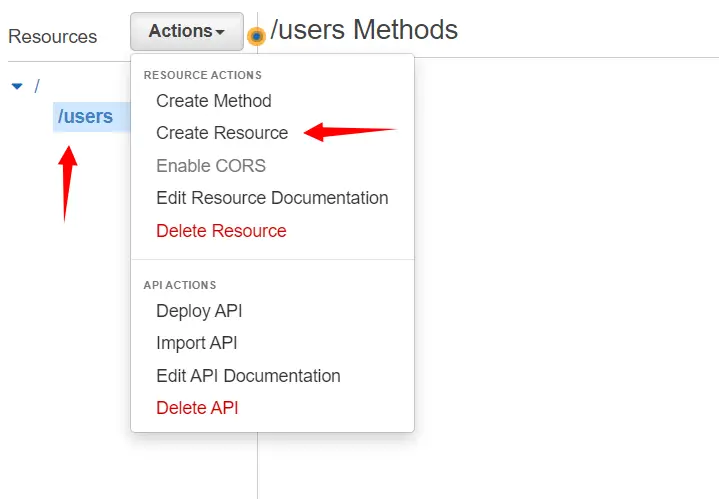
In Resources, we will click on Actions and then select Create Resource.
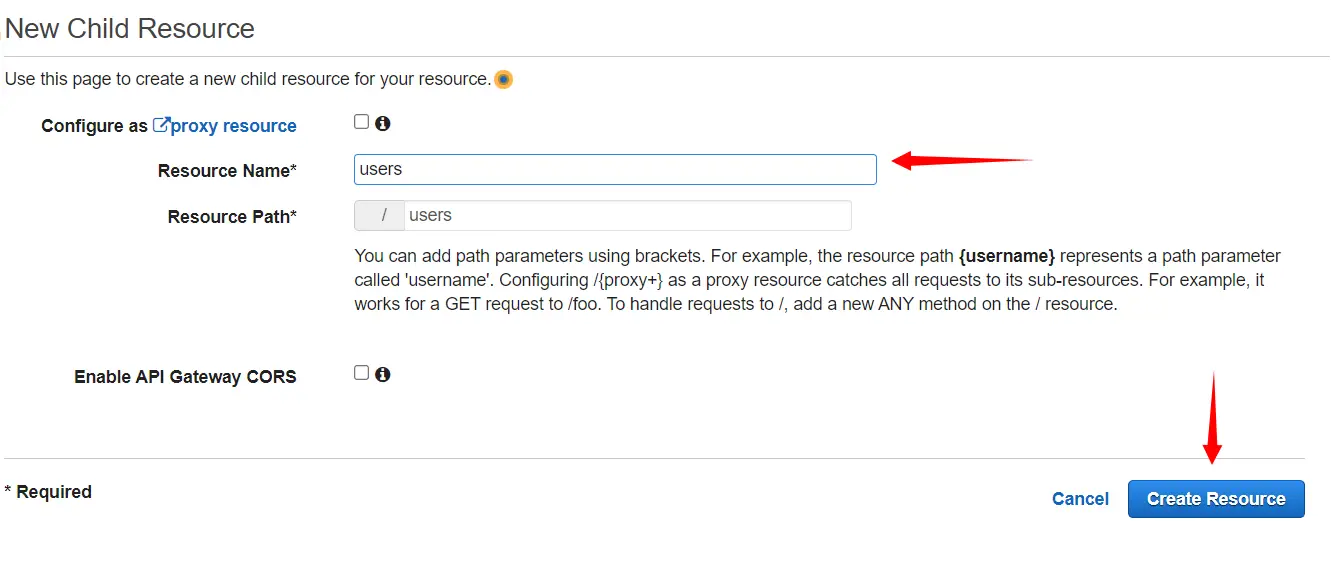
Here we will provide the Resource name i.e. users and then click on Create Resource.
After that, we will select our resource /users and then click on Actions and select Create Resource.
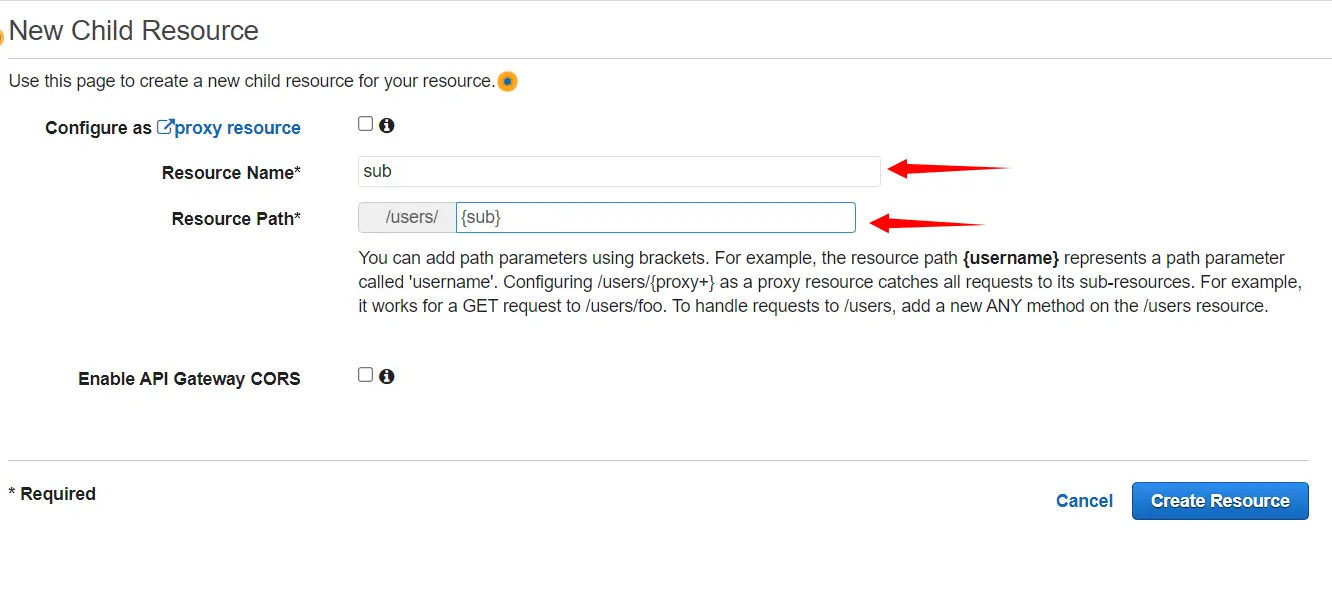
Here we will provide the Resource name i.e. sub and then in Resource Path, we will write {sub} so that we can use sub as a path parameter. We will use sub in our next tutorial in which we will use Lambda Authorizer to secure access to the User’s data in RDS. Note that sub claim is a unique identifier (UUID) for the authenticated user. It is not the same as the username, which might not be unique. Now we will click on Create Resource.
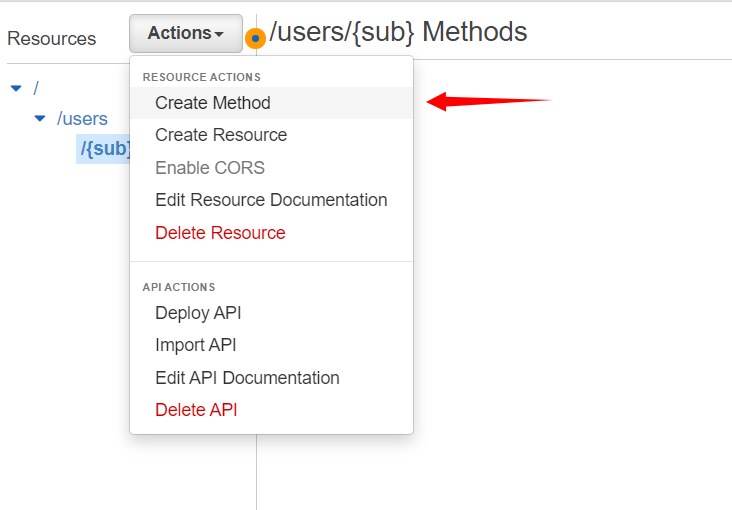
Create Method
After that, we will create a method for the resource.
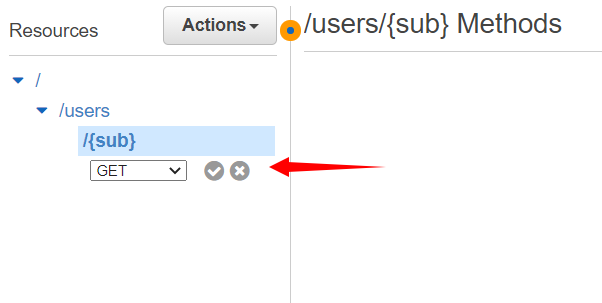
Here we will select Get and then click on the checkmark.
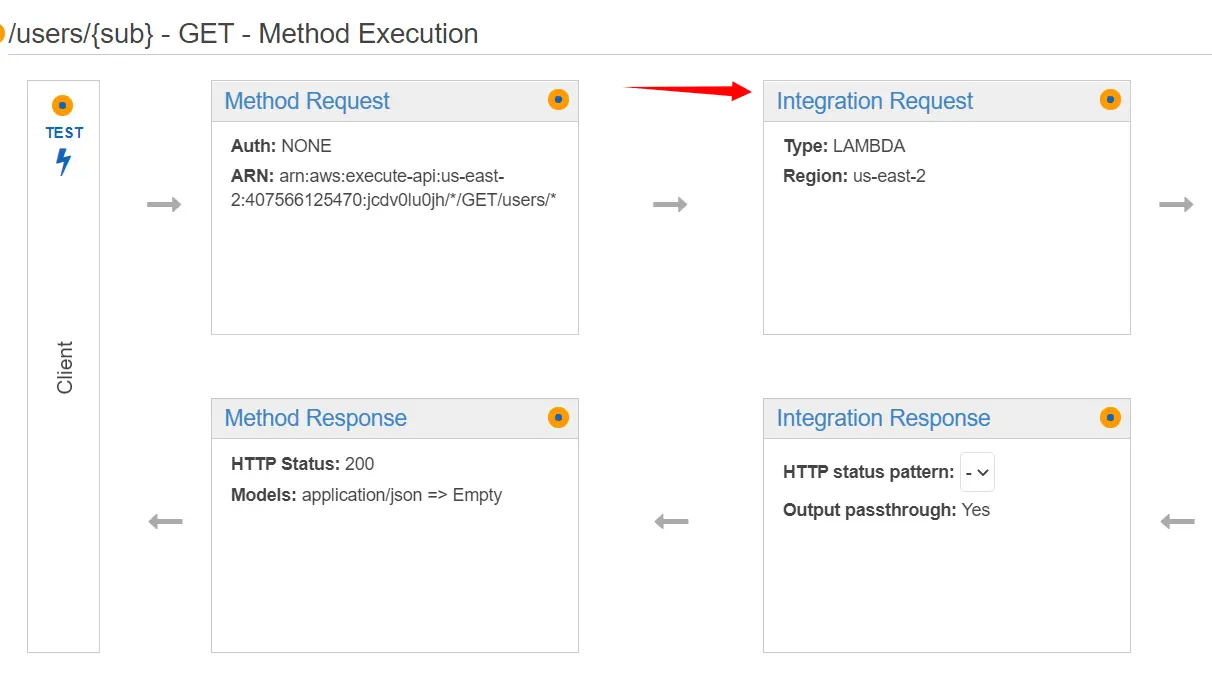
Here we will choose the Integration point for the method which in our case is Lambda Function. Then we will select the region in which our Lambda function resides i.e. us-east-2. After that, we will select our Lambda function. Then we will click on Save. Note that this lambda function has default code that returns “Hello from Lambda” if everything is working fine.

Now we will click on Integration request.
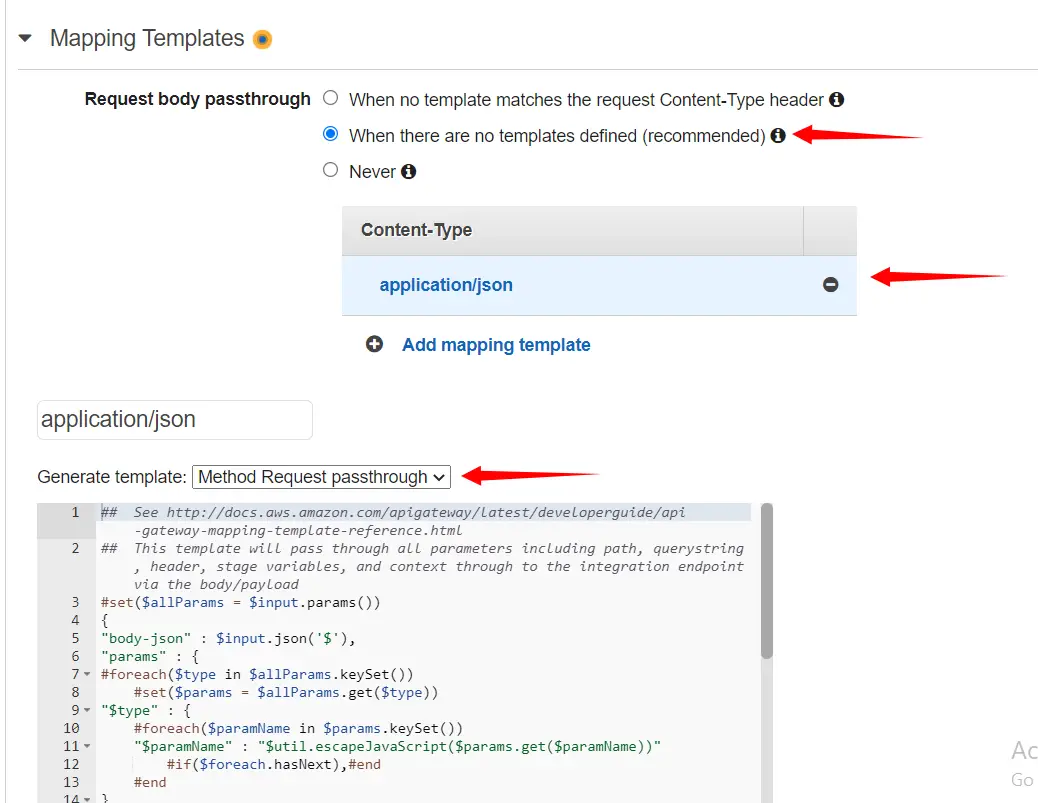
Here in Mapping Templates, we will select When there are no templates defined and then in mapping template, we will type application/json. After that in Generate template, we will select Method Request passthrough and then click on Save.
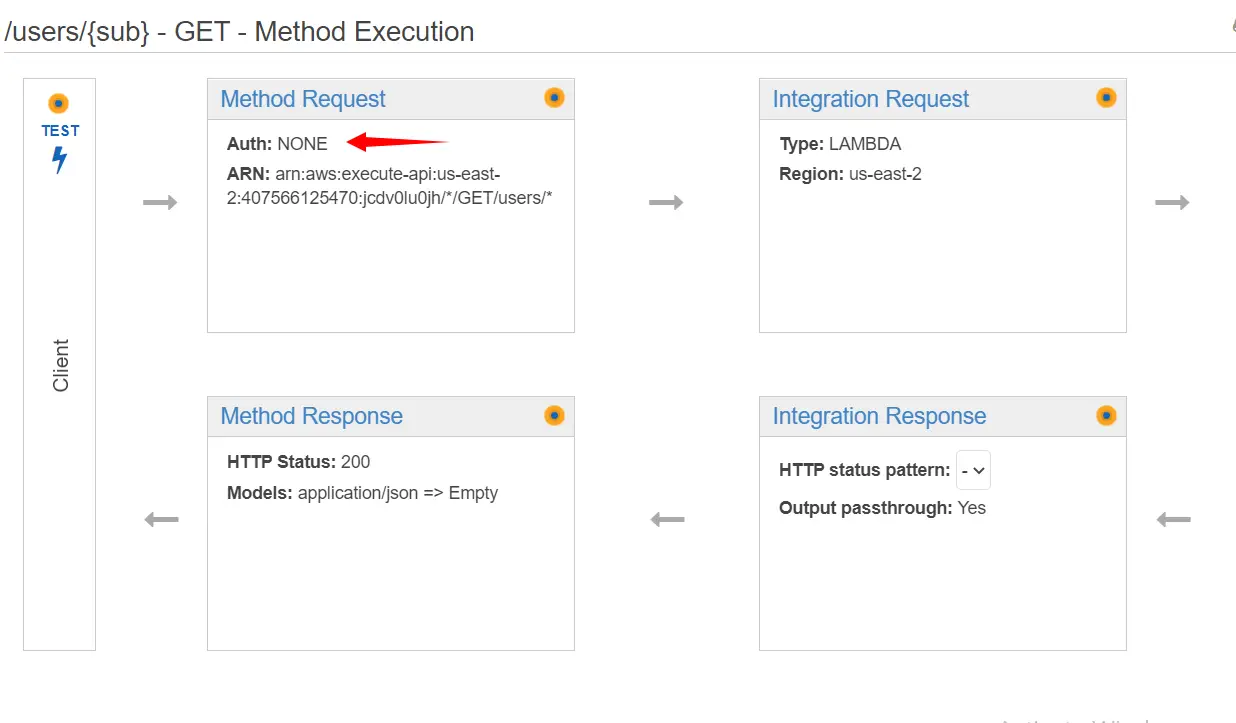
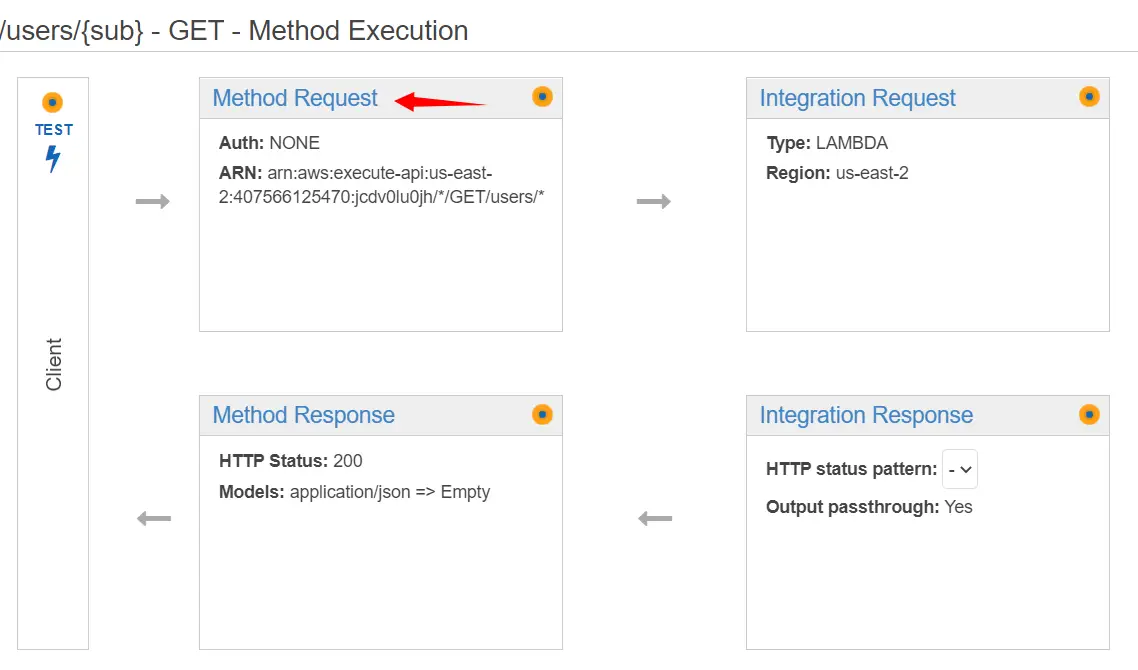
In Method Request, we can see that Auth is currently None. Now here comes the main part of attaching Lambda Authorizer to our API.
Create Authorizer
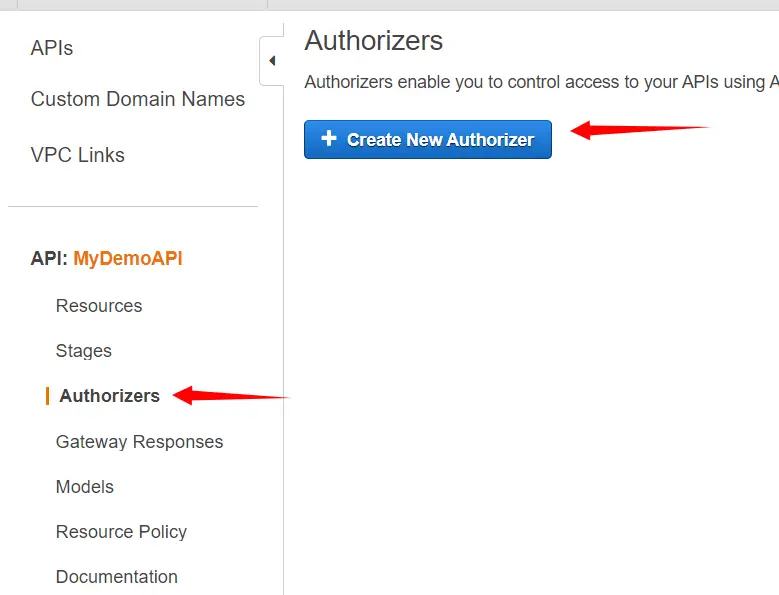
From the left pane, we will click on Authorizers and then click on Create New Authorizer.
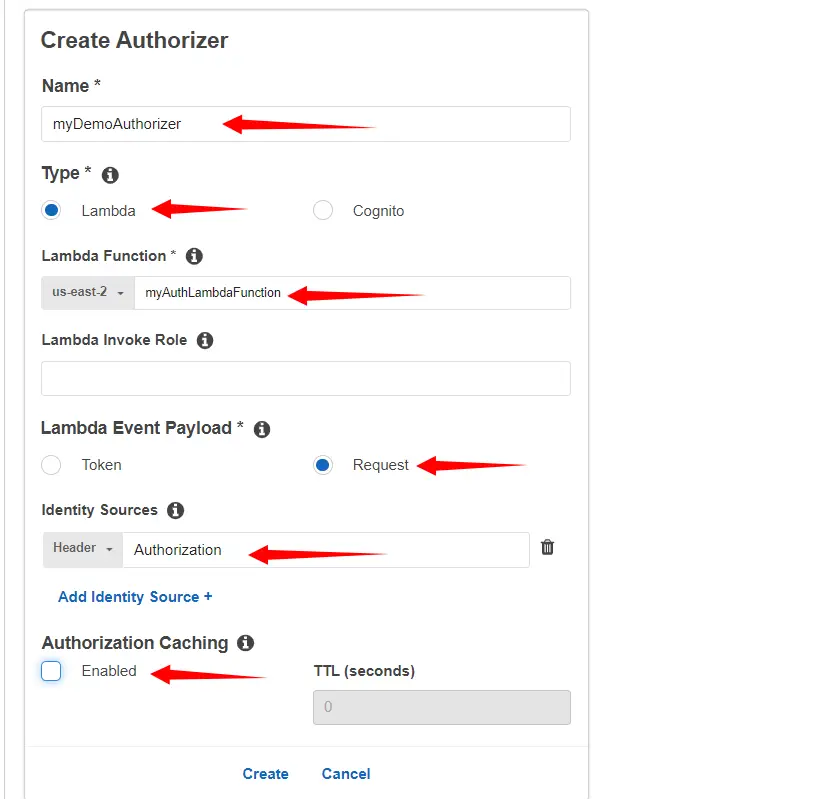
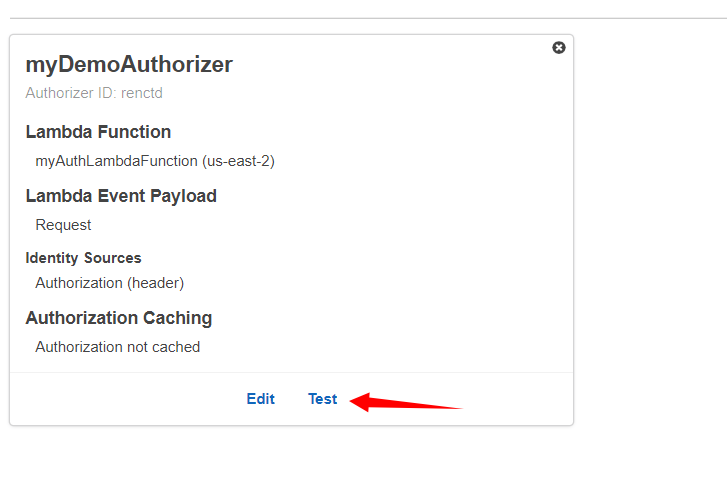
Here we will provide the name of our Authorizer i.e. myDemoAuthorizer. In our case, the type will be Lambda. For the Lambda function, we will select the function that contains the Authorizer code. We will discuss it in the latter part of the tutorial. In Lambda Event Payload we will select Request. In Identity Sources we will type Authorization through which authorizer will receive the value of JWT. We will disable caching for now and then click on Create.
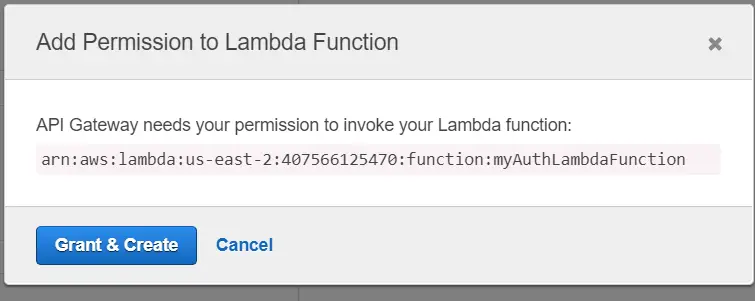
Now we will grant API Gateway permission to access the Lambda function that contains Authorizer code and click on Grant & Create.
Here we will click on Method Request.
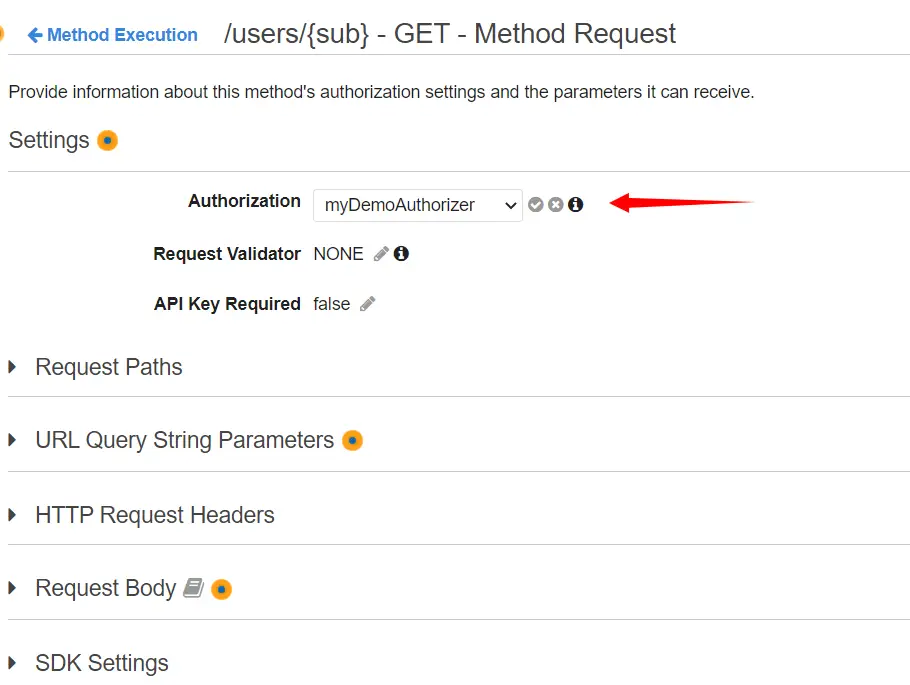
Now for Authorization, we will select the authorizer we have just created i.e. myDemoAuthorizer, and then click on the checkmark.
Deploy API
Now we will deploy our API.

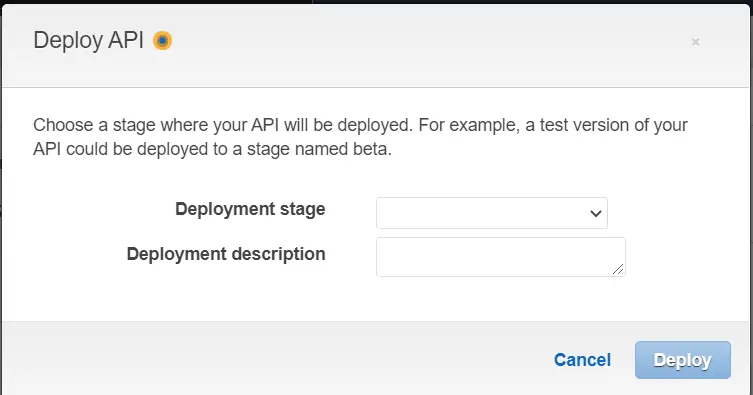
Here we will choose a stage where our API will be deployed. Since we do not have any stage we will create one.
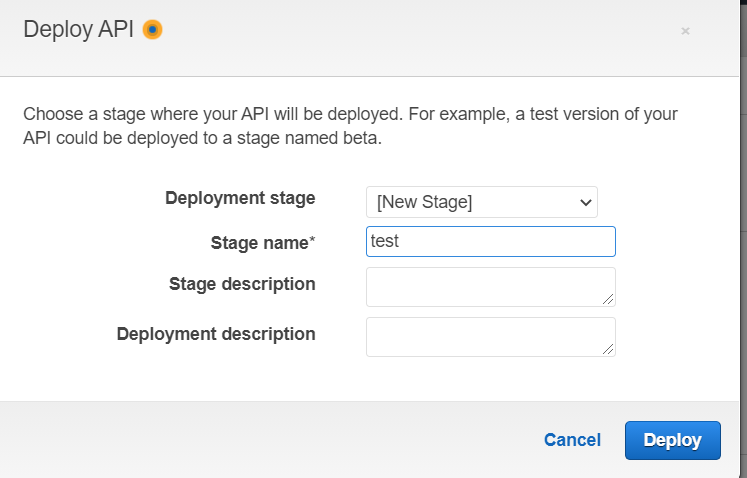
Here we will provide the name of our stage then click on Deploy. With this, we have deployed our API and we are ready to test it.
Implementation of Lambda Authorizer in Java
pom.xml
Following is our pom.xml. Note that we are using nimbus-jose-jwt that is the most popular and robust Java and Android library for JSON Web Tokens (JWT).
<project xmlns="http://maven.apache.org/POM/4.0.0"
    xmlns:xsi="http://www.w3.org/2001/XMLSchema-instance"
    xsi:schemaLocation="http://maven.apache.org/POM/4.0.0 http://maven.apache.org/xsd/maven-4.0.0.xsd">
    <modelVersion>4.0.0</modelVersion>

    <groupId>aws-lambda-auth</groupId>
    <artifactId>aws-lambda-auth</artifactId>
    <version>0.0.1-SNAPSHOT</version>
    <properties>
        <project.build.sourceEncoding>UTF-8</project.build.sourceEncoding>
    </properties>
    <build>

        <plugins>
            <plugin>
                <groupId>org.apache.maven.plugins</groupId>
                <artifactId>maven-compiler-plugin</artifactId>
                <version>3.6.0</version>
                <configuration>
                    <source>1.8</source>
                    <target>1.8</target>
                    <encoding>UTF-8</encoding>
                    <forceJavacCompilerUse>true</forceJavacCompilerUse>
                </configuration>
            </plugin>
            <plugin>
                <artifactId>maven-shade-plugin</artifactId>
                <version>3.0.0</version>
                <executions>
                    <execution>
                        <phase>package</phase>
                        <goals>
                            <goal>shade</goal>
                        </goals>
                    </execution>
                </executions>
            </plugin>
        </plugins>
    </build>

    <dependencies>
        <dependency>
            <groupId>com.amazonaws</groupId>
            <artifactId>aws-java-sdk-iam</artifactId>
            <version>1.11.505</version>
        </dependency>

        <dependency>
            <groupId>com.nimbusds</groupId>
            <artifactId>nimbus-jose-jwt</artifactId>
            <version>9.1</version>
        </dependency>
        <dependency>
            <groupId>com.amazonaws</groupId>
            <artifactId>aws-lambda-java-core</artifactId>
            <version>1.2.0</version>
        </dependency>
        <dependency>
            <groupId>com.amazonaws</groupId>
            <artifactId>aws-lambda-java-events</artifactId>
            <version>2.2.5</version>
        </dependency>
        <dependency>
            <groupId>junit</groupId>
            <artifactId>junit</artifactId>
            <version>3.8.1</version>
            <scope>test</scope>
        </dependency>
    </dependencies>

</project>
LambdaAuthorizer.java
In the handler function for the Authorizer, we will first get the Authorization token from the header then validate it from our JWTUtil class that we will discuss later in the tutorial. Note that JWTUtil also returns “sub” claim from the decoded token. Note that the Amazon Resource Name (ARNs) for our Lambda function looks like the following. It is uniquely identifying the endpoint Lambda Function.
arn:aws:execute-api:<region>:<account-id>:<api-id>/<stage>/<http-method>/<path>
After specifying ARN for the Lambda function we will return the Policy document based on the response from JWTUtil class that whether a user has been allowed or denied access to our API endpoint.
import com.amazonaws.services.lambda.runtime.Context;
import com.amazonaws.services.lambda.runtime.RequestHandler;
import com.amazonaws.services.lambda.runtime.events.APIGatewayProxyRequestEvent;

import java.util.Collections;
import java.util.HashMap;
import java.util.Map;

public class LambdaAuthorizer implements RequestHandler<APIGatewayProxyRequestEvent, Response> {

    public Response handleRequest(APIGatewayProxyRequestEvent event, Context context) {
        Map<String, String> headers = event.getHeaders();
        String authorizationToken = headers.get("Authorization");
        String auth = "Deny";
        String sub = JWTUtil.getSub(authorizationToken);
        if (sub != null) {

            auth = "Allow";

        }

        Map<String, String> ctx = new HashMap<String, String>();
        ctx.put("sub", sub);

        APIGatewayProxyRequestEvent.ProxyRequestContext proxyContext = event.getRequestContext();
        APIGatewayProxyRequestEvent.RequestIdentity identity = proxyContext.getIdentity();


        String arn = String.format("arn:aws:execute-api:%s:%s:%s/%s/%s/%s",System.getenv("AWS_REGION"), proxyContext.getAccountId(),
                proxyContext.getApiId(), proxyContext.getStage(), proxyContext.getHttpMethod(), "*");

        Statement statement = Statement.builder().effect(auth).resource(arn).build();

        PolicyDocument policyDocument = PolicyDocument.builder().statements(Collections.singletonList(statement))
                .build();

        return Response.builder().principalId(identity.getAccountId()).policyDocument(policyDocument)
                .context(ctx).build();
    }
}
Validate JWT – JWTUtil.java
The following class will validate JWT and return “sub” claim to the LambdaAuthorizer class. Here nimbus-jose-jwt library uses JWK to verify and validate the provided JWT. The Nimbus JOSE+JWT library includes a simple framework to take care of the necessary steps to validate a JWT which includes JWT parsing, Type check, Algorithm check, Signature check, and JWT claims check.
import java.net.MalformedURLException;
import java.net.URL;
import java.text.ParseException;
import com.nimbusds.jose.JOSEException;
import com.nimbusds.jose.JWSAlgorithm;
import com.nimbusds.jose.jwk.source.JWKSource;
import com.nimbusds.jose.jwk.source.RemoteJWKSet;
import com.nimbusds.jose.proc.BadJOSEException;
import com.nimbusds.jose.proc.JWSKeySelector;
import com.nimbusds.jose.proc.JWSVerificationKeySelector;
import com.nimbusds.jose.proc.SecurityContext;
import com.nimbusds.jwt.JWTClaimsSet;
import com.nimbusds.jwt.proc.ConfigurableJWTProcessor;
import com.nimbusds.jwt.proc.DefaultJWTProcessor;

public class JWTUtil {

    static ConfigurableJWTProcessor jwtProcessor = new DefaultJWTProcessor();
    static {

        try {

            JWKSource keySource = null;
            keySource = new RemoteJWKSet(
                    new URL("https://cognito-idp."+System.getenv("AWS_REGION")+".amazonaws.com/"+System.getenv("USER_POOL_ID")+"/.well-known/jwks.json"));
            JWSAlgorithm expectedJWSAlg = JWSAlgorithm.RS256;
            JWSKeySelector keySelector = new JWSVerificationKeySelector(expectedJWSAlg, keySource);
            jwtProcessor.setJWSKeySelector(keySelector);

        } catch (MalformedURLException e) {
            e.printStackTrace();
        }

    }

    public static String getSub(String token)  {

        SecurityContext ctx = null;
        JWTClaimsSet claimsSet = null;
        try {
            claimsSet = jwtProcessor.process(token, ctx);
            return claimsSet.getStringClaim("sub");
        } catch (BadJOSEException e) {
            e.printStackTrace();
        } catch (JOSEException e) {
            e.printStackTrace();
        } catch (ParseException e) {
            // TODO Auto-generated catch block
            e.printStackTrace();
        }
        return null;


    }

}
Lambda Authorizer Response
Following are the classes to build the Authorizer response that contains the Policy Document.
Response.java
import com.fasterxml.jackson.annotation.JsonProperty;
import com.fasterxml.jackson.databind.annotation.JsonDeserialize;
import com.fasterxml.jackson.databind.annotation.JsonPOJOBuilder;

import java.util.Map;

@JsonDeserialize(builder = Response.Builder.class)
public class Response {

    @JsonProperty("principalId")
    private String principalId;

    @JsonProperty("policyDocument")
    private PolicyDocument policyDocument;

    @JsonProperty("context")
    private Map<String, String> context;

    private Response(Builder builder) {
        this.principalId = builder.principalId;
        this.policyDocument = builder.policyDocument;
        this.context = builder.context;
    }

    public String getPrincipalId() {
        return principalId;
    }

    public PolicyDocument getPolicyDocument() {
        return policyDocument;
    }

    public Map<String, String> getContext() {
        return context;
    }

    public static Builder builder() {
        return new Builder();
    }

    @JsonPOJOBuilder(withPrefix = "")
    public static final class Builder {
        private String principalId;
        private PolicyDocument policyDocument;
        private Map<String, String> context;

        private Builder() { }

        public Builder principalId(String principalId) {
            this.principalId = principalId;
            return this;
        }

        public Builder policyDocument(PolicyDocument policyDocument) {
            this.policyDocument = policyDocument;
            return this;
        }

        public Builder context(Map<String, String> context) {
            this.context = context;
            return this;
        }

        public Response build() {
            return new Response(this);
        }
    }
}
PolicyDocument.java
import java.util.ArrayList;
import java.util.List;
import com.fasterxml.jackson.databind.annotation.JsonDeserialize;
import com.fasterxml.jackson.databind.annotation.JsonPOJOBuilder;

@JsonDeserialize(builder = PolicyDocument.Builder.class)
public class PolicyDocument {

    public final String Version = "2012-10-17";
    public List<Statement> Statement;

    private PolicyDocument(Builder builder) {
        this.Statement = builder.statements;
    }

    public static Builder builder(){
        return new Builder();
    }

    @JsonPOJOBuilder(withPrefix = "")
    public static final class Builder {
        private List<Statement> statements;

        private Builder() {
            statements = new ArrayList<aws_lambda_auth.aws_lambda_auth.Statement>();
        }

        public Builder statements(List<Statement> statements) {
            this.statements = statements;
            return this;
        }

        public PolicyDocument build() {
           return new PolicyDocument(this);
        }
    }
}
Statement.java
import com.fasterxml.jackson.databind.annotation.JsonDeserialize;
import com.fasterxml.jackson.databind.annotation.JsonPOJOBuilder;

@JsonDeserialize(builder = Statement.Builder.class)
public class Statement {

    public final String Action = "execute-api:Invoke";

    public String Effect;
    public String Resource;

    private Statement(Builder builder) {
        this.Effect = builder.effect;
        this.Resource = builder.resource;
    }

    public static Builder builder() {
        return new Builder();
    }

    @JsonPOJOBuilder(withPrefix = "")
    public static final class Builder {
        private String effect;
        private String resource;

        private Builder() { }

        public Builder effect(String effect) {
            this.effect = effect;
            return this;
        }

        public Builder resource(String resource) {
            this.resource = resource;
            return this;
        }

        public Statement build() {
            return new Statement(this);
        }
    }
}
Testing Lambda Authorizer
Now let’s test our Lambda Authorizer first. From the left pane, we will click on Authorizers and then click on Test that will show a pop-up to enter the JWT value in the Authorization header. To learn how to acquire JWT, we can refer to the following tutorial.
Amazon Cognito User Authentication in Spring Boot REST.
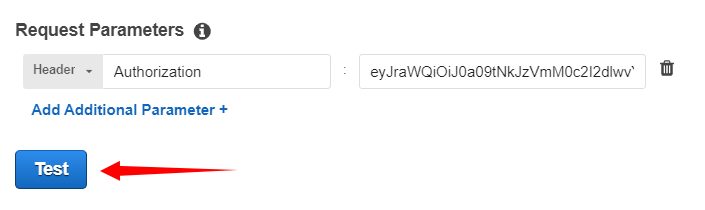
Here we will provide the JWT value for the Authorization header and then click on Test.
Let’s look at the Policy Document returned by the Lambda Authorizer. The authorizer allows a user with the above token to access our Lambda function.

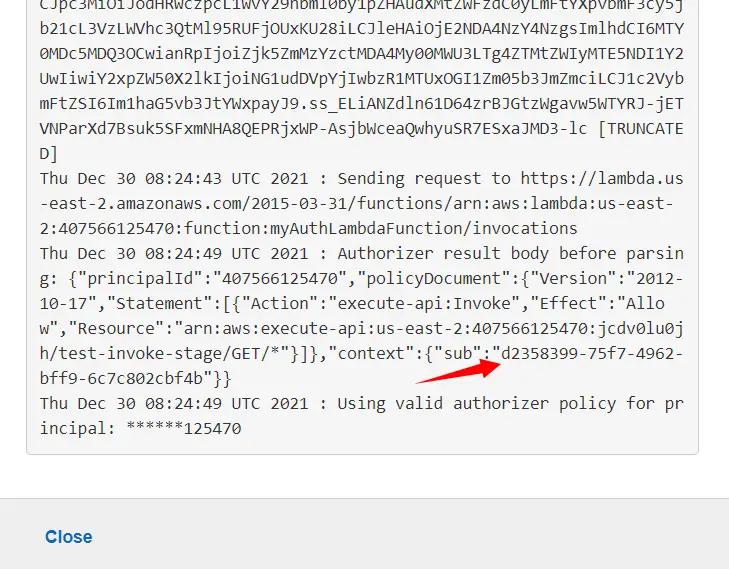
When we look at the logs we can see that the authorizer also returns sub value in the context that will be used in our next tutorial.
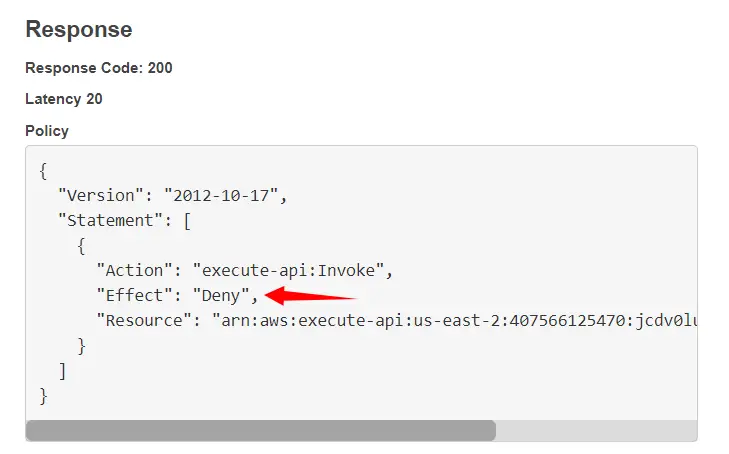
Now let’s test the authorizer with an invalid token. Here we can clearly see that the authorizer denies a user with an invalid token to access the lambda function.
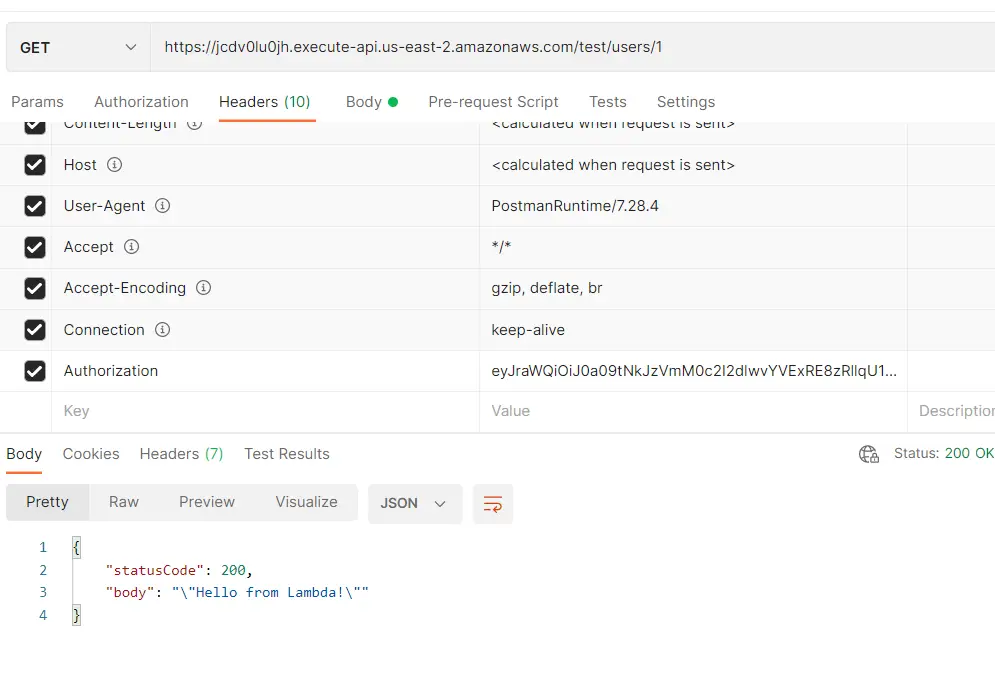
Now let’s test it with Postman as well. Here when we provide a valid JWT in the Authorization header. Our Lambda function returns “Hello from Lambda” with status code 200 since access to the Lambda function was allowed by the Authorizer.
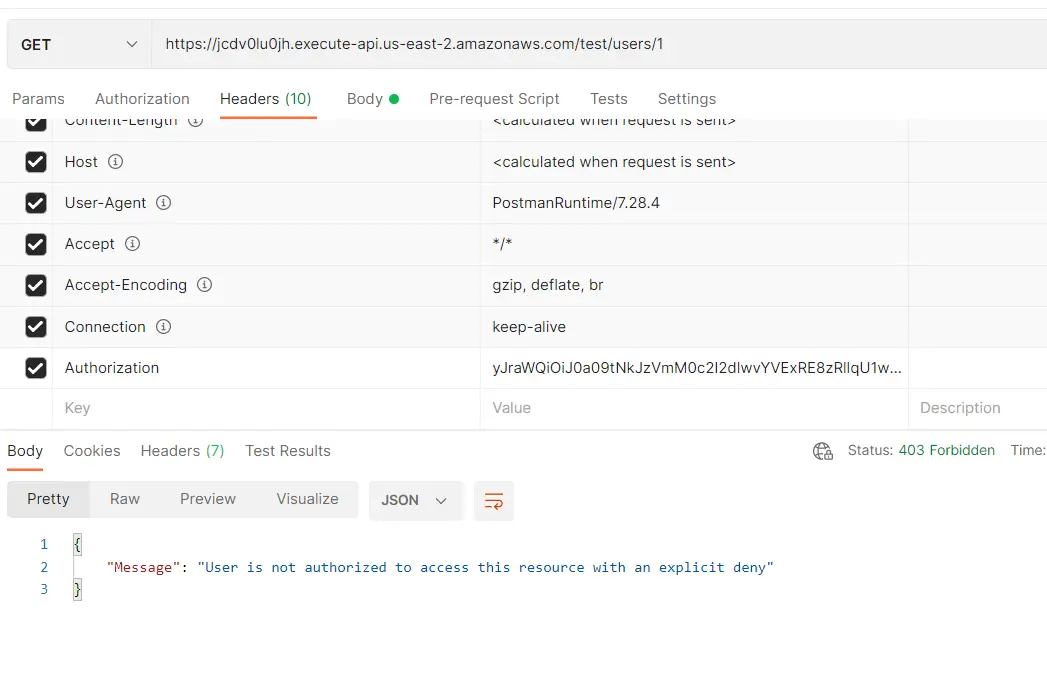
Now we can see that the user with the following token value is denied access by the Lambda authorizer as it says “User is not authorized to access this resource with an explicit deny”.
Conclusion
With this, we have come to the end of our tutorial. In this tutorial, we implemented API Gateway Lambda Authorizer Example in Java. First, we created an API using API Gateway then we made the Lambda function as an integration point for the GET method of our resource. After that, configured Lambda Authorizer for our GET method. In the end, we tested our implementation using AWS Management Console and Postman Client. In the next tutorial, we are going to secure access to the User’s data in RDS using Lambda Authorizer created in this tutorial.
Stay tuned for some more informative tutorials coming ahead. Feel free to leave any feedback or queries in the comment section.
Happy learning!