In this tutorial, you will learn how to configure Keycloak to use the MySQL database server instead of the H2 database.
For video lessons on how to secure your Spring Boot application with OAuth 2.0. and Spring Security 5, please checkout my complete video course OAuth 2.0. in Spring Boot applications.
Create MySQL Database for Keycloak
To make the Keycloak store data in MySQL database, we will need to create a new MySQL database. Sign-in to MySQL server with a root user credentials and create a new database. In the below MySQL command, I am creating a new database with the name “keycloak“. You can give it a different name if needed.
mysql> CREATE DATABASE keycloak CHARACTER SET utf8 COLLATE utf8_unicode_ci;
Query OK, 1 row affected, 2 warnings (0.00 sec)
Creating a New User
Now, when we have created a new MySQL database, we will need to create a new user. The credentials of this user will be used by the Keycloak server to connect to the MySQL database.
mysql> CREATE USER 'keycloak-user'@'%' IDENTIFIED BY '1h7rHhfy3';
Query OK, 0 rows affected (0.00 sec)
When creating a new user for the Keycloak database, you can give this user any valid username and password. In the MySQL command above, I have created a new user with username “keycloak-user” and password “1h7rHhfy3“.
Now, when we have created a new MySQL user, we will need to grant this user privileges to use the “keycloak” database.
mysql> GRANT ALL PRIVILEGES ON keycloak.* TO 'keycloak-user'@'%';
Query OK, 0 rows affected (0.00 sec)
And finally, you can flush the privileges to make them take an immediate effect.
mysql> flush privileges;
Query OK, 0 rows affected (0.00 sec)
You can exit MySQL and sign-in with a newly created user credentials to make sure they work.
Download MySQL Connector
To make the Keycloak server use the MySQL database server, you will need to download a MySQL connector for the version of MySQL server you are running. If you are using MySQL Community edition like I do, then you can download MySQL connector from this URL: MySQL Community Downloads. At the time of writing this tutorial, the MySQL connector I have downloaded is mysql-connector-java-8.0.20.jar.
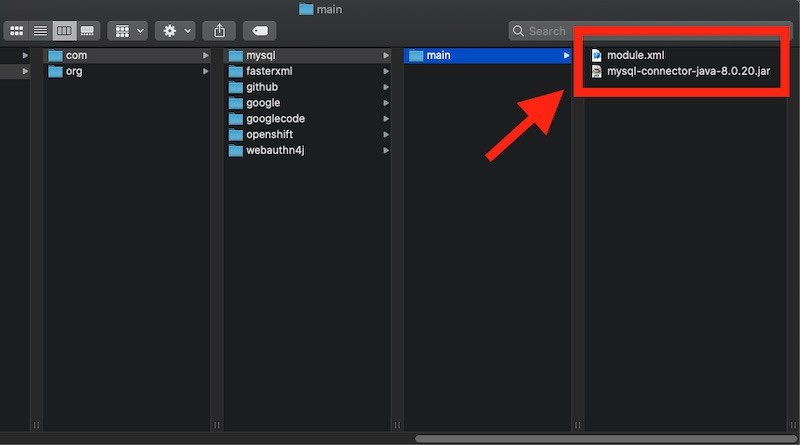
Copy MySQL Connector Into Keycloak Directory
Now, when we have downloaded the MySQL connector, we need to place it into a special folder in the Keycloak server.
{Keycloak Home Folder}/modules/system/layers/keycloak/com/mysql/main/mysql-connector-java-8.0.20.jar
To do this:
- Open the terminal window and change the directory to a Home directory of the Keycloak server. I am using Mac and the Keycloak on my computer is in the folder – “/Users/sergeykargopolov/keycloak-10.0.2“. If the Keycloak on your computer is in a different directory, just change to that directory,
- While inside of a Keycloak home directory, change directory to “modules/system/layers/keycloak/com”,
- Create a new folder called “main”,
- And inside of the “main” folder, create a new folder called “mysql“.
- Copy the MySQL Connector file into “mysql” folder.
So the complete path to a mysql-connector-java-8.0.20.jar on my computer will be:
/Users/sergeykargopolov/keycloak-10.0.2/modules/system/layers/keycloak/com/mysql/main/mysql-connector-java-8.0.20.jar
Create module.xml File
The next step is to create a new file called “module.xml” and place it next to a MySQL Connector file.
module.xml
<?xml version="1.0" ?>
<module xmlns="urn:jboss:module:1.3" name="com.mysql">
 <resources>
  <resource-root path="mysql-connector-java-8.0.20.jar" />
 </resources>
 <dependencies>
  <module name="javax.api"/>
  <module name="javax.transaction.api"/>
 </dependencies>
</module>
Notice that the value of resource-root path= is the name of our MySQL Connector file. Create the above module.xml file, in the same directory where the mysql-connector-java-8.0.20.jar is.
Make Keycloak Load the MySQL Connector
Now it is time to configure our Keycloak server to actually load the MySQL connector when the server starts up.
If you are running Keycloak as a standalone server, then change directory to {Keycloak Home Folder}/standalone/configuration/standalone.xml.
Add New Driver
Within the standalone.xml file look for <drivers> element and add to it the MySQL driver.
<driver name="mysql" module="com.mysql">
     <driver-class>com.mysql.jdbc.Driver</driver-class>
</driver>
Below is how the updated <drivers> element will look like after you add the MySQL driver to it.
<drivers>
     <driver name="mysql" module="com.mysql">
        <driver-class>com.mysql.jdbc.Driver</driver-class>
    </driver>
    <driver name="h2" module="com.h2database.h2">
        <xa-datasource-class>org.h2.jdbcx.JdbcDataSource</xa-datasource-class>
    </driver>
</drivers>
Add New Datasource
Withing the same standalone.xml file, search for <datasources> element. You will notice that currently, your server is already using the H2 driver. Comment out the KeycloakDS data source and create a new one that will make your Keycloak server use MySQL instead.
Note: Do not forget to update the JDBC URL (jdbc:mysql://localhost:3306/keycloak) and the user-name and password elements to make them relevant to your project.
<!--
<datasource jndi-name="java:jboss/datasources/KeycloakDS" pool-name="KeycloakDS" enabled="true" use-java-context="true" statistics-enabled="${wildfly.datasources.statistics-enabled:${wildfly.statistics-enabled:false}}">
<connection-url>jdbc:h2:${jboss.server.data.dir}/keycloak;AUTO_SERVER=TRUE</connection-url>
<driver>h2</driver>
<security>
<user-name>sa</user-name>
<password>sa</password>
</security>
</datasource>
-->
<datasource jndi-name="java:/jboss/datasources/KeycloakDS" pool-name="KeycloakDS" enabled="true">
<connection-url>jdbc:mysql://localhost:3306/keycloak?useSSL=false&characterEncoding=UTF-8&serverTimezone=UTC</connection-url>
<driver>mysql</driver>
<pool>
<min-pool-size>5</min-pool-size>
<max-pool-size>15</max-pool-size>
</pool>
<security>
<user-name>keycloak-user</user-name>
<password>1h7rHhfy3</password>
</security>
<validation>
<valid-connection-checker class-name="org.jboss.jca.adapters.jdbc.extensions.mysql.MySQLValidConnectionChecker"/>
<validate-on-match>true</validate-on-match>
<exception-sorter class-name="org.jboss.jca.adapters.jdbc.extensions.mysql.MySQLExceptionSorter"/>
</validation>
</datasource>
Add New Database Configuration
In the same standalone.xml file look for <spi> elements and add one more element with the name “connectionsJpa“.
<subsystem xmlns="urn:jboss:domain:keycloak-server:1.1">
    ...
    <spi name="connectionsJpa">
        <provider name="default" enabled="true">
            <properties>
                <property name="dataSource" value="java:jboss/datasources/KeycloakDS"/>
                <property name="initializeEmpty" value="true"/>
                <property name="migrationStrategy" value="update"/>
                <property name="migrationExport" value="${jboss.home.dir}/keycloak-database-update.sql"/>
            </properties>
        </provider>
    </spi>
    ...
</subsystem>
Where:
- dataSource – is a JNDI name of the dataSource,
- initializeEmpty – Initialize database if empty. If set to false the database has to be manually initialized. If you want to manually initialize the database set migrationStrategy to “manual” which will create a file with SQL commands to initialize the database. Defaults to true.
- migrationStrategy – Strategy to use to migrate the database. Valid values are update, manual, and validate. The update will automatically migrate the database schema. Manual will export the required changes to a file with SQL commands that you can manually execute on the database. Validate will simply check if the database is up-to-date.
- migrationExport – Path for where to write the manual database initialization/migration file.
You are now ready to restart the Keycloak server. When the server starts it will be using the new MySQL database instead of an existing H2 database.
I hope this tutorial was of some help to you. If you are interested in learning more about Keycloak, have a look at other Keycloak tutorials.
Happy learning!