In the ever-evolving world of software development, responsiveness and efficiency are paramount. Reactive Programming provides a powerful paradigm that allows you to build applications that are highly responsive, scalable, and resilient.
In this tutorial, we will delve into the world of Reactive Programming in Java, exploring its key concepts and how it can benefit your projects. By the end of this tutorial, you’ll have a solid understanding of Reactive Streams and be equipped with the knowledge to create reactive applications that handle data with finesse and grace.
Introduction to Reactive Programming
Reactive Programming is a programming paradigm focused on handling asynchronous and event-driven data streams. Unlike traditional imperative programming, where code executes sequentially, reactive programs react to data changes or events as they occur. Reactive programming emphasizes responsiveness, scalability, and resilience, making it well-suited for modern applications with real-time requirements.
In the context of Java, Reactive Programming involves working with reactive streams, which represent sequences of data that can be asynchronously processed. These streams emit events or data items over time, and developers can apply transformations, filters, and aggregations to the stream’s elements in a declarative manner.
Why use Reactive Programming in Java?
Reactive Programming in Java offers several benefits that cater to the demands of today’s software development landscape:
- Asynchronous and Non-blocking: By embracing reactive streams, Java applications can efficiently handle concurrent operations without blocking threads, resulting in better resource utilization and responsiveness.
- Scalability: Reactive programming facilitates the development of scalable applications, as it naturally accommodates handling large numbers of asynchronous events and data streams.
- Responsive User Interfaces: In user-facing applications, reactive programming can lead to more responsive and interactive user interfaces by leveraging event-driven architectures.
- Resilience: Reactive applications can be more resilient to failures, as they often involve components that react to errors and gracefully handle them.
- Functional Style: Reactive programming in Java often aligns with functional programming paradigms, promoting code that is more modular, composable, and easier to test.
Key Concepts of Reactive Programming
To effectively work with Reactive Programming in Java, it’s essential to understand some key concepts:
- Reactive Streams: These represent sequences of data items emitted over time, allowing for asynchronous processing while adhering to non-blocking backpressure.
- Publishers: Publishers are sources of data in reactive streams. They emit data items to subscribers.
- Subscribers: Subscribers consume data emitted by publishers and define how to handle the received data, errors, and completion signals.
- Processors: Processors act as both publishers and subscribers, allowing for transformations and intermediate processing steps in the stream.
- Backpressure: Backpressure is a flow control mechanism that enables subscribers to signal to publishers to slow down data emission when the subscriber can’t keep up with the rate of data consumption.
For a deeper understanding of Reactive Programming, I strongly encourage you to explore the following tutorial Introduction to Reactive Programming. It serves as an excellent resource for delving further into the intricacies of this programming paradigm.
Understanding these fundamental concepts sets the stage for leveraging the power of Reactive Programming in Java and working effectively with reactive streams.
Understanding Reactive Streams
Reactive Streams in Java are a programming paradigm that enables the processing of asynchronous data streams with a focus on handling backpressure. But what does that mean?
Imagine you have a continuous flow of data coming in, like sensor readings from IoT devices or user events in a web application. Handling this data efficiently can be challenging, especially when there’s a significant difference in the speed at which data is produced and consumed.
Reactive Streams provide a solution to this challenge by introducing a set of interfaces and operators that facilitate the efficient flow of data. They allow components of an application to interact asynchronously and respond to data as it arrives.
In simple terms, Reactive Streams enable a system to adapt dynamically to varying workloads, preventing it from being overwhelmed with data. It allows the application to handle data in a reactive manner, where it responds to events as they occur, rather than following a rigid and predefined sequence.
Characteristics of Reactive Streams
To better understand Reactive Streams, it’s essential to grasp their key characteristics:
- Asynchronous: Reactive Streams operate asynchronously, meaning data is processed independently of the main program flow. This enables handling multiple streams of data concurrently without blocking the application.
- Non-blocking: Reactive Streams avoid blocking operations that could potentially lead to performance bottlenecks. Instead, they employ non-blocking operations to ensure the application remains responsive and efficient.
- Backpressure handling: Backpressure occurs when a downstream component is unable to keep up with the rate of data produced by an upstream component. Reactive Streams provide mechanisms to handle backpressure, ensuring that data flow is controlled to prevent overwhelming slower components.
Benefits of Reactive Streams
Now that we understand the basic concepts, let’s explore the advantages of using Reactive Streams in Java:
- Scalability: Reactive Streams facilitate the development of highly scalable applications. By managing asynchronous and non-blocking data flow, Java applications can efficiently handle numerous concurrent operations without sacrificing performance.
- Responsiveness: Asynchronous processing and non-blocking operations enable Java applications to remain responsive, even under heavy workloads. This responsiveness enhances the user experience, especially in applications with real-time features.
- Resource Efficiency: Reactive Streams help optimize resource utilization by avoiding unnecessary waiting periods and ensuring that resources are utilized effectively.
- Error Handling: Reactive Streams provide robust error-handling mechanisms, allowing developers to manage errors and exceptions efficiently, leading to more stable and fault-tolerant applications.
- Stream-based Processing: Reactive Streams encourage a stream-based approach to data processing, simplifying complex data transformations and facilitating cleaner, more maintainable code.
In conclusion, Reactive Streams in Java offer a powerful and flexible way to handle asynchronous data streams efficiently. By embracing the characteristics of asynchronicity, non-blocking behavior, and backpressure handling, Java applications can achieve enhanced scalability, responsiveness, and resource efficiency while providing a more seamless user experience.
Java 9 Flow API
In Java 9, the Flow API was introduced to support Reactive Streams, making it easier for developers to work with asynchronous data streams in a more structured manner. The Flow API defines a set of interfaces that form the backbone of Reactive Streams. These interfaces allow for the smooth exchange of data between publishers, subscribers, and processors, enabling the creation of responsive and non-blocking applications.
At the core of the Flow API are three main components:
- Publisher: This interface represents a source of data or events, known as a “stream.” It emits data items or signals to its subscribers when there’s new information available. Think of it as a stream of data that sends updates to anyone interested in listening.
- Subscriber: The Subscriber interface represents a consumer of data or events. It subscribes to a Publisher to receive the data emitted by the Publisher. When the Publisher has new data available, it pushes the data to its subscribed Subscriber(s). It’s like having a receiver that listens for data from the Publisher.
- Processor: The Processor interface is a combination of both Publisher and Subscriber. It sits between a source Publisher and a target Subscriber, allowing you to perform transformations or manipulations on the data as it flows through the stream. Processors enable you to apply various operations to the data before delivering it to the Subscriber.
Publisher, Subscriber, and Processor Interfaces
- Publisher Interface: The Publisher interface looks like this:
public interface Publisher<T> { void subscribe(Subscriber<? super T> subscriber); } - Subscriber Interface: The Subscriber interface looks like this:
public interface Subscriber<T> {
    void onSubscribe(Subscription subscription);
    void onNext(T item);
    void onError(Throwable throwable);
    void onComplete();
}
The
Subscriberinterface defines four methods:onSubscribe: This method is called when a Subscriber subscribes to a Publisher. It receives aSubscriptionobject that represents the connection between the Subscriber and the Publisher.onNext: This method is called when the Publisher emits a new data item, and the Subscriber receives it through this method.onError: If an error occurs during the data flow, the Publisher calls this method to notify the Subscriber about the error.onComplete: This method is called when the Publisher has finished sending all the data items, indicating the completion of the stream.
- Processor Interface: The Processor interface combines the Publisher and Subscriber interfaces, allowing you to transform the data as it passes through the Processor. It looks like this:
public interface Processor<T, R> extends Subscriber<T>, Publisher<R> {
}
The
Processorinterface is a generic interface that takes two type parameters:Trepresents the type of data the Processor receives from its upstream Publisher, andRrepresents the type of data the Processor emits to its downstream Subscriber.
Working with Publishers and Subscribers
To work with the Flow API, you typically follow these steps:
- Implement your custom Publisher: Create a class that implements the Publisher interface and defines how it produces and emits data.
- Implement your custom Subscriber: Create another class that implements the Subscriber interface, specifying how it processes and reacts to the received data.
- Establish the connection: In your application, create instances of your custom Publisher and Subscriber, then use the
subscribemethod to connect them. - Observe data flow: As the Publisher emits data, it automatically delivers it to the connected Subscriber through the
onNextmethod. The Subscriber processes the data based on your implementation in theonNext,onError, andonCompletemethods.
By understanding and utilizing the Publisher, Subscriber, and Processor interfaces, you can begin to harness the power of the Java 9 Flow API and build responsive and efficient applications using Reactive Streams.
To better understand how Publishers and Subscribers interact in Reactive Streams, let’s take a closer look at the flow of events between them. The image below illustrates the data flow:
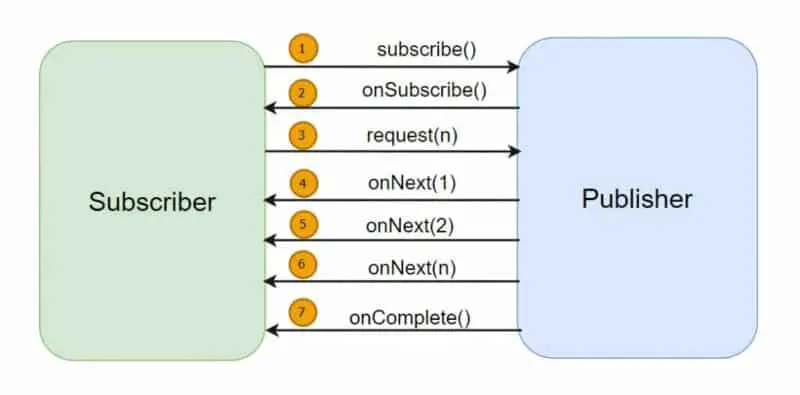
- Subscriber Initiates the Request: The data flow begins when the Subscriber initiates the request by invoking the
subscribe()method of the Publisher. This establishes the connection between the Subscriber and the Publisher, enabling the Publisher to send data updates to the Subscriber. - Sending the Subscription Object: Upon receiving the
subscribe()call, the Publisher responds by sending the Subscription object to the Subscriber through theonSubscribe()method. This object serves as a handle that the Subscriber can use to manage the data flow. - Requesting Data: Once the Subscriber receives the Subscription object, it can request the Publisher to send data by invoking the
request()function. Through this method, the Subscriber specifies the amount of data it wants to receive. - Concurrent Data Emission: As soon as the data becomes available, the Publisher starts sending data concurrently to the Subscriber in the form of a stream of events. The Publisher invokes the
onNext()function of the Subscriber interface for each data item, delivering the data to the Subscriber. - Handling Data: The Subscriber processes and handles the received data within its
onNext()implementation, performing any required operations or computations. - Completion of Data Flow: Once all data has been sent by the Publisher, it signals the completion of the data flow by invoking the
onComplete()method of the Subscriber. This notifies the Subscriber that there are no more data items to process.
In case of any errors during the data flow, the Publisher invokes the onError() method of the Subscriber, allowing the Subscriber to handle and react to the error situation gracefully. As we can see in the following example:
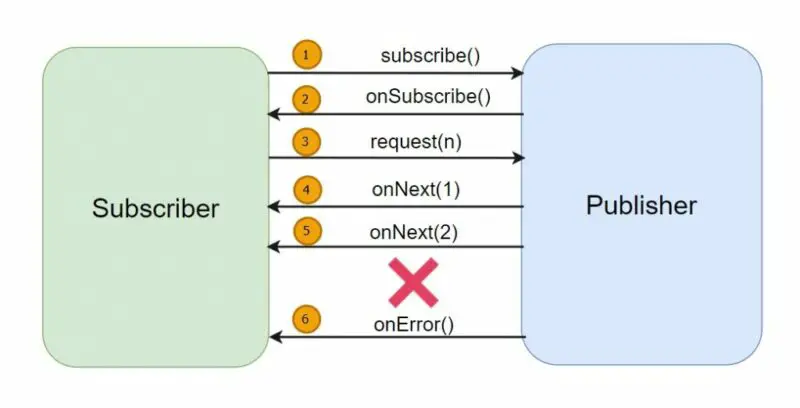
In this scenario, as the Publisher began sending data, an error arose, and the exception was transmitted using the onError() method of the Subscriber.
In the context of Reactive Programming, exceptions are handled similarly to data, implying that the exception will be dispatched to the Subscriber as an event.
For a comprehensive guide on working with Publishers and Subscribers, I highly recommend exploring the tutorial Reactive Programming: Creating Publishers and Subscribers in Java.
Reactive Operations and Transformations
In Reactive Programming, one of the most powerful aspects is the ability to perform various operations and transformations on the data flowing through the streams. These operations allow us to manipulate the data in a reactive and asynchronous manner, giving us more control over how we process and react to incoming data.
Let’s explore some essential reactive operations and transformations that are fundamental to understanding how reactive streams work:
Mapping and Filtering Reactive Data
When working with reactive data streams, mapping and filtering are common operations used to modify or refine the data. Mapping involves transforming the elements of a stream into a new format based on a provided function. For example, you can convert incoming data to uppercase, perform calculations, or extract specific fields from complex objects.
Filtering, on the other hand, lets you selectively pick the elements from the stream that meet certain conditions. It allows you to include or exclude data based on criteria defined by a predicate. This way, you can process only the relevant data and ignore the rest.
Consider the following code example:
// Example: Mapping data to uppercase
Flux<String> originalStream = Flux.just("hello", "world", "reactive", "programming");
Flux<String> mappedStream = originalStream.map(str -> str.toUpperCase());

// Example: Filtering data based on a condition
Flux<Integer> originalNumbers = Flux.range(1, 10);
Flux<Integer> filteredNumbers = originalNumbers.filter(num -> num % 2 == 0);
- Mapping data to uppercase: A Flux named
originalStreamis created with four strings: “hello”, “world”, “reactive”, and “programming.” Themapoperator is then applied to this Flux, transforming each string in the stream to its uppercase version using the lambda expressionstr -> str.toUpperCase(). The result is a new Flux namedmappedStream, containing the uppercase versions of the original strings. - Filtering data based on a condition: Another Flux named
originalNumbersis created usingFlux.range(1, 10), which generates a stream of integers from 1 to 10. Then, thefilteroperator is applied to this Flux using the lambda expressionnum -> num % 2 == 0. This filters the stream to only include even numbers, resulting in a new Flux namedfilteredNumberscontaining the even numbers from the original stream (2, 4, 6, 8, 10).
Combining Streams with Merge and Concat
In certain situations, you may have multiple data sources or streams that you want to combine into a single stream for unified processing. Reactive streams provide two common techniques for this: “Merge” and “Concat”.
“Merging” streams allows you to interleave the elements from multiple streams, creating a new stream that emits data from all sources concurrently. This is useful when you want to respond to data from different streams as soon as it arrives, without waiting for one stream to complete before processing the next.
On the other hand, “Concatenating” streams lets you combine the elements sequentially, one stream after the other. This means that the elements from the second stream will be emitted only after the first stream has completed. Concatenation is handy when you need to process streams in a specific order, maintaining a clear separation between them.
Let’s take a look at an example:
// Example: Merging two streams
Flux<String> stream1 = Flux.just("apple", "banana", "orange");
Flux<String> stream2 = Flux.just("grape", "kiwi", "mango");
Flux<String> mergedStream = Flux.merge(stream1, stream2);

// Example: Concatenating two streams
Flux<Integer> numbers1 = Flux.range(1, 5);
Flux<Integer> numbers2 = Flux.range(6, 5);
Flux<Integer> concatenatedStream = Flux.concat(numbers1, numbers2);
In the first code example, we have two Flux streams, stream1 and stream2, containing strings representing fruits. We use the Flux.merge() method to merge these two streams into a single stream, mergedStream. The merged stream emits data from both stream1 and stream2 concurrently, as soon as it arrives. This means that elements from both streams may interleave in the output.
In the second code example, we have two Flux streams, numbers1 and numbers2, containing integer values. We use the Flux.concat() method to concatenate these two streams into a single stream, concatenatedStream. The concatenated stream emits data sequentially, one stream after the other. First, it emits all elements from numbers1, and only after numbers1 completes, it emits elements from numbers2.
In summary, Flux.merge() combines multiple streams into a single stream, emitting elements concurrently, while Flux.concat() combines streams, emitting elements sequentially in the order of their sources.
Handling Errors with Error Handling Operators
Reactive streams provide powerful error handling capabilities to handle exceptions and errors that may occur during the data processing. When dealing with asynchronous operations, errors can be more challenging to manage in a traditional way. Reactive Programming, however, offers specialized operators to handle errors gracefully.
For instance, the “onErrorResumeNext” operator allows you to switch to an alternative stream of data when an error occurs. This helps in providing a fallback mechanism and ensures that your application can recover gracefully from failures.
Check out the following example:
// Example: Using onErrorResumeNext operator
Flux<Integer> numbers = Flux.just(1, 2, 3, 4, 5)
    .map(num -> {
        if (num == 3) {
            throw new RuntimeException("Error occurred at 3!");
        }
        return num;
    })
    .onErrorResume(e -> Flux.just(100, 200));

// The output will be: 1, 2, 100, 200
In this code example, we have a Flux of integers that emits the values 1, 2, 3, 4, and 5. Within the map operation, we check if the number is equal to 3. If it is, we deliberately throw a RuntimeException with a custom error message “Error occurred at 3!”.
However, instead of terminating the stream and propagating the error, we use the onErrorResume operator to gracefully handle the error. This operator catches the error and replaces it with a new Flux containing the values 100 and 200. As a result, the stream continues to emit the values 1 and 2 as expected, and when it encounters the error at 3, it switches to the new Flux with 100 and 200.
So, the output of the numbers Flux will be: 1, 2, 100, 200. The error at 3 is bypassed, and the stream continues with the fallback values provided in the onErrorResume operator. This mechanism ensures that the application can recover gracefully from errors and maintain the data flow even in the presence of exceptions.
Backpressure
Dealing with Fast Producers and Slow Consumers: One of the significant challenges in Reactive Programming is handling situations where data is produced much faster than it can be consumed. This issue is known as “backpressure.” If not managed properly, it can lead to resource exhaustion and application instability.
To address backpressure, reactive streams use various strategies like buffering, dropping, or applying flow control mechanisms. By employing these techniques, you can control the rate at which data is produced, allowing consumers to process it efficiently without getting overwhelmed.
For instance:
// Example: Applying backpressure with buffer
Flux<Integer> fastProducer = Flux.range(1, 1000);
Flux<Integer> bufferedStream = fastProducer
    .onBackpressureBuffer(100) // Buffer up to 100 elements when consumer is slow
    .delayElements(Duration.ofMillis(10)); // Introducing delay to simulate slow consumer

bufferedStream.subscribe(num -> {
    try {
        Thread.sleep(100); // Simulating slow processing
    } catch (InterruptedException e) {
        e.printStackTrace();
    }
    System.out.println(num);
});
In this code example, we have a Flux<Integer> named fastProducer that emits integers from 1 to 1000. To handle potential backpressure when the consumer is slow, we use the .onBackpressureBuffer(100) operator, which buffers up to 100 elements in memory.
To further simulate a slow consumer, we introduce a delay of 10 milliseconds between emitting each element using the .delayElements(Duration.ofMillis(10)) operator.
The bufferedStream is the resulting Flux after applying the backpressure buffer and delay.
When we subscribe to the bufferedStream, the consumer processes each element by printing it, but before doing so, it introduces an additional sleep of 100 milliseconds (Thread.sleep(100)) to simulate slow processing.
In summary, this code example demonstrates how to apply backpressure with buffering to handle situations where a fast producer generates data faster than the consumer can process it. The delay introduced helps simulate a slow consumer, allowing the buffer to accumulate data when necessary.
Best Practices and Tips
Reactive programming in Java can be powerful, but it also comes with its own set of challenges. To ensure a smoother experience, let’s explore some common pitfalls and how to avoid them:
- Backpressure Ignorance: One common issue in reactive applications is backpressure. Backpressure occurs when a data source emits data faster than the consumer can process it. If not handled properly, this can lead to memory overflow or application crashes. To tackle this, consider using backpressure strategies like buffering, dropping, or error handling to manage data flow.
- Improper Error Handling: Reactive streams can be unforgiving if errors are not handled correctly. Always use operators like
onErrorResumeoronErrorReturnto gracefully handle errors and provide fallback mechanisms. This ensures that your application continues to function even in the face of errors. - Nested Subscriptions: Avoid creating nested subscriptions within reactive chains. This can lead to resource leaks and unexpected behavior. Instead, use operators like
flatMaporconcatMapto manage the sequencing of operations and avoid unnecessary complexity. - Mixing Blocking and Non-blocking Code: Combining blocking code with reactive streams can lead to performance bottlenecks and defeat the purpose of using reactive programming. Strive to use non-blocking libraries and operations to maintain the responsiveness and scalability of your application.
- Overusing Reactive Streams: While reactive programming offers many benefits, it’s essential to use it judiciously. Not all parts of your application need to be reactive. Identify the parts that will benefit the most from reactivity and use traditional approaches where they fit better.
Strategies for Debugging Reactive Code
Debugging reactive code might seem challenging, but with the right strategies, it can be made easier:
- Use Logging and Observing: Incorporate logging statements strategically throughout your reactive chain to track the flow of data and identify potential issues. Tools like
log()operator in reactive libraries can be helpful for this purpose. - Reactive Breakpoints: Some IDEs and reactive libraries offer support for reactive breakpoints. These breakpoints pause execution at specific points in the reactive chain, allowing you to inspect the data and analyze the behavior.
- Testing and Testability: Write comprehensive unit tests for your reactive code to ensure its correctness. Use test schedulers to control the timing of events and verify your reactive streams’ behavior in different scenarios.
Choosing Between Synchronous and Asynchronous Operations
Choosing between synchronous and asynchronous operations depends on the use case and specific requirements. Consider the following guidelines:
- Synchronous Operations: Use synchronous operations for simple and quick tasks that don’t involve blocking or long-running operations. Synchronous operations are straightforward to reason about and can simplify your code.
- Asynchronous Operations: Prefer asynchronous operations for tasks that may block, involve I/O operations, or have long processing times. Asynchronous operations prevent thread blocking, allowing your application to remain responsive and scalable.
- Combining Synchronous and Asynchronous: Often, a mix of synchronous and asynchronous operations may be necessary. Identify critical sections that require asynchronicity and delegate other parts to synchronous operations to strike a balance between performance and simplicity.
Remember, practice and experience play a vital role in mastering reactive programming. Embrace a gradual learning approach, and don’t hesitate to experiment with different strategies to find what works best for your specific projects.
Real-world Examples and Use Cases
In real-world scenarios, Reactive Streams find wide application in building highly responsive and scalable web applications. Let’s explore how Reactive Streams can be implemented in web applications:
- Asynchronous Data Fetching: Traditional web applications often face challenges when dealing with slow or unreliable data sources, like external APIs or remote servers. With Reactive Streams, we can fetch data asynchronously, allowing the application to continue processing other tasks while waiting for the data to arrive. This approach ensures that the application remains responsive, and users experience minimal delays.
- Real-time Data Updates: Web applications often require real-time updates to display the latest information to users without requiring manual page refreshes. Reactive Streams enable a continuous flow of data from the server to the client, making it possible to receive real-time updates and keep the user interface up-to-date without excessive network requests.
- Handling Concurrent Requests: Web applications face situations where multiple users send requests simultaneously. Reactive Streams handle these concurrent requests efficiently by managing resources smartly and avoiding bottlenecks. This prevents server overload and maintains a smooth user experience even during peak times.
Reactive Data Processing and Stream-based Operations
In various domains, such as financial services, IoT applications, and data analytics, Reactive Streams prove to be powerful for data processing and stream-based operations. Let’s explore how they work in such contexts:
- Continuous Data Transformation: Reactive Streams allow continuous transformation of data streams as they flow through the application. This means that incoming data can be processed in real-time, enabling applications to derive insights, perform calculations, or apply filters on the data as it arrives.
- Event-driven Processing: Many real-world systems generate events at different intervals, such as sensor data in IoT devices or user interactions in social media applications. Reactive Streams provide an event-driven processing model, where the application can react to each event as it occurs, ensuring timely and efficient handling of data.
- Chaining Operations for Efficiency: Reactive Streams support chaining multiple operations together, allowing developers to compose complex data processing pipelines easily. These pipelines optimize resource utilization and enhance the application’s performance, making it well-suited for handling large-scale data processing tasks.
Integrating Reactive Streams with Database Access
Databases are vital components of modern applications, and Reactive Streams can be seamlessly integrated into database access for improved performance and responsiveness.
- Non-blocking Database Queries: Traditional database access can lead to blocking operations, where the application waits for a response from the database before proceeding. Reactive Streams facilitate non-blocking database queries, allowing the application to handle other tasks while waiting for the database response.
- Reactive Database Drivers: To integrate Reactive Streams with databases, developers can use reactive database drivers designed to work harmoniously with the Reactive Streams API. These drivers provide a reactive interface to interact with the database, enabling efficient and non-blocking data retrieval and manipulation.
- Scalability and Performance: By adopting Reactive Streams in database access, applications can achieve better scalability and improved performance. The non-blocking nature of Reactive Streams ensures that the application can efficiently handle a high volume of concurrent database requests without compromising responsiveness.
Remember, these real-world examples demonstrate just a glimpse of the potential applications of Reactive Streams. As you delve deeper into the world of Reactive Programming, you’ll discover even more exciting use cases that can revolutionize the way you build and interact with applications.
Conclusion
In this tutorial, you have discovered how Reactive Programming enables you to build applications that are responsive, scalable, and robust. Armed with the understanding of Reactive Streams and the Java 9 Flow API, you now have the tools to create asynchronous and event-driven applications with ease.
Remember to apply best practices, utilize error-handling operators, and manage backpressure efficiently. Make sure to explore the Java Reactive page for additional captivating tutorials.