In this tutorial, we are going to see how we can throw custom exceptions with a custom payload in a Spring Boot application and deploy it on AWS as a serverless Lambda function. Let us start by creating a simple Spring boot project.
In this project, we are going to create a Request Handler that accepts a POST request. The POST request takes a Student Object as Request body and throws a custom exception named MyException if the age of the student is less than 10 years. Once you creating a basic Spring boot project, add the necessary maven dependencies.
Importing necessary Maven dependencies
Import the spring cloud maven dependencies into pom.xml file as shown below as we are going to deploy this application on AWS Lambda.
<dependencies>
        <dependency>
            <groupId>org.springframework.cloud</groupId>
            <artifactId>spring-cloud-function-adapter-aws</artifactId>
        </dependency>
        <dependency>
            <groupId>com.amazonaws</groupId>
            <artifactId>aws-lambda-java-events</artifactId>
            <version>2.0.2</version>
        </dependency>
        <dependency>
            <groupId>com.amazonaws</groupId>
            <artifactId>aws-lambda-java-core</artifactId>
            <version>1.1.0</version>
        </dependency>
        <dependency>
            <groupId>org.springframework.boot</groupId>
            <artifactId>spring-boot-starter-test</artifactId>
            <scope>test</scope>
            <exclusions>
                <exclusion>
                    <groupId>org.junit.vintage</groupId>
                    <artifactId>junit-vintage-engine</artifactId>
                </exclusion>
            </exclusions>
        </dependency>
        <dependency>
            <groupId>org.json</groupId>
            <artifactId>json</artifactId>
            <version>20090211</version>
        </dependency>
</dependencies>
Next, create a student class in the com.appdevelopersblog.aws.lambda.model package with id, name, and age as attributes.
Student.java
The Student.java class also includes a Constructor method, Getters, and Setters for all three attributes.
package com.appdevelopersblog.aws.lambda.model;

public class Student {

    private int id;
    private String name;
    int age;

    public Student() {

    }
    public Student(int id , String name, int age) {
        this.id = id;
        this.name = name;
        this.age = age;
    }
    public int getId() {
        return id;
    }
    public void setId(int id) {
        this.id = id;
    }
    public String getName() {
        return name;
    }
    public void setName(String name) {
        this.name = name;
    }
    public int getAge() {
        return age;
    }
    public void setAge(int age) {
        this.age = age;
    }
}
The next step is to create a class named MyException in the com.appdevelopersblog.aws.lambda.exceptions package that defines the custom exception that we shall use anywhere in the application.
MyException.java
This class extends the RuntimeException superclass and contains a constructor that accepts a string that is nothing but the error message in the payload of the Error response.
package com.appdevelopersblog.aws.lambda.exceptions;

public class MyException extends RuntimeException{

    public MyException(String message) {
        super(message);
    }

}
The next step is to create a MyExceptionResponse class that defines what fields we wish to display in the payload of the Error response. In this example, the payload consists of the fields – message, trace, and HTTP status.
MyExceptionResponse.java
This class consists of private final objects of the required fields in the Response payload. It also consists of a Constructor to set the values of the fields.
package com.appdevelopersblog.aws.lambda.exceptions;

import org.springframework.http.HttpStatus;

public class MyExceptionResponse {
    private final String message;
    private final StackTraceElement[] trace;
    private final HttpStatus httpStatus;

    public MyExceptionResponse(String message, StackTraceElement[] trace, HttpStatus httpStatus) {
        this.message = message;
        this.trace = trace;
        this.httpStatus = httpStatus;
    }

    public String getMessage() {
        return message;
    }

    public StackTraceElement[] getTrace() {
        return trace;
    }

    public HttpStatus getHttpStatus() {
        return httpStatus;
    }
}
Now, to handle the runtime exceptions, we need to create a controller class. This class is also responsible for generating a response with the fields mentioned in MyExceptionResponse.java. Create a class named APIExceptionHandler and annotate it with @ControllerAdvice.
APIExceptionHandler.java
The annotated class acts as an interceptor to all the Exceptions thrown across the whole application.
In this file, create a method that handles the exception and sends a response of type MyExceptionResponse as shown below.
package com.appdevelopersblog.aws.lambda.exceptions;

import org.springframework.http.HttpStatus;
import org.springframework.http.ResponseEntity;
import org.springframework.web.bind.annotation.ControllerAdvice;
import org.springframework.web.bind.annotation.ExceptionHandler;

@ControllerAdvice
public class APIExceptionHandler {

    @ExceptionHandler(value = {MyException.class})
    public ResponseEntity<Object> handleMyException(MyException e){
        final HttpStatus badRequest = HttpStatus.BAD_REQUEST;
        MyExceptionResponse res = new MyExceptionResponse(e.getMessage(),e.getStackTrace(), badRequest);
        return new ResponseEntity<>(res, badRequest);
    }
}
Here, we need to annotate the method handleMyException( ) with @ExceptionHandler and provide value as MyException.class. This prompts the controller to invoke this method if an exception of type MyException arises during Runtime.
You can create any number of custom exceptions in this Controller class only. If you do so, you need to define handler methods to all those exceptions. Or you can also use a single handler method for multiple custom exceptions.
Finally, create a Handler class that extends SpringBootRequestHandler.
RequestHandler.java
This RequestHandler.java file consists of the POST Request implementation. Add your logic to store the details into a database here. In this class, we verify the age of the student and throw MyException if the age is less than ten years.
package com.appdevelopersblog.aws.lambda;

import com.amazonaws.services.lambda.runtime.Context;
import com.appdevelopersblog.aws.lambda.request.Request;
import com.appdevelopersblog.aws.lambda.model.Student;
import com.appdevelopersblog.aws.lambda.exceptions.MyException;
import org.springframework.cloud.function.adapter.aws.SpringBootRequestHandler;

public class RequestHandler extends SpringBootRequestHandler<String,Object> {
    public Object handleRequest(Request request, Context context){
        Student student = null;
        switch (request.getHttpMethod()) {
            case "POST" :
                student = request.getStudent();
                if (student.getAge()<10){
                    throw new MyException("Bad Request, High school student cannot have age less than 10 years");
                }
                //Logic to save the student details into repository
                return student;
            case "default" :
                break;
        }
        return null;
    }
}
Now, deploy this application in AWS Lambda.
If you don’t know how to do it, check out this tutorial.
Create AWS Lambda Functions from Spring Cloud Functions
Also, refer to the below tutorial on how to send requests to the Lambda function using AWS API Gateway.
Handling Exceptions from AWS Lambda written in JAVA
After creating a Lambda function and an API Gateway, send a POST request with the Request body as follows. Since the age field is 9 (less than 10), MyException is thrown at Runtime returns the below Response.
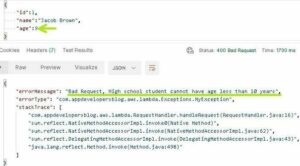
Note how the Response contains the error message as “Bad Request, High school students cannot have age less than 10 years”, and Java stack trace. Also, the HTTP status code is set to 400 Bad Request as specified in the ExceptionHandler method in the APIExceptionHandler class.
Link to Code : GitHub
That’s it for this tutorial. Stay tuned for more.