In this tutorial, you will learn how to use GridView in Flutter.
When building mobile applications with Flutter, the GridView is used to display data in rows and columns. You can use the GridView to display widgets like Text, Image, Card, Button, and so on. GridView is scrollable so, when creating this widget, we need to specify scrolling direction.
You can create GridView in two different ways:
- GridView.count() constructor, and
- GridView.builder()
GridView.count() Constructor
The GridView.count() is a constructor that allows us to create a GridView widget. Let’s look at a very simple Flutter mobile application code that uses GridView.count() constructor to create a grid view.
import 'package:flutter/material.dart';

void main() => runApp(MyApp());

class MyApp extends StatelessWidget {
  @override
  Widget build(BuildContext context) {
    return MaterialApp(
      home: Scaffold(
        appBar: AppBar(
          title: Text('GridView'),
        ),
        body: Center(
          child: Container(
            // height: 200,
            child: GridView.count(
              scrollDirection: Axis.vertical,
              crossAxisCount: 2,
              children: [
                Card(
                  color: Colors.teal,
                ),
                Card(
                  color: Colors.cyan,
                ),
                Card(
                  color: Colors.yellowAccent,
                ),
                Card(
                  color: Colors.deepOrange,
                ),
                Card(
                  color: Colors.red,
                ),
                Card(
                  color: Colors.yellow,
                ),
                Card(
                  color: Colors.purpleAccent,
                ),
                Card(
                  color: Colors.indigo,
                ),
                Card(
                  color: Colors.black,
                ),
                Card(
                  color: Colors.pinkAccent,
                ),
              ],
            ),
          ),
        ),
      ),
    );
  }
}
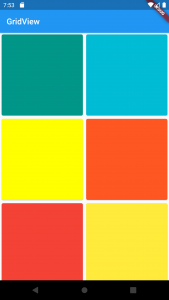
As you can see in the example above the GridView properties that we have used are as follows:
- scrollDirection: Axis.vertical – here we are configuring a scroll direction to be vertical. If your mobile application requires horizontal scrolling, then you can use Axis.horizontal instead.
- crossAxisCount: 2 – this means our items will be displayed in two vertical columns. If your mobile application requires more than two vertical columns, then you can provide a different value here.
If you run the above code example in your Flutter development environment, then you should get a mobile app that looks like in the image below:
GridView.builder()
The GridView.builder() creates a scrollable, 2D array of widgets that are created on-demand. We use GridView.builder() when we want to display data dynamically in a grid. The most common use case is in a gallery that reads displays images from your backend. Here is an example code for it:
import 'package:flutter/material.dart';

void main() => runApp(MyApp());

class MyApp extends StatelessWidget {
  @override
  Widget build(BuildContext context) {
    List<String> images = [
      "assets/Apples.png",
      "assets/Bananas.png",
      "assets/Cherries.png",
      "assets/Grapes.png",
      "assets/Oranges.png",
      "assets/Peaches.png",
      "assets/Plumbs.png",
      "assets/Rasberries.png",
      "assets/Strawberries.png",
    ];
    return MaterialApp(
      home: Scaffold(
        appBar: AppBar(
          title: Text('GridView'),
        ),
        body: Center(
          child: Container(
            child: GridView.builder(
              itemCount: images.length,
              gridDelegate: SliverGridDelegateWithFixedCrossAxisCount(
                crossAxisCount: 3,
                crossAxisSpacing: 5.0,
                mainAxisSpacing: 5.0,
              ),
              itemBuilder: (BuildContext context, int index) {
                return Image.asset(images[index]);
              },
            ),
          ),
        ),
      ),
    );
  }
}
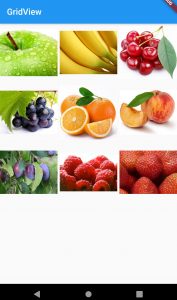
As you can see we have a list of image URLs called “images”. In the GridView.builder() we have set the itemCount to the length of the list images and we have the grid delegate property set to SliverGridDelegateWithFixedCrossAxisCount object. It is important to note that the itemCount and the SliverGridDelegateWithFixedCrossAxisCount are required properties and their values can not be null.
In the SliverGridDelegateWithFixedCrossAxisCount object, we have configured three properties:
- crossAxisCount – is set to 3 (three vertical columns),
- crossAxisSpacing – is a vertical spacing of items, and
- mainAxisSpacing – which is the horizontal spacing.
The second required property is itemBuilder. We use itemBuilder property to define a function that accepts two parameters (context and index) and returns an Image.asset widget for each image URL that is stored in the “images” list.
Build and run the above code example in your Flutter development environment. If all is good, then your mobile app will look similar to the one in the image below.
I hope this Flutter tutorial was helpful for you. If you are interested in learning Flutter, please check other Flutter tutorials on this site. Some of them have video tutorials included.
Happy mobile app development with Flutter 🙂!