In this Flutter tutorial, you will learn how to do basic form validation in Flutter. We will go through it step by step, and you’ll learn how to use Form and TextFormField widgets in Flutter.
If you are interested in Flutter video tutorials, check this playlist: Flutter Video Tutorials. Also, there is a large collection of code examples if you check Flutter tutorials page.
Creating a New Flutter App
First, we’ll create a new Flutter app to work with. This tutorial assumes you have Flutter installed. Open the terminal/command window on your computer and use the below Flutter command to create a new app.
flutter create form-validation
If all is good, the above command will create a new Flutter app for you. Open the created app project.
In the lib/main.dart file, delete everything, then copy and paste the below code snippet to make your app code a little bit simpler. This will be our starting point to work with.
import 'package:flutter/material.dart';

void main() {
  runApp(MyApp());
}

class MyApp extends StatelessWidget {
  @override
  Widget build(BuildContext context) {
    return MaterialApp(
      title: 'Form validation',
      theme: ThemeData(
        primarySwatch: Colors.blue,
        visualDensity: VisualDensity.adaptivePlatformDensity,
      ),
      home: MyHomePage(title: 'Sign Up'),
    );
  }
}
Our next step will be to create MyHomePage widget:
- It will be a stateful widget
- If you are on VS Code, type stful shortcut to generate a stateful widget.
class MyHomePage extends StatefulWidget {
  MyHomePage({Key key, this.title}) : super(key: key);

  final String title;

  @override
  _MyHomePageState createState() => _MyHomePageState();
}

class _MyHomePageState extends State<MyHomePage> {
  @override
  Widget build(BuildContext context) {
    return Scaffold(
      appBar: AppBar(
        title: Text(widget.title),
      ),
      body: Center(
        child: Container(
          padding: EdgeInsets.all(16),
          child: Column(
            mainAxisAlignment: MainAxisAlignment.center,
            children: [],
          ),
        ),
      ),
    );
  }
}
Now, our starter code is ready!
TextFormField Widget
A TextFormField widget is the same as TextField, but with additional properties like validator and autovalidate.
A basic TextFormField widget should look like this:
TextFormField(
     controller: _controller,
     decoration: InputDecoration(
          hintText: 'Name',
     ),
),
- We should provide a controller to it, to save any text entered by the user.
- decoration property is used to customize the field. Using decoration property you can add hints, labels, icons, and so on.
Creating TextFormField Widgets
Now, we’ll create 4 TextFormFields:
- Name
- Phone
- Password
Later on, we’ll add validators specific to the type of field.
Let’s create our first TextFormField. This field is for the name.
TextFormField(
   autofillHints: [AutofillHints.name],
   decoration: InputDecoration(
      hintText: 'Name',
   ),
),
The above code snippet will create a TextFormField that will look like in the image below:
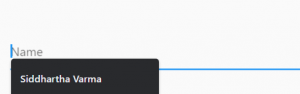
- autofillHints was added in Flutter 1.20+ and it displays autofill hints with the scopes provided as a list to it,
- hintText shows the hint text for the field. It can be seen in the above image.
Similarly, we’ll create other text fields:
TextFormField(
  autofillHints: [AutofillHints.name],
  decoration: InputDecoration(
    hintText: 'Name',
  ),
),
SizedBox(
  height: 20,
),
TextFormField(
  autofillHints: [AutofillHints.email],
  decoration: InputDecoration(
    hintText: 'Email',
  ),
),
SizedBox(
  height: 20,
),
TextFormField(
  autofillHints: [AutofillHints.telephoneNumber],
  decoration: InputDecoration(
    hintText: 'Phone',
  ),
),
SizedBox(
  height: 20,
),
TextFormField(
  obscureText: true,
  decoration: InputDecoration(
    hintText: 'Password',
  ),
)
Note that we have used an additional property called obscureText for the password field, It will hide the password and show ‘*’ instead.
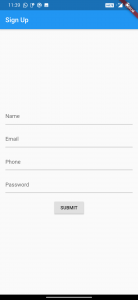
Now, your main.dart file should look like this:
import 'package:flutter/material.dart';

void main() {
  runApp(MyApp());
}

class MyApp extends StatelessWidget {
  @override
  Widget build(BuildContext context) {
    return MaterialApp(
      title: 'Form validation',
      theme: ThemeData(
        primarySwatch: Colors.blue,
        visualDensity: VisualDensity.adaptivePlatformDensity,
      ),
      home: MyHomePage(title: 'Sign Up'),
    );
  }
}

class MyHomePage extends StatefulWidget {
  MyHomePage({Key key, this.title}) : super(key: key);

  final String title;

  @override
  _MyHomePageState createState() => _MyHomePageState();
}

class _MyHomePageState extends State<MyHomePage> {
  @override
  Widget build(BuildContext context) {
    return Scaffold(
      appBar: AppBar(
        title: Text(widget.title),
      ),
      body: Center(
        child: Column(
          mainAxisAlignment: MainAxisAlignment.center,
          children: [
            TextFormField(
              autofillHints: [AutofillHints.name],
              decoration: InputDecoration(
                hintText: 'Name',
              ),
            ),
            SizedBox(
              height: 20,
            ),
            TextFormField(
              autofillHints: [AutofillHints.email],
              decoration: InputDecoration(
                hintText: 'Email',
              ),
            ),
            SizedBox(
              height: 20,
            ),
            TextFormField(
              autofillHints: [AutofillHints.telephoneNumber],
              decoration: InputDecoration(
                hintText: 'Phone',
              ),
            ),
            SizedBox(
              height: 20,
            ),
            TextFormField(
              obscureText: true,
              decoration: InputDecoration(
                hintText: 'Password',
              ),
            ),
          ],
        ),
      ),
    );
  }
}
Did we miss something though? Yes, you guessed it right! We haven’t created the controllers yet!
Creating Controllers
In this part, we’ll create TextEditingController for each TextFormField widget.
In the _MyHomePageState, we first declare variables for each controller.
TextEditingController _nameController;
TextEditingController _emailController;
TextEditingController _phoneController;
TextEditingController _passwordController;
and in the initState() function, we initialize all the controllers:
@override
void initState() {
  super.initState();
  _nameController = TextEditingController();
  _emailController = TextEditingController();
  _phoneController = TextEditingController();
  _passwordController = TextEditingController();
}
and set controllers to their respective textfield.
Form Validation
To enable field validation, we need to use the validator property in the TextFormField widget. The validator property will allow us to specify a function that takes a string parameter called value. It also returns a String.
validator: (String value) {
  return "";
},
Now we’ll go through some basic validators:
-
Check if the provided value is empty
validator: (value) { if (value.isEmpty) { return 'This field is required'; } }, -
Simple Email Address validators:
a) To check if the email contains “@”:
validator: (value) {
  if (value.isEmpty) {
    return 'This field is required';
  }
  if (!value.contains('@')) {
    return "A valid email address should contain '@'";
  }
},
b) A more comprehensive check of a proper email address through regexp:
validator: (value) { if (value.isEmpty) { return 'This field is required'; } if (!value.contains('@')) { return "A valid email should contain '@'"; } if (!RegExp( r"^[a-zA-Z0-9.a-zA-Z0-9.!#$%&'*+-/=?^_`{|}~]+@[a-zA-Z0-9]+\.[a-zA-Z]+", ).hasMatch(value)) { return "Please enter a valid email"; } }, -
Check the length of the provided value
validator: (value) { if (value.isEmpty) { return 'This field is required'; } if (value.length != 10) { return 'A valid phone number should be of 10 digits'; } }, -
Simple validator for the Password
For password, we enforce length and a basic regexp that checks if it has letters and numbers
validator: (value) {
      if (value.isEmpty) {
        return 'This field is required';
      }
      if (value.length < 8) {
        return 'Password should have atleast 8 characters';
      }
      if (!RegExp(r'[A-Z0-9a-z]*').hasMatch(value)) {
        return 'Enter a stronger password';
      }
},
This regular expression checks for capital letters (A-Z), numbers (0-9), and at least one special character.
Now, Your main.dart should look like this:
import 'package:flutter/material.dart';

void main() {
  runApp(MyApp());
}

class MyApp extends StatelessWidget {
  @override
  Widget build(BuildContext context) {
    return MaterialApp(
      title: 'Form validation',
      theme: ThemeData(
        primarySwatch: Colors.blue,
        visualDensity: VisualDensity.adaptivePlatformDensity,
      ),
      home: MyHomePage(title: 'Sign Up'),
    );
  }
}

class MyHomePage extends StatefulWidget {
  MyHomePage({Key key, this.title}) : super(key: key);

  final String title;

  @override
  _MyHomePageState createState() => _MyHomePageState();
}

class _MyHomePageState extends State<MyHomePage> {
  TextEditingController _nameController;
  TextEditingController _emailController;
  TextEditingController _phoneController;
  TextEditingController _passwordController;

  @override
  void initState() {
    super.initState();
    _nameController = TextEditingController();
    _emailController = TextEditingController();
    _phoneController = TextEditingController();
    _passwordController = TextEditingController();
  }

  @override
  Widget build(BuildContext context) {
    return Scaffold(
      appBar: AppBar(
        title: Text(widget.title),
      ),
      body: Center(
        child: Column(
          mainAxisAlignment: MainAxisAlignment.center,
          children: [
            TextFormField(
              controller: _nameController,
              autofillHints: [AutofillHints.name],
              decoration: InputDecoration(
                hintText: 'Name',
              ),
              validator: (value) {
                if (value.isEmpty) {
                  return 'This field is required';
                }
              },
            ),
            SizedBox(
              height: 20,
            ),
            TextFormField(
              controller: _emailController,
              autofillHints: [AutofillHints.email],
              decoration: InputDecoration(
                hintText: 'Email',
              ),
              validator: (value) {
                if (value.isEmpty) {
                  return 'This field is required';
                }
                if (!value.contains('@')) {
                  return "A valid email should contain '@'";
                }
                if (!RegExp(
                  r"^[a-zA-Z0-9.a-zA-Z0-9.!#$%&'*+-/=?^_`{|}~]+@[a-zA-Z0-9]+\.[a-zA-Z]+",
                ).hasMatch(value)) {
                  return "Please enter a valid email";
                }
              },
            ),
            SizedBox(
              height: 20,
            ),
            TextFormField(
              controller: _phoneController,
              autofillHints: [AutofillHints.telephoneNumber],
              decoration: InputDecoration(
                hintText: 'Phone',
              ),
              validator: (value) {
                if (value.isEmpty) {
                  return 'This field is required';
                }
                if (value.length != 10) {
                  return 'A valid phone number should be of 10 digits';
                }
              },
            ),
            SizedBox(
              height: 20,
            ),
            TextFormField(
              controller: _passwordController,
              obscureText: true,
              decoration: InputDecoration(
                hintText: 'Password',
              ),
              validator: (value) {
                if (value.isEmpty) {
                  return 'This field is required';
                }
                if (value.length < 8) {
                  return 'Password should have atleast 8 characters';
                }
                if (!RegExp(r'[A-Z0-9a-z]*').hasMatch(value)) {
                  return 'Enter a stronger password';
                }
              },
            ),
          ],
        ),
      ),
    );
  }
}
Final Steps
Finally, we just need to wrap our column with a Form widget. The Form widget takes a key parameter from which we can get the form’s state.
After the TextEditingController declaration, add the following line:
.
.
TextEditingController _passwordController;

final _formKey = GlobalKey<FormState>();

@override
void initState() {
.
.
Now, we add the _formKey to our Form widget.
body: Form(
        key: _formKey,
        child: Center(
          child: Column(
.
.
.
To check the form state, add a RaisedButton, and call the validate() method to see if all data is correct or not
RaisedButton(
  onPressed: () {
    if (!_formKey.currentState.validate()) {
      return;
    }
    //else make api call
    Scaffold.of(context).showSnackBar(
      SnackBar(
        content: Text('Looks Good!'),
      ),
    );
  },
  child: Text('SUBMIT'),
),
Complete Code Example
The final main.dart file should look like this:
import 'package:flutter/material.dart';

void main() {
  runApp(MyApp());
}

class MyApp extends StatelessWidget {
  @override
  Widget build(BuildContext context) {
    return MaterialApp(
      title: 'Form validation',
      theme: ThemeData(
        primarySwatch: Colors.blue,
        visualDensity: VisualDensity.adaptivePlatformDensity,
      ),
      home: MyHomePage(title: 'Sign Up'),
    );
  }
}

class MyHomePage extends StatefulWidget {
  MyHomePage({Key key, this.title}) : super(key: key);

  final String title;

  @override
  _MyHomePageState createState() => _MyHomePageState();
}

class _MyHomePageState extends State<MyHomePage> {
  TextEditingController _nameController;
  TextEditingController _emailController;
  TextEditingController _phoneController;
  TextEditingController _passwordController;

  final _formKey = GlobalKey<FormState>();

  @override
  void initState() {
    super.initState();
    _nameController = TextEditingController();
    _emailController = TextEditingController();
    _phoneController = TextEditingController();
    _passwordController = TextEditingController();
  }

  @override
  Widget build(BuildContext context) {
    return Scaffold(
      appBar: AppBar(
        title: Text(widget.title),
      ),
      body: Form(
        key: _formKey,
        child: Container(
          padding: EdgeInsets.all(16),
          child: Center(
            child: Column(
              mainAxisAlignment: MainAxisAlignment.center,
              children: [
                TextFormField(
                  controller: _nameController,
                  autofillHints: [AutofillHints.name],
                  decoration: InputDecoration(
                    hintText: 'Name',
                  ),
                  validator: (value) {
                    if (value.isEmpty) {
                      return 'This field is required';
                    }
                  },
                ),
                SizedBox(
                  height: 20,
                ),
                TextFormField(
                  controller: _emailController,
                  autofillHints: [AutofillHints.email],
                  decoration: InputDecoration(
                    hintText: 'Email',
                  ),
                  validator: (value) {
                    if (value.isEmpty) {
                      return 'This field is required';
                    }
                    if (!value.contains('@')) {
                      return "A valid email should contain '@'";
                    }
                    if (!RegExp(
                      r"^[a-zA-Z0-9.a-zA-Z0-9.!#$%&'*+-/=?^_`{|}~]+@[a-zA-Z0-9]+\.[a-zA-Z]+",
                    ).hasMatch(value)) {
                      return "Please enter a valid email";
                    }
                  },
                ),
                SizedBox(
                  height: 20,
                ),
                TextFormField(
                  controller: _phoneController,
                  autofillHints: [AutofillHints.telephoneNumber],
                  decoration: InputDecoration(
                    hintText: 'Phone',
                  ),
                  validator: (value) {
                    if (value.isEmpty) {
                      return 'This field is required';
                    }
                    if (value.length != 10) {
                      return 'A valid phone number should be of 10 digits';
                    }
                  },
                ),
                SizedBox(
                  height: 20,
                ),
                TextFormField(
                  controller: _passwordController,
                  obscureText: true,
                  decoration: InputDecoration(
                    hintText: 'Password',
                  ),
                  validator: (value) {
                    if (value.isEmpty) {
                      return 'This field is required';
                    }
                    if (value.length < 8) {
                      return 'Password should have atleast 8 characters';
                    }
                  },
                ),
                SizedBox(
                  height: 20,
                ),
                RaisedButton(
                  onPressed: () {
                    if (!_formKey.currentState.validate()) {
                      return;
                    }
                    //else make api call
                    showDialog(
                      context: context,
                      child: AlertDialog(
                        content: Text('Looks Good'),
                      ),
                    );
                  },
                  child: Text('SUBMIT'),
                ),
              ],
            ),
          ),
        ),
      ),
    );
  }
}
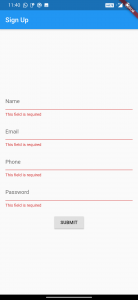
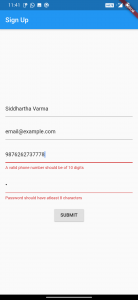
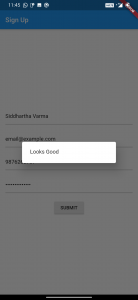
If you run the above code, you should get an app that looks and works as illustrated with the images below.
I hope this Flutter tutorial was of good value to you. If you are interested in learning Flutter, please check other Flutter tutorials on this site. Some of them have video tutorials included.
Happy learning!