This tutorial is the fifth in a series on Reactive Programming in Java and Spring Framework. In this tutorial, we will develop a simple REST API using Spring Web flux. To completely understand this tutorial, it is better to read a previous tutorial first. It would also help to know how to develop a REST Controller using Spring Framework in a Blocking (Non-reactive) way.
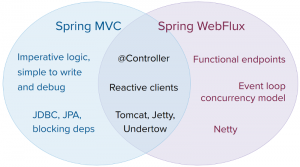
The Web Reactive Stack
The image below from Spring Webflux documentation shows how the Spring Web Reactive Stack is different from and similar to the Spring MVC’s Stack.
Hands-On-Code
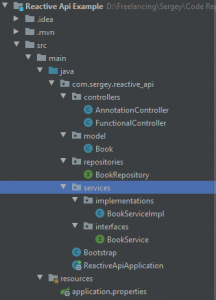
The REST API we will build is a simple CRUD API that will be responsible for interacting with books stored in MongoDB. We will use Maven as a Dependency Management tool. Below is the project structure:
Below is the pom.xml file I used for the project:
<?xml version="1.0" encoding="UTF-8"?>
<project xmlns="http://maven.apache.org/POM/4.0.0" xmlns:xsi="http://www.w3.org/2001/XMLSchema-instance"
         xsi:schemaLocation="http://maven.apache.org/POM/4.0.0 https://maven.apache.org/xsd/maven-4.0.0.xsd">
    <modelVersion>4.0.0</modelVersion>
    <parent>
        <groupId>org.springframework.boot</groupId>
        <artifactId>spring-boot-starter-parent</artifactId>
        <version>2.5.0</version>
        <relativePath/> <!-- lookup parent from repository -->
    </parent>
    <groupId>com.sergey</groupId>
    <artifactId>reactive_api</artifactId>
    <version>0.0.1</version>
    <name>reactive_api</name>
    <description>Demo project for Spring Boot</description>
    <properties>
        <java.version>1.8</java.version>
    </properties>
    <dependencies>
        <dependency>
            <groupId>org.projectlombok</groupId>
            <artifactId>lombok</artifactId>
            <version>1.18.20</version>
        </dependency>
        <dependency>
            <groupId>org.springframework.boot</groupId>
            <artifactId>spring-boot-starter-data-mongodb-reactive</artifactId>
        </dependency>
        <dependency>
            <groupId>org.springframework.boot</groupId>
            <artifactId>spring-boot-starter-webflux</artifactId>
        </dependency>
        <dependency>
            <groupId>de.flapdoodle.embed</groupId>
            <artifactId>de.flapdoodle.embed.mongo</artifactId>
        </dependency>
    </dependencies>
    <build>
        <plugins>
            <plugin>
                <groupId>org.springframework.boot</groupId>
                <artifactId>spring-boot-maven-plugin</artifactId>
            </plugin>
        </plugins>
    </build>
</project>
To reduce configurations, we will use an in-memory MongoDB. This will be provided by the flapdoodle project library.
Model
The Book Entity will be the single entity in the model. For simplicity, we will consider each book to have a single author.
@Document
@Data
@NoArgsConstructor
public class Book {
    @Id
    private String id;
    private String name;
    private String author;

    public Book(String name, String author) {
        this.name = name;
        this.author = author;
    }
}
The Lombok Project has been used to reduce boilerplate code.
Service
I am a big fan of SOLID principles, so we will make everything depend on abstractions. There will be an interface for the service and implementation of this service.
Interface
public interface BookService {
    Mono<Book> getBookById(String id);

    Flux<Book> getAllBooks();

    Mono<Void> deleteBookById(String id);

    Mono<Void> deleteAllBooks();

    Mono<Book> createBook(Book book);

    Mono<Book> updateBook(Book book);
}
Implementation
@Service
public class BookServiceImpl implements BookService {
    private final BookRepository bookRepository;

    public BookServiceImpl(BookRepository bookRepository) {
        this.bookRepository = bookRepository;
    }

    private Book formatBook(Book book) {
        book.setName(book.getName().toLowerCase());
        book.setAuthor(book.getAuthor().toUpperCase());
        return book;
    }

    @Override
    public Mono<Book> getBookById(String id) {
        return bookRepository.findById(id)
                .map(this::formatBook);
    }

    @Override
    public Flux<Book> getAllBooks() {
        return bookRepository.findAll().map(this::formatBook);
    }

    @Override
    public Mono<Void> deleteBookById(String id) {
        return bookRepository.deleteById(id);
    }

    @Override
    public Mono<Void> deleteAllBooks() {
        return bookRepository.deleteAll();
    }

    @Override
    public Mono<Book> createBook(Book book) {
        if (book.getId() != null) {
            return Mono.error(new IllegalArgumentException("Id of New Book Must be Null"));
        }
        return bookRepository.save(book);
    }

    @Override
    public Mono<Book> updateBook(Book book) {
      return  bookRepository.existsById(book.getId())
                .flatMap(isExisting ->{
                    if (isExisting) {
                        return bookRepository.save(book);
                    } else {
                        return Mono.error(new IllegalArgumentException("The Book Id must exist for Update To Occur"));
                    }
                });
    }
}
More logic may be added in the implementation class if required.
Rest Controller
When using Spring Webflux, there are two ways to make a controller:
1) Using annotations as in Spring MVC.
This is the simplest method for those with a strong Spring MVC background. Below is the Controller class with all the CRUD methods:
@RestController
@RequestMapping("/v1/annotated/books")
public class AnnotationController {
    private final BookService bookService;

    public AnnotationController(BookService bookService) {
        this.bookService = bookService;
    }

    @GetMapping
    public Flux<Book> getAllBooks() {
        return bookService.getAllBooks();
    }
    @GetMapping("/{id}")
    public Mono<Book> getBookById(@PathVariable String id) {
        return bookService.getBookById(id);
    }

    @PostMapping
    @ResponseStatus(HttpStatus.CREATED)
    public Mono<Book> createBook(@RequestBody Book book) {
        return bookService.createBook(book);
    }

    @PutMapping
    public Mono<Book> updateBook(@RequestBody Book book) {
        return bookService.updateBook(book);
    }

    @DeleteMapping("/{id}")
    public Mono<Void> deleteBookById(@PathVariable String id) {
        return bookService.deleteBookById(id);
    }

    @DeleteMapping
    public Mono<Void> deleteAllBooks() {
        return bookService.deleteAllBooks();
    }
}
2) Using functional endpoints
These endpoints are created using the functional programming style. This means it heavily makes use of lambda expressions. Also, this method is more lightweight than the annotations method, as it uses the same Reactive Core Foundation. It uses a functional programming model in which functions are used to route and handle requests.
@Configuration
@EnableWebFlux
public class FunctionalController {
    private static String BASE_URL = "/v1/functional/books";
    private final BookService bookService;

    public FunctionalController(BookService bookService) {
        this.bookService = bookService;
    }

    @Bean
    public RouterFunction<ServerResponse> getAllBooks() {
        return RouterFunctions.route()
                .GET(BASE_URL, request -> ServerResponse.ok().body(bookService.getAllBooks(), Book.class)).build();
    }

    @Bean
    public RouterFunction<ServerResponse> getBookById() {
        return RouterFunctions.route()
                .GET(BASE_URL.concat("/{id}"), request -> {
                    String id = request.pathVariable("id");
                    return ServerResponse.ok().body(bookService.getBookById(id), Book.class);
                }).build();
    }

    @Bean
    public RouterFunction<ServerResponse> createBook() {
        return RouterFunctions.route()
                .POST(BASE_URL, request -> request.bodyToMono(Book.class)
                        .flatMap(bookService::createBook)
                        .flatMap(book -> ServerResponse.status(HttpStatus.CREATED)
                                .body(book, Book.class))).build();
    }

    @Bean
    public RouterFunction<ServerResponse> updateBook() {
        return RouterFunctions.route()
                .PUT(BASE_URL, request -> request.bodyToMono(Book.class)
                        .flatMap(bookService::updateBook)
                        .flatMap(book -> ServerResponse.ok()
                                .body(book, Book.class))).build();
    }

    @Bean
    public RouterFunction<ServerResponse> deleteBookById() {
        return RouterFunctions.route()
                .DELETE(BASE_URL.concat("/{id}"), request -> {
                    String id = request.pathVariable("id");
                    return ServerResponse.ok().body(bookService.deleteBookById(id), Void.class);
                }).build();
    }

    @Bean
    public RouterFunction<ServerResponse> deleteAllBooks() {
        return RouterFunctions.route()
                .DELETE(BASE_URL, request -> ServerResponse.ok()
                        .body(bookService.deleteAllBooks(), Void.class)).build();
    }
}
The RouterFunction Class represents the main entry point of a request when we use the functional style. It takes a request and returns a response wrapped in the ServerResponse Class. It can be seen as the equivalent of the request mappings and their associated methods when using the annotated style. The RouterFunctions Class is one that is used to build RouterFunctions using the builder pattern. We use it to give the structure of the request and how the request will be used to form the response. You can refer to the part of the Webflux Documentation on RouterFunctions to have more in-depth knowledge of how it works.
Testing
You can test the application by adding a Bootstrap class that will load some data into the Database and later use Postman or any similar tool to test the different endpoints.
@Component
@Slf4j
public class Bootstrap implements CommandLineRunner {
    private final BookRepository bookRepository;

    public Bootstrap(BookRepository bookRepository) {
        this.bookRepository = bookRepository;
    }

    @Override
    public void run(String... args) throws Exception {
        Book book1 = new Book("Docker In Action", "Florian Lowe");
        Book book2 = new Book("Java Best Practices", "Sergey");
        Book book3 = new Book("Reactive Programming in C#", "Satoshi Nakamoto");

        bookRepository.saveAll(Arrays.asList(book1, book2, book3))
                .subscribe(book -> log.info("Save Books with Name: {}", book.getName()));
    }
}
Conclusion
This marks the end of this tutorial. You can now use Spring Webflux to work on your different projects. Hope this has been helpful to you. See you in the following tutorial.