In this tutorial, you will learn to design and run in a Docker container a simple Spring Boot application that uses MongoDB.
To learn more about Docker, please check Docker Tutorials page.
Overview
Docker is becoming an increasingly important tool in the DevOps process. It allows you to package an application, along with all its dependencies into a so-called container, and then run it in any environment. We will see how to create a Docker image of the Spring Boot application and walk through the basic Docker commands.
Docker Basics
The idea behind containerization is that it simplifies and automates the deployment of applications and their dependencies. In the end, all containers are launched in the same way, regardless of what is inside.
Docker is a tool designed to make it easier to create, deploy, and run applications by using containers. Containers allow a developer to package up an application with all of the parts it needs, such as libraries and other dependencies, and ship it all out as one package.
Reason to dockerize your application:
- Mobility: Containers can run your application anywhere irrespective of the host operating system.
- Scalability: Multiple instances of the containerized image can be deployed on the same machine based on application/API load.
- Faster Delivery: Docker images make it easy to put new versions of software and deploy them to production
- Best for Microservice Architecture: Docker images are lightweight, portable, and self-contained hence best suited for next-gen cloud-native architecture.
As an example, we will develop a simple REST-based Spring Boot application and then create a Docker image based on it, and deploy a container to a local machine.
Preparation:
- JDK 1.8
- Intellij Idea for IDE
- Maven
- SpringBoot Application
- Lombok plugin
- Docker Desktop
This tutorial has the following steps for better understanding:
- Creating a Basic Spring Boot Application,
- Building a Docker file,
- Creating a Docker image,
- Running the MongoDB Container,
- Running the Spring Application Container.
Step 1: Creating a Basic Spring Boot Application
Before starting with Docker, we will create a simple REST API in the Spring Boot application. The application aims to provide us CRUD functionality via REST API with MongoDB. Later we will migrate the application execution environment and database in Docker Container.
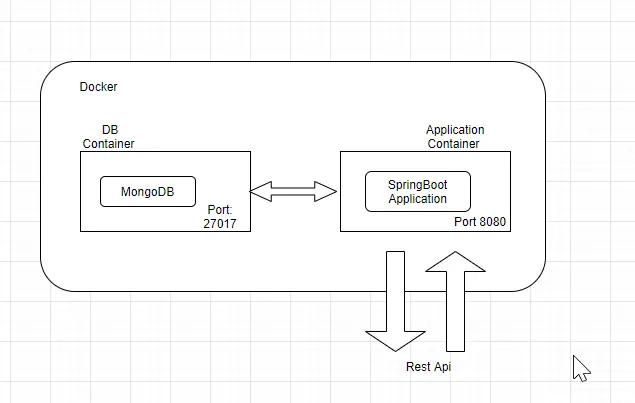
Our application architecture will be as follow:
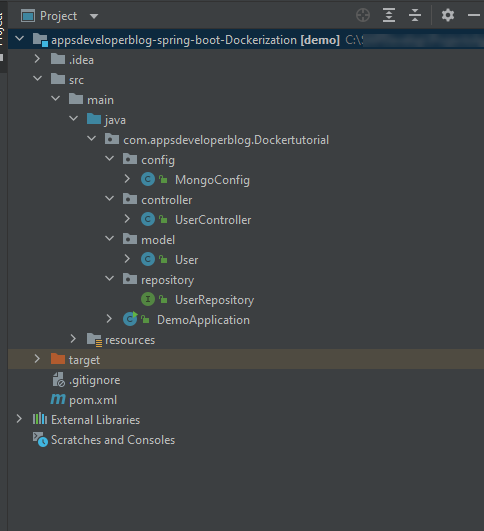
You can use the Spring Initializr page to create an initial project template. After importing the project into IDE, we will be creating the following sub-packages inside our main package ‘com.appsdeveloperblog.DockerTutorial‘ :
- Config: This package contains a configuration class with the filename ‘config.java’
- Controller: This package contains class ‘UserController‘ with filename ‘UserController.java’
- Model: This package contains user POJO structure with filename ‘User.java’
- Repository: The package contains MongoRepository interface implementation
In the end, the final project structure will look like this:
In the following sections, we will learn about each section in detail.
Maven Dependencies
The complete pom.xml file will be as below −
<?xml version="1.0" encoding="UTF-8"?>
<project xmlns="http://maven.apache.org/POM/4.0.0" xmlns:xsi="http://www.w3.org/2001/XMLSchema-instance"
         xsi:schemaLocation="http://maven.apache.org/POM/4.0.0 https://maven.apache.org/xsd/maven-4.0.0.xsd">
    <modelVersion>4.0.0</modelVersion>
    <parent>
        <groupId>org.springframework.boot</groupId>
        <artifactId>spring-boot-starter-parent</artifactId>
        <version>2.5.5</version>
        <relativePath/> <!-- lookup parent from repository -->
    </parent>
    <groupId>com.appsdeveloperblog.DockerTutorial</groupId>
    <artifactId>Spring-boot-custom-JSON</artifactId>
    <version>0.0.1-SNAPSHOT</version>
    <name>SpringBoot Docker Tutorial</name>
    <description>SpringBoot Docker Tutorial</description>

    <properties>
        <java.version>11</java.version>
        <maven.compiler.source>1.8</maven.compiler.source>
        <maven.compiler.target>1.8</maven.compiler.target>
    </properties>
    <dependencies>
        <dependency>
            <groupId>org.springframework.boot</groupId>
            <artifactId>spring-boot-starter-web</artifactId>
        </dependency>
        <dependency>
            <groupId>org.springframework.boot</groupId>
            <artifactId>spring-boot-starter-data-mongodb</artifactId>
        </dependency>
        <dependency>
            <groupId>org.projectlombok</groupId>
            <artifactId>lombok</artifactId>
            <version>1.18.22</version>
        </dependency>
    </dependencies>
    <build>
        <plugins>
            <plugin>
                <groupId>org.springframework.boot</groupId>
                <artifactId>spring-boot-maven-plugin</artifactId>
            </plugin>
        </plugins>
    </build>
</project>
Model Class
package com.appsdeveloperblog.Dockertutorial.model;


import lombok.AllArgsConstructor;
import lombok.Getter;
import lombok.Setter;
import org.springframework.data.annotation.Id;
import org.springframework.data.mongodb.core.mapping.Document;

@Document
@Getter
@Setter
@AllArgsConstructor
public class User {
    @Id
    private int id;
    private String firstName;
    private String lastName;

}
Controller Class
In this class, we will be annotating it with @RestController annotation, hence it will handle our web requests like GET /users for retrieving user lists from MongoDB. The complete code for the UserController.java file is as follow −
package com.appsdeveloperblog.Dockertutorial.controller;

import com.appsdeveloperblog.Dockertutorial.model.User;
import com.appsdeveloperblog.Dockertutorial.repository.UserRepository;
import org.springframework.beans.factory.annotation.Autowired;
import org.springframework.web.bind.annotation.*;
import java.util.List;

@RestController
public class UserController {
    @Autowired
    UserRepository userRepository;

    @GetMapping("/users")
    public List<User> list() {
        return userRepository.findAll();
    }
}
MongoRepository Class
This class extends the MongoRepository interface, as we are using MongoDB for persisting data. Hence, MongoRepository will by default provides us with generic methods like save(), findAll(), insert(), etc.
The complete code for the UserRepository.java file is as follow −
package com.appsdeveloperblog.Dockertutorial.repository;

import com.appsdeveloperblog.Dockertutorial.model.User;
import org.springframework.data.mongodb.repository.*;


public interface UserRepository extends MongoRepository<User, Integer> {
}
Config Class
The class is annotated with the @Configuration annotation, here we implement the CommandLineRunner and this class provides have methods to perform CRUD operations on the configured database and collection. We will insert two test records in our MongoDB collection at the start of the application.
The complete code for the MongoConfig.java file is as follow −
package com.appsdeveloperblog.Dockertutorial.config;


import com.appsdeveloperblog.Dockertutorial.model.User;
import com.appsdeveloperblog.Dockertutorial.repository.UserRepository;
import org.springframework.boot.CommandLineRunner;
import org.springframework.context.annotation.Bean;
import org.springframework.context.annotation.Configuration;
import org.springframework.data.mongodb.repository.config.EnableMongoRepositories;

@EnableMongoRepositories(basePackageClasses = UserRepository.class)
@Configuration
public class MongoConfig {
    @Bean
    CommandLineRunner commandLineRunner(UserRepository userRepository) {
        return strings -> {
            userRepository.save(new User(1, "Calvin", "Ryan"));
            userRepository.save(new User(2, "Bryson", "Reid"));
        };
    }
}
Resources
Inside the resources package, we will create our application.properties which will contain MongoDB connection parameters. As we will be running our MongoDB instance as a separate container hence our host will be ‘host.docker.internal‘ via which we will access the application container will access MongoDB service on another container.
spring.data.mongodb.host=host.docker.internal
spring.data.mongodb.port=27017
Step 2: Creating a Docker file
Firstly, we create a file with the name Dockerfile at the root of our project structure with the contents shown below.
FROM openjdk:11
ARG JAR_FILE=target/*.jar
COPY ${JAR_FILE} app.jar
EXPOSE 8080
ENTRYPOINT ["java","-jar","/app.jar"]
A Dockerfile is a plain text file that contains a list of commands that the Docker client runs while creating an image. Let’s go line by line to understand what each step is doing.
FROM – FROM instruction specifies the underlying OS architecture from which you build the image. For example, we choose OpenJDK version 11 as the base image on which our application image is built.
ARG – This sets the path to the jar file which is generated by Maven build.
COPY- This copy copies the jar file created after running the maven build to the app.jar file inside the docker container.
EXPOSE – Define which container ports to expose to the outside world
ENTRYPOINT: This allows you to configure a container that will run as an executable. Basically, this will execute the specified command once an image is deployed and the container is up.
Step 3: Building a Docker image
First, we will build our application locally using a maven build. It will package the application into a jar file.
mvn clean install
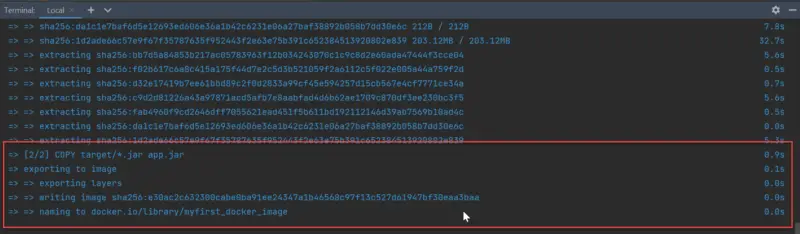
After receiving the build success message, we will be build a Docker image of our application by using the below command:
docker build -t myfirst_docker_image .
Subsequently, you should see similar output on the console window if everything goes fine.
This can also be confirmed, if the build is successful or not by using the below command. It should display the image information with the hash of the image.
docker images | grep "myfirst"

Step 4: Running the MongoDB Container
But, before we start running our application on the Docker container. We need to run our dependent database container i.e. MongoDB as well. To set up the MongoDB container the following steps are needed.
First, we will pull the latest MongoDB image from the Docker repository using the below command.
docker pull mongo
Although, the above command will give you the latest current released image. But, if you are interested in a specific version then you can use the below command.
docker pull mongo:4.0.4
(In this example, we will stick to the latest version of MongoDB. )
It may take a moment to download the complete image, but when it is done, we have an image that is ready to use.
Next, we need to run the downloaded image. In order to run Mongo image, we use the following command:
docker run -d --name mongo-on-docker -p 27017:27017 mongo
Let understand the command a bit,
-drun the container in the background so that we are free to use the current terminal instance.--name mongo-on-dockerdefines a friendly name for the container.-p 27017:27017declares that the local port 27017 is mapped to the container internal 27017 port.mongothis signifies the name of the image to run
Once the container is up and running, it exposes MongoDB service on port 27017.
Step 5: Running the Spring Application Container
As we already created the docker image in step 3, now we will run the image using the below command:
docker run -d --name springapplication-on-docker -p 8080:8080 myfirst_docker_image
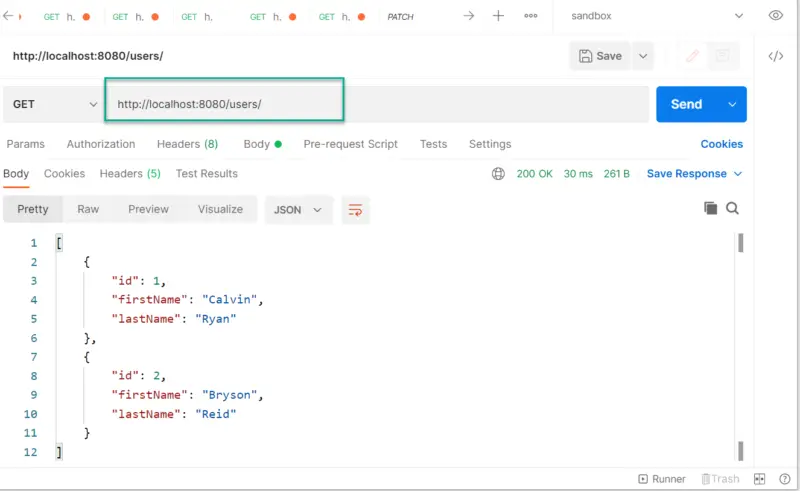
Once the container is up and running, it exposes port 8080 on which our spring boot service is running. We can now execute GET URL http://localhost:8080/users either on browser or Postman.
As expected, your application will be available on http://localhost:8080/users and it successfully retrieves the list of users from MongoDB.
We can also view the logs for our application in docker using the following steps.
First, we need to find the container id on which our service is running. This we can get via the following command
docker container ls -a
Now, we will execute log query
docker logs <ContainerID>
This way we can get a complete log of our application as well.
Conclusion
Although, there are many ways to create docker images. In this tutorial, we learned one of the ways to create a docker image from a simple Spring Boot project using the docker command. As a result, we learned how to run a container and tested the REST endpoint inside this image. I hope you enjoyed it. Happy learning !!
very gooood