In this tutorial, you will learn how to create a DatePicker in Flutter. You can use DatePicker in your app to present the user with a Calendar view. Users can then use this calendar view to either select one of the dates on the calendar or simply check the selected date.
If you are interested in Flutter video tutorials, check this playlist: Flutter Video Tutorials. Also, there is a large collection of code examples if you check Flutter tutorials page.
1. Create DateTime Variable
To present DatePicker with a current date selected on it, we will first need to get the current date value. We will use this current date value when creating a DatePicker object.
To get the current date in Flutter we use the DateTime object and then call it’s now() function.
DateTime currentDate = DateTime.now();
With the above code example, we have declared a new currentDate object of DateTime data type and we will use it when creating an instance of DatePicker. The value of currentDate will be relevant to the user’s geographical region.
2. Creating Function To Show DatePicker
Below is a basic code to create a new DatePicker in Flutter. To create a DatePicker in Flutter we use an asynchronous showDatePicker() function.
The _selectDate() method below, will call the showDatePicker() and will wait until the user selects the date. If the user presses the Cancel button then the showDatePicker() will return null otherwise, it will return the DateTime object representing the value selected on the Calendar.
Future<void> _selectDate(BuildContext context) async {
  final DateTime pickedDate = await showDatePicker(
      context: context,
      initialDate: currentDate,
      firstDate: DateTime(2015),
      lastDate: DateTime(2050));
  if (pickedDate != null && pickedDate != currentDate)
    setState(() {
      currentDate = pickedDate;
    });
}
The showDatePicker() function takes in a few parameters:
- initialDate – is a date value that will be selected when the Calendar is presented. Here we use the currentDate object that we have created in the very first code snippet above.
- firstDate – will contain the minimum date that the user can select. For example, if you have set it to 2002 then the user can’t select a date before 2002.
- lastDate – is the opposite of to firstDate it will contain the last date which the user can select. For example, if you have set it to 2050 then the user can’t select after 2050.
3. Setting Up The UI
Now, that you know how to create a DatePicker in Flutter, let’s see how we can display it to the user.
Most of the time date picker is presented when the user taps on a button. Below is a very simple code example, that displays a button in the center of the screen. When the user taps on a button, it will call the _selectDate() function. The _selectDate() function will create and display the DatePicker.
Scaffold(
      appBar: AppBar(
        title: Text("DatePicker"),
      ),
      body: Center(
        child: Column(
          mainAxisSize: MainAxisSize.min,
          children: <Widget>[
            Text(currentDate.toString()),
            SizedBox(
              height: 20.0,
            ),
            RaisedButton(
              onPressed: () => _selectDate(context),
              child: Text('Select date'),
            ),
          ],
        ),
      ),
    );
Once user has selected the date on the calendar, the calendar will disappear and the selected date will be set to a Text() widget that is located next to a button.
The Text widget has the value of currentDate. If the user has not yet picked the Date then it will show the current date. If the user has selected the date then the _selectDate() function will return the selected date and the Text widget will be updated with the selected date.
Complete Code Example
Below is a complete code example that uses all the code snippets we have created in this tutorial.
import 'dart:async';
import 'package:flutter/material.dart';

void main() => runApp(MyApp());

class MyApp extends StatelessWidget {
  @override
  Widget build(BuildContext context) {
    return MaterialApp(
      title: 'Flutter Demo',
      home: MyHomePage(),
    );
  }
}

class MyHomePage extends StatefulWidget {
  @override
  _MyHomePageState createState() => _MyHomePageState();
}

class _MyHomePageState extends State<MyHomePage> {
  DateTime currentDate = DateTime.now();

  Future<void> _selectDate(BuildContext context) async {
    final DateTime pickedDate = await showDatePicker(
        context: context,
        initialDate: currentDate,
        firstDate: DateTime(2015),
        lastDate: DateTime(2050));
    if (pickedDate != null && pickedDate != currentDate)
      setState(() {
        currentDate = pickedDate;
      });
  }

  @override
  Widget build(BuildContext context) {
    return Scaffold(
      appBar: AppBar(
        title: Text("DatePicker"),
      ),
      body: Center(
        child: Column(
          mainAxisSize: MainAxisSize.min,
          children: <Widget>[
            Text(currentDate.toString()),
            RaisedButton(
              onPressed: () => _selectDate(context),
              child: Text('Select date'),
            ),
          ],
        ),
      ),
    );
  }
}
If you use this code example to build and run an app, it will look and work as illustrated with the images below.
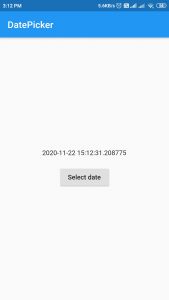 Displays user’s current date and the button to present DatePicker.
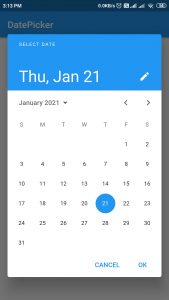
Displays calendar view to let users select the date.
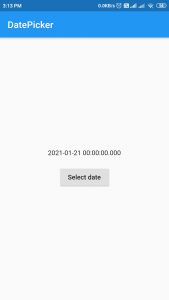
Once the user selects the date on the calendar, the calendar will disappear and the selected date will be displayed in the Text Widget.
I hope this Flutter tutorial is helpful to you. If you are interested in learning Flutter, please check other Flutter tutorials on this site. Some of them have video tutorials included.
Happy learning!