In this tutorial, you will learn how to programmatically create a UITextField in Swift. It will be a short tutorial with a very simple code example, but it will cover all the following:
- Create UITextField of specific height and width,
- Position UITextField at the center of the view,
- Set UITextField backgroundColor,
- Set UITextField textColor,
- Set UITextField UITextBorderStyle,
- Add UITextField as a subview,
- Set UITextField placeholder text,
- Set UITextField sample text.
A UITextField is a control that displays editable text and sends an action message to a target object when the user presses the return button. UITextField inherits from UIView and conforms to the UIKeyInput protocol, which allows it to receive keyboard input.
If you are interested in video lessons on how to write Unit tests and UI tests to test your Swift mobile app, check out this page: Unit Testing Swift Mobile App
Step 1: Create a UITextField of Specific Height and Width
To create a UITextField, you use the UITextField(frame:) initializer, which creates a UITextField with a specific frame (position and size). Here’s how you can do it:
let myTextField: UITextField = UITextField(frame: CGRect(x: 0, y: 0, width: 300.00, height: 30.00))
In the code snippet above, I created a UITextField named myTextField with a width of 300 pixels and a height of 30 pixels.
Step 2: Position the UITextField at the Center of the View
To position the UITextField at the center of the view, you can set the center property of the UITextField to the center of the view:
myTextField.center = self.view.center
This line of code positions the UITextField in the center of the view.
Step 3: Set UITextField Placeholder Text
The placeholder text is a hint to the user about what kind of input should be entered in the text field. It disappears when the user starts typing in the text field. You can set the placeholder text using the placeholder property:
myTextField.placeholder = "Placeholder text"
In the code snippet above, I set the placeholder text of the UITextField to “Placeholder text”.
Step 4: Set Sample Text to UITextField
You can set the sample text of the UITextField using the text property:
myTextField.text = "UITextField example"
In the code snippet above, I set the sample text of the UITextField to “UITextField example”.
Step 5: Set UITextField Border Style
The border style of a UITextField determines how the text field’s border looks. You can set the border style using the borderStyle property:
myTextField.borderStyle = UITextField.BorderStyle.line
In the code snippet above, I set the border style of the UITextField to a line.
Step 6: Set UITextField Background Color
The background colour of a UITextField determines the color of the area behind the text field. You can set the background color using the backgroundColor property:
myTextField.backgroundColor = UIColor.white
In the code snippet above, I set the background colour of the UITextField to blue.
Step 8: Add UITextField as a Subview
Finally, to display the UITextField on the screen, you need to add it as a subview to a parent view. You can do this using the addSubview(_:) method of the parent view:
self.view.addSubview(myTextField)
In the code snippet above, I added the UITextField as a subview to the parent view (self.view).
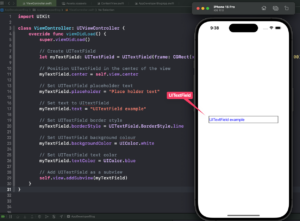
Complete code to create a UITextField programmatically
Let’s create a simple iOS app that uses all the above code snippets. I think it will be helpful to see how it all works when put together as a simple iOS app.
import UIKit

class ViewController: UIViewController {
    override func viewDidLoad() {
        super.viewDidLoad()

        // Create UITextField
        let myTextField: UITextField = UITextField(frame: CGRect(x: 0, y: 0, width: 300.00, height: 30.00))

        // Position UITextField in the center of the view
        myTextField.center = self.view.center

        // Set UITextField placeholder text
        myTextField.placeholder = "Place holder text"

        // Set text to UItextField
        myTextField.text = "UITextField example"

        // Set UITextField border style
        myTextField.borderStyle = UITextField.BorderStyle.line

        // Set UITextField background colour
        myTextField.backgroundColor = UIColor.white

        // Set UITextField text color
        myTextField.textColor = UIColor.blue

        // Add UITextField as a subview
        self.view.addSubview(myTextField)
    }
}
In this code, I override the viewDidLoad() method, which is called after the controller’s view is loaded into memory. Inside this method, I created a UITextField, configured its properties, and added it as a subview to the view controller’s view.
Conclusion
I hope this tutorial was helpful to you.
Depending on your specific requirements, you might need to add more configurations or handle more events. Also, keep in mind that UITextField is a subclass of UIView, so you can apply the same principles to other types of views as well.
As you continue developing your Swift and iOS development skills, you’ll come across more complex scenarios. To learn more about Swift and find other helpful code examples and tutorials, check the Swift Code Examples page.
If you are interested in video lessons on how to write Unit tests and UI tests to test your Swift mobile app, check out this page: Unit Testing Swift Mobile App