In this guide, you will learn to use @RepeatedTest and @ParametrizedTest annotations introduced in JUnit 5. We’ll look at the capability that lets us run a test a certain number of times. We’ll also look at interfaces that will allow us to retrieve information about the repeated tests. Moreover, we will also look at a feature that allows us to repeat the same test with different parameters and learn how to use different types of argument sources. So, let’s begin!
For video lessons, check “Testing Java with JUnit and Mockito” page.
Introduction of JUnit 5
The JUnit framework is a popular test automation framework for unit testing in Java. The JUnit 5 also known as Jupiter, the most recent version of JUnit has many enhancements over JUnit 4. Among the many, new and helpful annotations in JUnit 5, @RepeatedTest and @ParametrizedTest are the most powerful.
With this, we know that both of these annotations are a “must know” for any Java software engineers, as well as Automation Engineers working on web applications because they make it easier to test your application code.
Let’s assume you have a Maven, Spring Boot Project. Refer to this article for more details.
To begin with, add the following dependencies into your Maven project:
<dependency>
     <groupId>org.junit.jupiter</groupId>
     <artifactId>junit-jupiter-api</artifactId>
     <version>5.8.2</version>
     <scope>test</scope>
 </dependency>
The above-mentioned dependency imports the @RepeatedTest annotation and supporting classes.
<dependency>
    <groupId>org.junit.jupiter</groupId>
    <artifactId>junit-jupiter-params</artifactId>
    <version>5.8.2</version>
    <scope>test</scope>
</dependency>
The above-mentioned dependency imports the @ParametrizedTest annotation and supporting classes.
@RepeatedTest Annotation
As per the official documentation:
“JUnit Jupiter provides the ability to repeat a test a specified number of times by annotating a method with @RepeatedTest and specifying the total number of repetitions desired.”
Since each invocation of the test case is treated as a regular @Test method in JUnit 5, it supports the same lifecycle callbacks and extensions.
Usage of @RepeatedTest Annotation Based on a Scenario
Consider the case of an online live streaming platform. When a user logs in to the web application and selects the “Channels” tab, an exception is thrown with the message “Web page not available.”
The user repeats the steps three times and encounters the same error, but on the fourth attempt, it works. The development team and the client are both aware of this environmental issue. In such a case, we could make use of the @RepeatedTest annotation to handle clicking on the Channel page four times and then proceed with other tests without failing. This was one of the examples but in the same way, we often encounter use-cases in different software applications to utilize @RepeatedTest annotation.
Syntax
@RepeatedTest(10)
void repeatedTest() {
// ...
}
- Mark a test with @RepeatedTest annotation instead of a @Test annotation.
- Pass a number as an input argument to the annotation that represents the number of executions of the test.
Rules
- The methods with the @RepeatedTest annotation cannot be static.
- The methods with the @RepeatedTest annotation cannot be private.
- The return type of the methods annotated with the @RepeatedTest should be void.
Examples
1. With Integer Value as an Argument
The simplest way of using the annotation is to pass an integer value as an argument. The following example demonstrates the usage of the annotation:
@RepeatedTest(5)
public void testRepeatedTest() {
    System.out.println("Hello World");
}
As per expectations, the output of the above test shows that the annotated method runs 5 times:
Hello World
Hello World
Hello World
Hello World
Hello World
The following snapshot displays the execution of the method five times:

2. With Display Name Pattern as an Argument
The @RepeatedTest annotation also supports another argument to configure a custom display name. To understand the usage better, let’s try to understand the following three placeholders supported:
- {displayName}: It displays the annotated method name.
- {currentRepetition}: It returns the current repetition count.
- {totalRepetitions}: It returns the total number of repetitions.
The following examples demonstrate the usage of the display name patterns:
1. SHORT_DISPLAY_NAME
Annotation uses SHORT_DISPLAY_NAME as the default placeholder. The default display name for repetition is determined by the pattern:
"repetition {currentRepetition} of {totalRepetitions}."
The following code snippet shows how to set a short display name pattern in the @RepeatedTest:
@RepeatedTest(value = 5, name = SHORT_DISPLAY_NAME)
public void repeatedTestWithShortDisplayName() {
    System.out.println("Hello World");
}
The output window snapshot is shown below:

2. LONG_DISPLAY_NAME
JUnit displays the following pattern when it is used:
repetition 'currentRepetition' of 'totalRepetitions' (displayName)
The following code snippet shows how to set a long display name pattern in the @RepeatedTest:
@RepeatedTest(value = 5, name = LONG_DISPLAY_NAME)
public void repeatedTestWithLongDisplayName() {
    System.out.println("Hello World");
}
The output window snapshot is shown below:

3. Custom Display Name
We can customize the display patterns by using the placeholders defined earlier. The following example demonstrates the usage:
@RepeatedTest(value = 5, name = "{displayName} {currentRepetition}/{totalRepetitions}")
@DisplayName("Repeating..")
void repeatedTestWithCustomDisplayName() {
   System.out.println("Hello World");
}
In the above example, we have used @DisplayName annotation to override the default method name by the name provided in the annotation @DisplayName(“Repeating..”).
The JUnit tab displays the following output as shown in the snapshot below:

Interfaces supported by @RepeatedTest
TestInfo
TestInfo is an interface that retrieves information about a test method, whether it’s a @Test, @RepeatedTest, parameterized test, or a lifecycle callback function marked with @BeforeEach, @AfterEach, @BeforeAll, @AfterAll annotation.
It supports the following methods:
- TestInfo.getDisplayName(): It returns the display name of the test which is invoked.
- TestInfo.getTags(): It returns the associated tags with the test method.
- TestInfo.getTestClass(): It returns the name of the class inside which the test method is placed.
- TestInfo.getTestMethod(): It returns the name of the test method.
The following code demonstrates the usage of the methods discussed above:
@RepeatedTest(value = 1)
public void testInfo(TestInfo testInfo) {
    System.out.println("Test Info Details:");
    System.out.println("Display name:  " + testInfo.getDisplayName());
    System.out.println("Tag:" + testInfo.getTags());
    System.out.println("Test method  name: " + testInfo.getTestMethod().get().getName());
    System.out.println("Test class  name: " + testInfo.getTestClass().get().getName());
}
The output of the above test is as follows:
Test Info Details:
Display name: repetition 1 of 1
Tag:[]
Test method name: testInfo
Test class name: demoTestClass
RepetitionInfo
RepetitionInfo is an interface that retrieves information about the test method’s repetition. The interface comes with the following two methods:
- RepetitionInfo.getCurrentRepetition() : It returns the current repetition of the @RepeatedTest method.
- RepetitionInfo.getTotalRepetitions() : It returns the total count of repetitions of @RepeatedTest method.
The following code demonstrates how we can use functions provided by the interface:
@RepeatedTest(value = 1)
public void repeationInfo(RepetitionInfo repetitionInfo) {
    System.out.println("Repetition Info Details:");
    System.out.println("Current Repetition:  " + repetitionInfo.getCurrentRepetition());
    System.out.println("Total Repetitions:" + repetitionInfo.getTotalRepetitions());
}
The output of the above test is as follows:
Repetition Info Details:
Current Repetition:  1
Total Repetitions:1
@ParameterizedTest
As per the official documentation:
“Parameterized tests run a test multiple times with different arguments.”
Usage of @Parametrized annotation based on a scenario
When we wish to run the same test with different sets of parameters, we may use the @ParametrizedTest annotation. To see if a student passes an exam, we have created a test method that evaluates the criteria for passing an exam. To compile results, we need to run the same test for all the students of a particular class. In this case, we can pass a list of Students as an argument to a single test, which will run for all students. This was one of the examples, but we see a wide range of applications of the @ParametrizedTest annotation for all software applications as it gives us leverage to test flow with a wide range of input values.
Possible Sources of Arguments
As per the definition, we pass different input values as arguments to the test method. JUnit offers a variety of ways to pass arguments to the method body. Let’s have a look at them:
@ValueSource
It is the simplest form of providing value source to the @ParametrizedMethod. It only allows you to provide a single argument per parameterized test invocation and allows you to specify a single array of literal values. The following types of literal values are supported by the annotation @ValueSource:
- short
- byte
- int
- long
- float
- double
- char
- boolean
- java.lang.String
- java.lang.Class
It works well with the Wrapper classes as well. The following code snippet demonstrates the usage of the @ValueSource annotation:
@ParameterizedTest
@ValueSource(ints = { 1, 2, 3 })
void testParametrizedMethodWithInt(int argument) {
    int x = 5;
    int sum = 0;
    sum = x + argument;
    System.out.println(sum);
}
The output of the above test case is shown below:
6
7
8
Let’s have a look with the same values source and test body, but with the argument type as Integer.
@ParameterizedTest
@ValueSource(ints = { 1, 2, 3 })
void testMethodWithAutoboxing(Integer argument) {
    int x = 5;
    int sum = 0;
    sum = x + argument;
    System.out.println(sum);
}
The results of the above test are displayed below:
6
7
8
@NullSource
It provides a single null argument to the annotated @ParameterizedTest method. It works well with all arguments of wrapper class type. The following test demonstrates the functionality:
@ParameterizedTest
@NullSource
void testParametrizedMethodNullSource(String argument) {
    assertTrue(argument == null);
}
It is not possible to use @NullSource with the argument type as primitive.
@EmptySource
It sends a single empty parameter to the @ParameterizedTest methods of the following types:
- java.lang.String
- java.util.List
- java.util.Set
- java.util.Map
- primitive arrays
- object arrays
The below example demonstrates the use of the @EmptySource in the Parametrized Test method:
@ParameterizedTest
@EmptySource
void testParametrizedMethodEmptySource(String argument) {
    assertTrue(StringUtils.isBlank(argument));
}
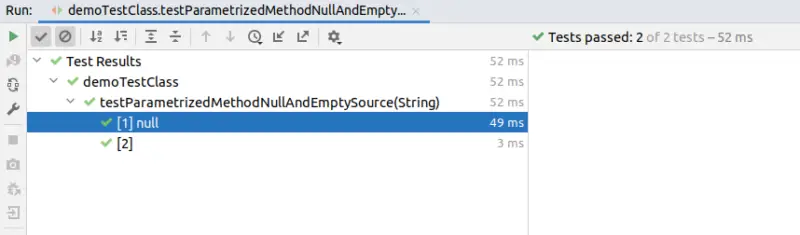
@NullAndEmptySource
It combines @NullSource and @EmptySource features. The test method will be called twice in this example, once with a null value and once with an empty value.
@ParameterizedTest
@NullAndEmptySource
void testParametrizedMethodNullAndEmptySource(String argument) {
    assertTrue(StringUtils.isBlank(argument));
}
As per the expectations, the test ran two times, one with the null argument and the other with the empty string.
@EnumSource
It allows us to use Enum constants more easily. The test method will be called one by one for each enum constant. The test method shown below will be called four times in this example, once for each enum constant. For the demonstration purpose, we have created an enum for OrderStatus:
enum OrderStatus {
    ACTIVE, IN_PROCESS, SHIPPED, DELIVERED
}
Now, in the ParametrizedTest we have used the above enum as the @EnumSource:
@ParameterizedTest
@EnumSource(OrderStatus.class)
void testParametrizedMethodEnumSource(OrderStatus orderStatus) {
    System.out.println(orderStatus.toString());
}
The following snapshot shows that the test case is repeated four times with the arguments of the OrderStatus enum values.

@MethodSource
@MethodSource is an ArgumentsSource that provides access to values returned from factory methods in the class where this annotation is declared, as well as static factory methods in external classes referenced by fully qualified method name. The factory method must generate a stream of arguments, with the annotated @ParameterizedTest method consuming each argument in the stream.
@ParameterizedTest
@MethodSource("argumentsProviderFactory")
void testParametrizedMethodWithMethodSource(Integer argument) {
    System.out.println(argument);
    assertNotNull(argument);
}

static Stream<Integer> argumentsProviderFactory() {
    return Stream.of(1,2);
}
It is essential to define the factory method as static and it should not accept any arguments. If we don’t supply a factory method name directly via @MethodSource, JUnit will default to looking for a factory method with the same name as the current @ParameterizedTest method. It also has support for Streams of primitive types (DoubleStream, IntStream, and LongStream). Below example demonstrates the use:
@ParameterizedTest
@MethodSource("argumentsProviderFactoryForIntStream")
void testParametrizedMethodWithMethodSourceIntStream(Integer argument) {
    assertEquals(9, argument);
}

static IntStream argumentsProviderFactoryForIntStream() {
    return IntStream.of(9, 9);
}
@CsvSource
It allows us to use comma-separated values to express argument lists. Each CSV token represents a CSV line resulting in one parameterized test invocation.
@ParameterizedTest
@CsvSource(value = {
        "Alice, 1, 88.0",
        "Bob, 2, 90",
        "Trudy, 3, 70.5"
})
void testParametrizedMethodWithCsvSource(String studentName, Integer rollNumber, Double percentage) {
    assertNotNull(studentName);
    assertNotNull(rollNumber);
    assertTrue(percentage > 35);
}
We can also set ignoreLeadingAndTrailingWhitespace property to true or false depending on our use-case. This lets JUnit know whether to accept or ignore white spaces. It is set to true by default.
Note: The delimiter by default is a comma (,), but you can change it by changing the delimiter attribute. Instead of a single character, the delimiterString attribute allows you to utilize a String delimiter. Both delimiter attributes, however, cannot be specified at the same time.
@CsvFileSource
It’s pretty similar to @CsvSource, except that instead of reading inline tokens, here we’re reading CSV tokens from a file.
In this way, we can use comma-separated value (CSV) files from the classpath or the local file system. The parameterized test will then invoke once for each record in a CSV file.
We can use the first record to provide CSV headers if desired. We can use the numLinesToSkip parameter to tell JUnit to ignore the headers. The following test snippet demonstrates how to use the mentioned source in the @ParametrizedTest:
@ParameterizedTest
@CsvFileSource(resources = "/students.csv")
void testParametrizedMethodWithCsvFileSource(String studentName, Integer rollNumber, Double percentage) {
    assertNotNull(studentName);
    assertNotNull(rollNumber);
    assertTrue(percentage > 35);
}
@ArgumentsSource
A custom, reusable ArgumentsProvider can be specified using @ArgumentsSource. It’s worth noting that an ArgumentsProvider implementation must be specified as either a top-level class or a static nested class. For the sake of example, we have defined a model class of the Student.
public class Student {
    private String studentName;
    private Integer rollNumber;
    private Double percentage;

    public Student(String studentName, Integer rollNumber, Double percentage) {
        this.studentName = studentName;
        this.rollNumber = rollNumber;
        this.percentage = percentage;
    }

    // getters and setters
}
Below is a simple example of defining a custom Argument Provider:
public class StudentArgumentProvider implements ArgumentsProvider {
    @Override
    public Stream<? extends Arguments> provideArguments(ExtensionContext context) {
        return Stream.of(
                Arguments.of(new Student("Peter", 1, 87.5)),
                Arguments.of(new Student("Bob", 2, 76.0))

        );
    }
}
Finally, we have used the custom argument provider as the @ArgumentSource in the @ParametrizedTest:
@ParameterizedTest
@ArgumentsSource(StudentArgumentProvider.class)
void testParametrizedMethodWithArgumentSource(Student student) {
    assertNotNull(student.getStudentName());
    assertNotNull(student.getRollNumber());
    assertNotNull(student.getPercentage());
}
Conclusion
In this article, we went through a guide to use the @RepeatedTest and @ParametrizedTest annotations in JUnit 5, as well as how to repeat a test several times using the same data and a different set of data. In addition, we looked into the ways available in various interfaces for obtaining information about repeating tests.
We’ve encountered a wide range of argument sources when it comes to the parameterized test. If you’re a techie who wants to improve the quality of his or her code, the Testing Java Code page is a great place to start. Don’t forget to leave your feedback or views in the comments section if you found this post useful.
