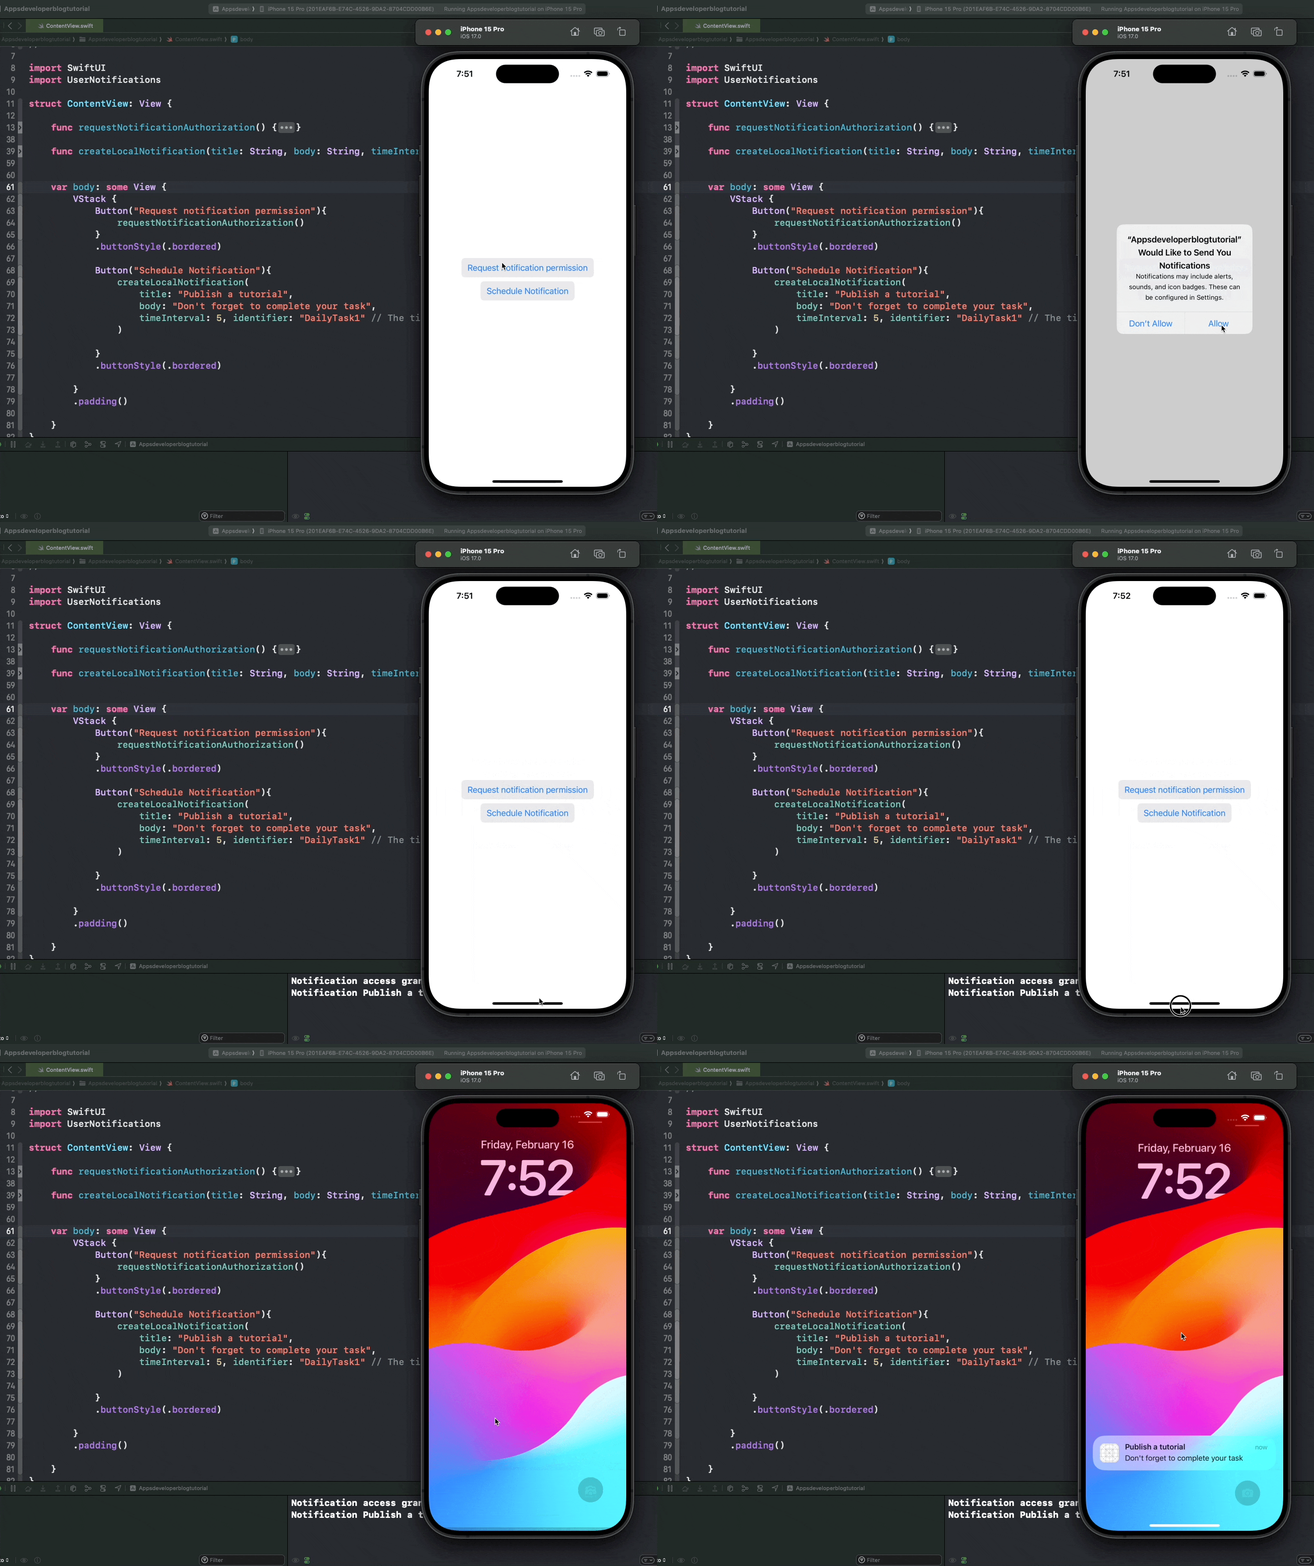
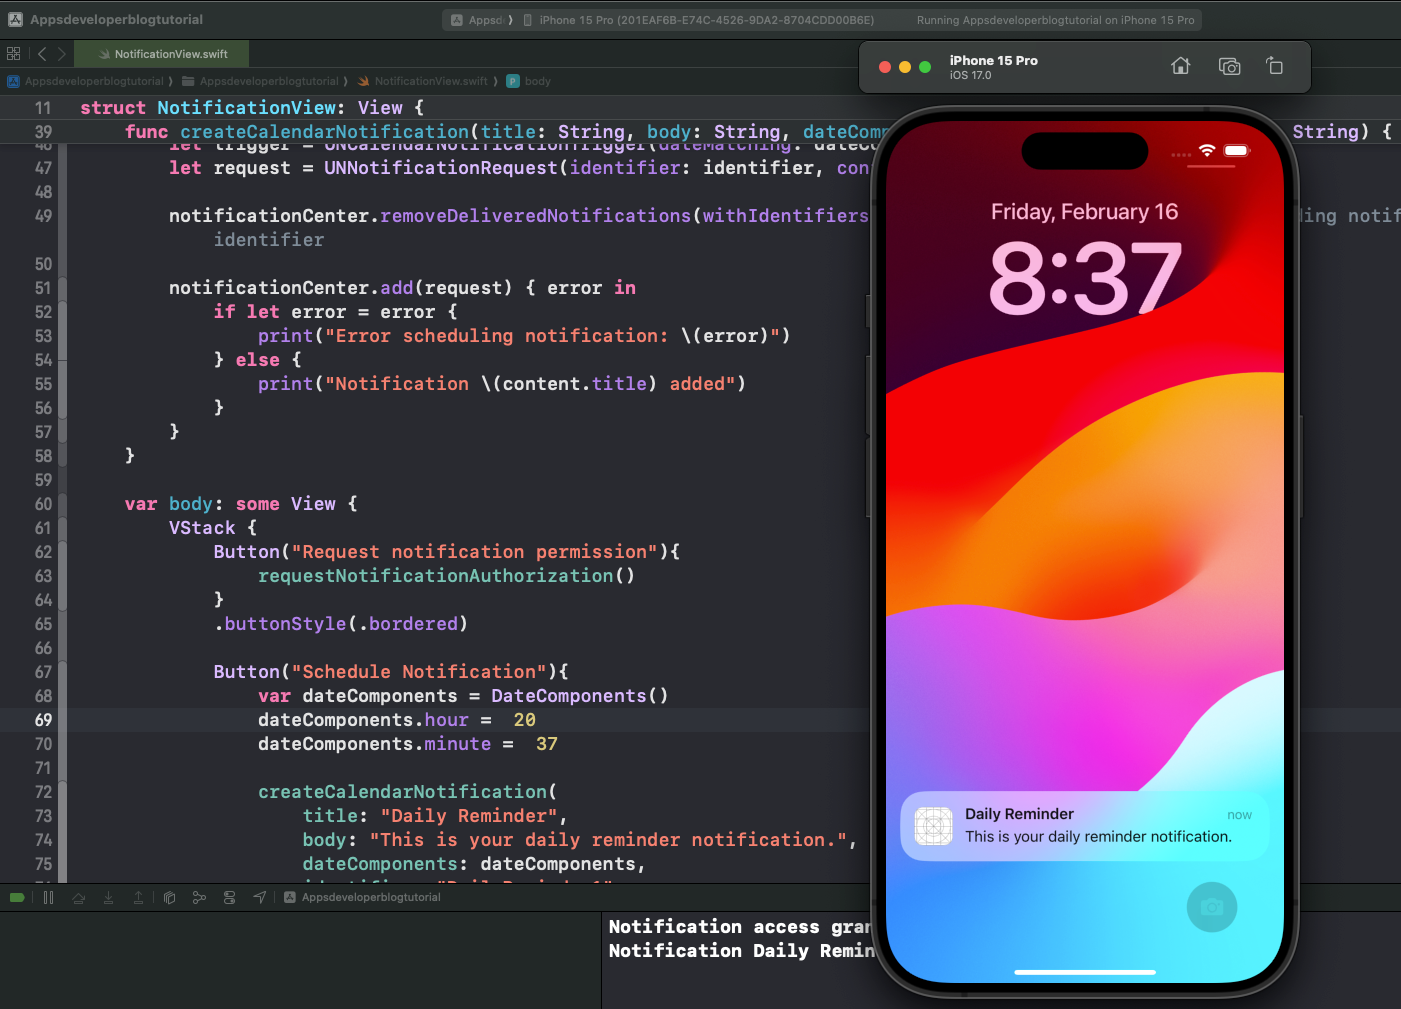
Local notifications are a powerful feature that allows you to engage with your users by sending timely reminders, updates, and alerts directly to their devices. In this tutorial, you’ll learn how to implement local notifications in SwiftUI, focusing on two types of triggers: time interval and calendar.
I’ll start by explaining how to request notification permissions from the user and then proceed to create both time interval and calendar notifications.
Asking for Notification Permission
Before you can schedule and receive local notifications, you need to request the user’s permission. This is a critical step because, without permission, your app won’t be able to show notifications to the user.
To request notification permission, you can use the UNUserNotificationCenter class to get the current notification settings and then request authorization if it hasn’t been determined yet. Here’s how you can do it:
import UserNotifications

func requestNotificationAuthorization() {
    let center = UNUserNotificationCenter.current()

    center.getNotificationSettings { settings in
        switch settings.authorizationStatus {
        case .notDetermined:
            center.requestAuthorization(options: [.alert, .badge, .sound]) { granted, error in
                if granted {
                    print("Notification access granted.")
                } else {
                    print("Notification access denied.\(String(describing: error?.localizedDescription))")
                }
            }
            return
        case .denied:
            print("Notification access denied")
            return
        case .authorized:
            print("Notification access granted.")
            return
        default:
            return
        }
    }
}
In this function, you check the current notification settings and request authorization if it’s not determined. If the user grants permission, you print a success message; otherwise, you print an error message.
Types of local notification triggers
Once you have the user’s permission, you can add a local notification. This involves creating the notification content, setting up the trigger, and then adding the notification request to the UNUserNotificationCenter.
There are 4 types of local notification triggers, but in this tutorial, I will cover the first two of them that are most commonly used for local notification:
Time Interval Notifications
Time interval notifications are a type of local notification that is scheduled to be delivered after a certain time interval has passed. This is useful when you want to send notifications at specific intervals, such as every hour or every day at a particular time.
To create a time interval notification, you use the UNTimeIntervalNotificationTrigger class, which allows you to specify the time interval from the current time when the notification should be delivered. You can also specify whether the notification should repeat at the specified interval or only fire once.
Here’s an example of how to create a time interval notification that fires after 5 seconds and does not repeat:
func createLocalNotification(title: String, body: String, timeInterval: Double, identifier: String) {
        let notificationCenter = UNUserNotificationCenter.current()
        let content = UNMutableNotificationContent()
        content.title = title
        content.body = body
        content.sound = UNNotificationSound.default

        let trigger = UNTimeIntervalNotificationTrigger(timeInterval:  timeInterval, repeats: false)
        let request = UNNotificationRequest(identifier: identifier, content: content, trigger: trigger)

        notificationCenter.removeDeliveredNotifications(withIdentifiers: [identifier]) // Remove previous pending notification with same identifier

        notificationCenter.add(request) { error in
            if let error = error {
                print("Error scheduling notification: \(error)")
            } else {
                print("Notification \(content.title) added")
            }
        }
    }

createLocalNotification(
                    title: "Publish a tutorial",
                    body: "Don't forget to complete your task",
                    timeInterval: 5, identifier: "DailyTask1" // The time (in seconds))
In this code snippet, you create a UNMutableNotificationContent object to define the content of the notification. Then, you set the UNTimeIntervalNotificationTrigger to fire the notification after 5 seconds.
Before adding it to the UNUserNotificationCenter to schedule the notification you remove the previous notification with the same identifier using removeDeliveredNotifications(withIdentifiers: [identifier]).
Finally, you create a UNNotificationRequest with the content and trigger and add it to the UNUserNotificationCenter to schedule the notification.
Time Interval Notifications: Complete Code Example
Below is a complete code example for time interval local notification using SwiftUI.
import SwiftUI
import UserNotifications

struct NotificationView: View {

    func requestNotificationAuthorization() {
        let center = UNUserNotificationCenter.current()

        center.getNotificationSettings { settings in
            switch settings.authorizationStatus {
            case .notDetermined:
                center.requestAuthorization(options: [.alert, .badge, .sound]) { granted, error in
                    if granted {
                        print("Notification access granted.")
                    } else {
                        print("Notification access denied.\(String(describing: error?.localizedDescription))")
                    }
                }
                return
            case .denied:
                print("Notification access denied")
                return
            case .authorized:
                print("Notification access granted.")
                return
            default:
                return
            }
        }
    }

    func createTimeIntervalLocalNotification(title: String, body: String, timeInterval: Double, identifier: String) {
        let notificationCenter = UNUserNotificationCenter.current()
        let content = UNMutableNotificationContent()
        content.title = title
        content.body = body
        content.sound = UNNotificationSound.default

        let trigger = UNTimeIntervalNotificationTrigger(timeInterval:  timeInterval, repeats: false)
        let request = UNNotificationRequest(identifier: identifier, content: content, trigger: trigger)

        notificationCenter.removeDeliveredNotifications(withIdentifiers: [identifier]) // Remove previous pending notification with same identifier

        notificationCenter.add(request) { error in
            if let error = error {
                print("Error scheduling notification: \(error)")
            } else {
                print("Notification \(content.title) added")
            }
        }
    }

    var body: some View {
        VStack {
            Button("Request notification permission"){
                requestNotificationAuthorization()
            }
            .buttonStyle(.bordered)

            Button("Schedule Notification"){
                createTimeIntervalLocalNotification(
                    title: "Publish a tutorial",
                    body: "Don't forget to complete your task",
                    timeInterval: 5, identifier: "DailyTask1" // The time (in seconds)
                )

            }
            .buttonStyle(.bordered)

        }
        .padding()

    }
}

Calendar Notifications
Calendar local notifications are a type of local notification that is scheduled to be delivered at a specific date and time. This is useful when you want to send notifications at specific times, such as a meeting reminder at 9 AM or a birthday wish at midnight.
To create a calendar local notification, you use the UNCalendarNotificationTrigger class, which allows you to specify the date and time when the notification should be delivered. You can also specify whether the notification should be repeated on a daily, weekly, or monthly basis.
Here’s an example of how to create a calendar local notification that fires at 10:30 AM and repeats daily:
func createCalendarNotification(title: String, body: String, dateComponents: DateComponents, identifier: String) {
    let notificationCenter = UNUserNotificationCenter.current()
    let content = UNMutableNotificationContent()
    content.title = title
    content.body = body
    content.sound = UNNotificationSound.default

    let trigger = UNCalendarNotificationTrigger(dateMatching: dateComponents, repeats: true)
    let request = UNNotificationRequest(identifier: identifier, content: content, trigger: trigger)

    notificationCenter.removeDeliveredNotifications(withIdentifiers: [identifier]) // Remove previous pending notification with same identifier

    notificationCenter.add(request) { error in
        if let error = error {
            print("Error scheduling notification: \(error)")
        } else {
            print("Notification \(content.title) added")
        }
    }
}

// Example usage:
var dateComponents = DateComponents()
dateComponents.hour =  10 // 24-hour format
dateComponents.minute =  30

createCalendarNotification(
    title: "Daily Reminder",
    body: "This is your daily reminder notification.",
    dateComponents: dateComponents,
    identifier: "DailyReminder1"
)
In this code snippet, you create a UNMutableNotificationContent object to define the content of the notification. Then, you set the UNCalendarNotificationTrigger to fire the notification at 10:30 AM and repeat it daily. Make sure you use the 24-hour format to schedule a notification.
Before adding it to the UNUserNotificationCenter to schedule the notification, you remove the previous notification with the same identifier using removeDeliveredNotifications(withIdentifiers: [identifier]). Finally, you create a UNNotificationRequest with the content and trigger and add it to the UNUserNotificationCenter to schedule the notification.
Calendar Notifications: Complete Code Example
This is the complete code example for calendar trigger local notification using SwiftUI:
import SwiftUI
import UserNotifications

struct NotificationView: View {

    func requestNotificationAuthorization() {
        let center = UNUserNotificationCenter.current()

        center.getNotificationSettings { settings in
            switch settings.authorizationStatus {
            case .notDetermined:
                center.requestAuthorization(options: [.alert, .badge, .sound]) { granted, error in
                    if granted {
                        print("Notification access granted.")
                    } else {
                        print("Notification access denied.\(String(describing: error?.localizedDescription))")
                    }
                }
                return
            case .denied:
                print("Notification access denied")
                return
            case .authorized:
                print("Notification access granted.")
                return
            default:
                return
            }
        }
    }

    func createCalendarNotification(title: String, body: String, dateComponents: DateComponents, identifier: String) {
        let notificationCenter = UNUserNotificationCenter.current()
        let content = UNMutableNotificationContent()
        content.title = title
        content.body = body
        content.sound = UNNotificationSound.default

        let trigger = UNCalendarNotificationTrigger(dateMatching: dateComponents, repeats: true)
        let request = UNNotificationRequest(identifier: identifier, content: content, trigger: trigger)

        notificationCenter.removeDeliveredNotifications(withIdentifiers: [identifier]) // Remove previous pending notification with same identifier

        notificationCenter.add(request) { error in
            if let error = error {
                print("Error scheduling notification: \(error)")
            } else {
                print("Notification \(content.title) added")
            }
        }
    }

    var body: some View {
        VStack {
            Button("Request notification permission"){
                requestNotificationAuthorization()
            }
            .buttonStyle(.bordered)

            Button("Schedule Notification"){
                var dateComponents = DateComponents()
                dateComponents.hour =  20 // 24 hours format
                dateComponents.minute =  37

                createCalendarNotification(
                    title: "Daily Reminder",
                    body: "This is your daily reminder notification.",
                    dateComponents: dateComponents,
                    identifier: "DailyReminder1"
                )
            }
            .buttonStyle(.bordered)

        }
        .padding()

    }
}

Conclusion
I hope this tutorial was helpful to you. Now, you can enhance your apps to keep users informed and engaged, whether it’s for reminders, updates, or any other critical information that needs to be communicated. Remember to use these features responsibly, as excessive notifications can lead to a poor user experience.
For more Swift Code examples and tutorials, please check the Swift Code Examples page on this website.