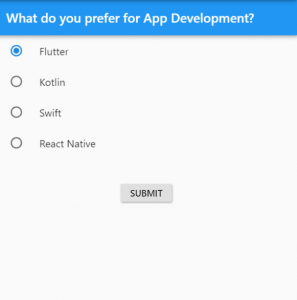
In this tutorial, you will learn how to use a Radio button as well as RadioListTile in Flutter.
If you are interested in Flutter video tutorials, check this playlist: Flutter Video Tutorials. Also, there is a large collection of code examples if you check Flutter tutorials page.
Radio buttons are used where a user needs to select an option from a given list of values. They are an integral part of all digital UIs and in Flutter, there’s a widget for that!
Yes, Radio is another widget in Flutter.
Radio Example in Flutter
A simple Radio widget looks like this:
Radio<String>(
     value: "Flutter",
     groupValue: _method,
     onChanged: (value) {
        setState(() {
          _method = value;
        });
     },
),
It takes in the following arguments:
- value: Local value assigned to the Radio
- groupValue: The variable that is shared (maintains state) among all the Radios
- onChanged: A function, which is generally used to update the groupValue variable.
- When the user taps the Radio, it executes the onChanged function.
- Since we are using setState, the group-value becomes equal to the Radio’s value and it becomes highlighted.
A practical example could be as follows:

The code for it is as follows:
enum FavoriteMethod { flutter, kotlin, swift, reactNative }


class MyStatefulWidget extends StatefulWidget {
  MyStatefulWidget({Key key}) : super(key: key);

  @override
  _MyStatefulWidgetState createState() => _MyStatefulWidgetState();
}


class _MyStatefulWidgetState extends State<MyStatefulWidget> {
  FavoriteMethod _method = FavoriteMethod.flutter;

  Widget build(BuildContext context) {
    return Scaffold(
      appBar: AppBar(title: Text('What do you prefer for App Development?')),
      body: Column(
        children: <Widget>[
          ListTile(
            title: const Text('Flutter'),
            leading: Radio<FavoriteMethod>(
              value: FavoriteMethod.flutter,
              groupValue: _method,
              onChanged: (value) {
                setState(() {
                  _method = value;
                });
              },
            ),
          ),
          ListTile(
            title: const Text('Kotlin'),
            leading: Radio<FavoriteMethod>(
              value: FavoriteMethod.kotlin,
              groupValue: _method,
              onChanged: (value) {
                setState(() {
                  _method = value;
                });
              },
            ),
          ),
          ListTile(
            title: const Text('Swift'),
            leading: Radio<FavoriteMethod>(
              value: FavoriteMethod.swift,
              groupValue: _method,
              onChanged: (value) {
                setState(() {
                  _method = value;
                });
              },
            ),
          ),
          ListTile(
            title: const Text('React Native'),
            leading: Radio<FavoriteMethod>(
              value: FavoriteMethod.reactNative,
              groupValue: _method,
              onChanged: (value) {
                setState(() {
                  _method = value;
                });
              },
            ),
          ),
          SizedBox(height: 40),
          RaisedButton(child: Text('SUBMIT'), onPressed: () {}),
        ],
      ),
    );
  }
}
RadioListTile makes it even Simpler
RadioListTile is a combination of Radio and ListTile widgets.
Below is a very simple example of how to use RadioListTile.
RadioListTile(
  title: const Text('Flutter'),
  value: FavoriteMethod.flutter,
  groupValue: _method,
  onChanged: (value) {
    setState(() {
      _method = value;
    });
  },
),
I hope this tutorial was helpful to you. If you are interested in learning Flutter, please check other Flutter tutorials on this site. Some of them have video tutorials included.
Happy learning!