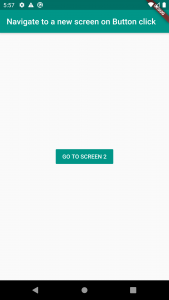
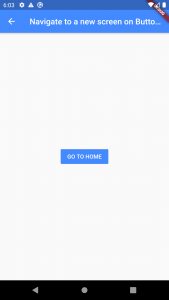
In this tutorial, you will learn how to navigate from one screen to another using a button click in Flutter. For this purpose we will follow these steps:
- Create a new Flutter app
- Create the UI
- Create the navigation
1. Create a New Flutter Project
Go ahead and create a new Flutter app. If you don’t know how to create a project you can refer to the “Hello World App in Flutter” tutorial. For this tutorial, we will create two screens. One of the screens will be “Home”.

2. Create the UI
We are going to create a very simple screen with only one button in the middle. Below is a code example that does just that.
class Home extends StatefulWidget {
  @override
  _HomeState createState() => _HomeState();
}

class _HomeState extends State<Home> {
  @override
  Widget build(BuildContext context) {
    return Scaffold(
      appBar: AppBar(
          title: const Text('Navigate to a new screen on Button click'),
          backgroundColor: Colors.teal),
      body: Center(
        child: FlatButton(
          color: Colors.teal,
          textColor: Colors.white,
          onPressed: () {

          },
          child: Text('GO TO SCREEN 2'),
        ),
      ),
    );
  }
}
As for the second screen, we will use the same layout but will change colors. This will help us see if the navigation is working.
Below is a code example for screen 2.
class Screen2 extends StatefulWidget {
  @override
  _Screen2State createState() => _Screen2State();
}

class _Screen2State extends State<Screen2> {
  @override
  Widget build(BuildContext context) {
    return Scaffold(
      appBar: AppBar(
          title: const Text('Navigate to a new screen on Button click'),
          backgroundColor: Colors.blueAccent),
      body: Center(
        child: FlatButton(
          color: Colors.blueAccent,
          textColor: Colors.white,
          onPressed: () {


          },
          child: Text('GO TO HOME'),
        ),
      ),
    );
  }
}

2. Creating the Navigation
In Flutter there is a built-in method for navigation between screens, called “Navigator“. To switch to a new screen, we will use the “Navigator.push” method. The push() method adds a screen to the stack of routes managed by the Navigator. we will create our own route using the MaterialPageRoute, which is useful because it transitions to the new route using a platform-specific animation. Here is the sample code for the navigation:
FlatButton(
          color: Colors.teal,
          textColor: Colors.white,
          onPressed: () {
            Navigator.of(context).push(MaterialPageRoute(builder: (context)=>Screen2()));
          },
          child: Text('GO TO SCREEN 2'),
        ),
As you can see in the “onPressed” property we have a function( Navigator.of(context).push(“MaterialPageRoute(builder: (context)=>Screen2()));“) that will take us to the desired screen. Here is the code for the whole app:
import 'package:flutter/material.dart';

void main() => runApp(MyApp());

/// This Widget is the main application widget.
class MyApp extends StatelessWidget {
  @override
  Widget build(BuildContext context) {
    return MaterialApp(
      home: Home(),
    );
  }
}

class Home extends StatefulWidget {
  @override
  _HomeState createState() => _HomeState();
}

class _HomeState extends State<Home> {
  @override
  Widget build(BuildContext context) {
    return Scaffold(
      appBar: AppBar(
          title: const Text('Navigate to a new screen on Button click'),
          backgroundColor: Colors.teal),
      body: Center(
        child: FlatButton(
          color: Colors.teal,
          textColor: Colors.white,
          onPressed: () {
            Navigator.of(context).push(MaterialPageRoute(builder: (context)=>Screen2()));
          },
          child: Text('GO TO SCREEN 2'),
        ),
      ),
    );
  }
}
class Screen2 extends StatefulWidget {
  @override
  _Screen2State createState() => _Screen2State();
}

class _Screen2State extends State<Screen2> {
  @override
  Widget build(BuildContext context) {
    return Scaffold(
      appBar: AppBar(
          title: const Text('Navigate to a new screen on Button click'),
          backgroundColor: Colors.blueAccent),
      body: Center(
        child: FlatButton(
          color: Colors.blueAccent,
          textColor: Colors.white,
          onPressed: () {
            Navigator.of(context).push(MaterialPageRoute(builder: (context)=>Home()));

          },
          child: Text('GO TO HOME'),
        ),
      ),
    );
  }
}
I hope this Flutter tutorial was helpful for you. If you are interested in learning Flutter, please check other Flutter tutorials on this site. Some of them have video tutorials included.