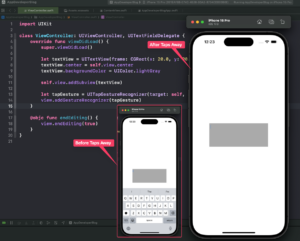
In this tutorial, you will learn how to create a UITextView programmatically, position it at the center of the view, change its background color, and dismiss the keyboard when the user taps away. You will also create a UITapGestureRecognizer, add it to the main view, and add the UITextView as a subview. Finally, you will create a function to handle the tap-away event.
Step 1: Create UITextView Programmatically
First, let’s create a UITextView programmatically. I will position it at the center of the view and change its background color. Here is an example of how to do this:
let textView = UITextView(frame: CGRect(x: 20.0, y: 90.0, width: 250.0, height: 100.0))
textView.center = self.view.center
textView.backgroundColor = UIColor.lightGray
self.view.addSubview(textView)
Step 2: Create UITapGestureRecognizer
Next, I will create a UITapGestureRecognizer.
UITapGestureRecognizer is a gesture recognizer that interprets single or multiple taps. I will add this gesture recognizer to the main view and will trigger a function when the user taps anywhere on the screen. Here is how to create a UITapGestureRecognizer:
let tapGesture = UITapGestureRecognizer(target: self, action: #selector(endEditing))
In the code snippet above, I create a tap gesture recognizer that will call a function named endEditing when the user taps on the view. The target parameter specifies the object that will perform the action, which is self in this case. The action parameter specifies the name of the function that will be executed, which is endEditing in this case. The #selector syntax is a way of referring to a function by its name.
Next, I need to add the tap gesture recognizer to the view that I want to detect taps on. To do this, I use the following code:
view.addGestureRecognizer(tapGesture)
This code means that I want to add the tap gesture recognizer to the view object, which is the main view of the screen in this case. The addGestureRecognizer method is a function that takes a gesture recognizer as an argument and adds it to the view.
Now, whenever the user taps on the view, the endEditing function will be called. This function will hide the keyboard and end the editing mode of any text field on the screen. I will create this function in the next section of this tutorial.
Step 3: Dismiss UITextView when user taps away
Now, let’s create a function named endEditing that will be triggered when the user taps anywhere on the screen. This function will resign the first responder status of the UITextView, effectively dismissing the keyboard:
@objc func endEditing() {
    view.endEditing(true)
}
Complete Example
Here is the complete example combining all the steps:
import UIKit
class ViewController: UIViewController, UITextFieldDelegate {
    override func viewDidLoad() {
        super.viewDidLoad()

        let textView = UITextView(frame: CGRect(x: 20.0, y: 90.0, width: 250.0, height: 100.0))
        textView.center = self.view.center
        textView.backgroundColor = UIColor.lightGray

        self.view.addSubview(textView)

        let tapGesture = UITapGestureRecognizer(target: self, action: #selector(endEditing))
        view.addGestureRecognizer(tapGesture)
    }

    @objc func endEditing() {
        view.endEditing(true)
    }
}

Conclusion
I hope this tutorial was helpful to you. You now know how to dismiss the UITextView keyboard when the user taps away. If you want to learn more about UITextView and its customizable properties, you can read this tutorial: “Create and Customize UITextView Programmatically in Swift“.
To learn more about Swift and to find other code examples, check the following page: Swift Code Examples.