This tutorial demonstrates how to deploy a Spring Boot REST app to Tomcat 10.
Apache states that the Jakarta EE platform represents the evolution of the Java EE platform. Tomcat 10 and later versions implement specifications that were developed as part of Jakarta EE. In contrast, Tomcat 9 and earlier versions implement specifications that were developed as part of Java EE. Consequently, applications that were developed for Tomcat 9 and earlier will not run on Tomcat 10. Nonetheless, there may still be ways to address this issue.
Applications based on Java EE and designed for Tomcat 9 or earlier versions can be placed in the “$CATALINA_BASE/webapps-javaee” directory, and Tomcat will automatically convert them to Jakarta EE and copy them to the “webapps” directory. The conversion process is carried out by the Apache Tomcat migration tool for Jakarta EE, which is also available as a separate download for offline use.
To demonstrate how to deploy a Spring Boot REST application to a standalone Tomcat 10 server, the steps we will take include:
- Download and install Apache Tomcat 10.
- Create and build a very simple Spring Boot REST application.
- Deploy WAR file to a standalone Tomcat 10.
Tomcat 10 Installation
To download Tomcat 10, you can use the following link:
For Windows users, add the following line to environment variables under the name ‘CATALINA_HOME’:
C:\Program Files\Apache Software Foundation\Tomcat 10.0
To start the Tomcat server, execute the following command on the Windows command prompt:
C:\Program Files\Apache Software Foundation\Tomcat 10.0\bin>startup
If the configurations are correct, the following output will be displayed after starting Tomcat:
C:\Program Files\Apache Software Foundation\Tomcat 10.0\bin>startup
Using CATALINA_BASE:   "C:\Program Files\Apache Software Foundation\Tomcat 10.0"
Using CATALINA_HOME:   "C:\Program Files\Apache Software Foundation\Tomcat 10.0"
Using CATALINA_TMPDIR: "C:\Program Files\Apache Software Foundation\Tomcat 10.0\temp"
Using JRE_HOME:        "C:\Program Files\Java\jdk-11.0.10"
Using CLASSPATH:       "C:\Program Files\Apache Software Foundation\Tomcat 10.0\bin\bootstrap.jar;C:\Program Files\Apache Software Foundation\Tomcat 10.0\bin\tomcat-juli.jar"
Using CATALINA_OPTS:   ""
C:\Program Files\Apache Software Foundation\Tomcat 10.0\bin>
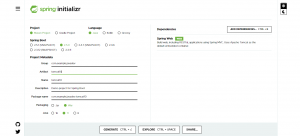
Creating a Spring Boot Application
Navigate to Spring Initializr and create a new project with the dependencies shown below. After extracting the generated zip folder, import the project into IntelliJ or your preferred IDE.
To configure the Maven packaging type to WAR add the following line to your project’s ‘pom.xml’:
<packaging>war</packaging>
In order to use an external Tomcat, you should add the following tag to the Tomcat dependency in the ‘pom.xml’ file:
<dependency>
    <groupId>org.springframework.boot</groupId>
    <artifactId>spring-boot-starter-tomcat</artifactId>
    <scope>provided</scope>
</dependency>
To run the application from Tomcat in the classical way, extend SpringBootServletInitializer in the main application and override the configure method:
import org.springframework.boot.SpringApplication;
import org.springframework.boot.autoconfigure.SpringBootApplication;
import org.springframework.boot.builder.SpringApplicationBuilder;
import org.springframework.boot.web.servlet.support.SpringBootServletInitializer;

@SpringBootApplication
public class Tomcat10Application extends SpringBootServletInitializer {

    public static void main(String[] args) {
        SpringApplication.run(Tomcat10Application.class, args);
    }

    @Override
    protected SpringApplicationBuilder configure(SpringApplicationBuilder builder) {
        return builder.sources(Tomcat10Application.class);
    }
}
Create a User model
Create a class named User in a package called model with the following fields:
- firstName
- lastName
public class User {
    private String firstName;
    private String lastName;
    private String email;

    public User(String firstName, String lastName, String email) {
        this.firstName = firstName;
        this.lastName = lastName;
        this.email = email;
    }
    // Generate toString method
}
Create a User Controller
Create a class named UserController in a package called controller and create a user object which will be returned when a user issues the following request/user/read/one:
import org.springframework.web.bind.annotation.GetMapping;
import org.springframework.web.bind.annotation.RequestMapping;
import org.springframework.web.bind.annotation.RestController;

@RestController
@RequestMapping("/user")
public class UserController {

    @GetMapping("/read/one")
    public String readUser(){
        User user = new User("John","doe","[email protected]");

        return user.toString();
    }
}
Deploying an application to Tomcat 10
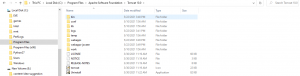
Navigate to the Tomcat installation directory mostly found under Program Files and create a folder named webapps-javaee:
On a command prompt, navigate to your project source, and generate a WAR file using the following command:
mvnw verify
Add the generated WAR file to webapps-javaee folder where it will be automatically migrated by Tomcat and added to webapps folder where it can then be deployed to the client:

Restart Tomcat and observe the logs on server startup.
Using jakartaee-migration Tool
Alternatively, the application can be migrated using the following command:
java -jar jakartaee-migration-*-shaded.jar <source> <destination>
Once the command has executed successfully, restart Tomcat.

When you restart the server, Tomcat will migrate the application automatically and add it to webapps folder under Tomcat installation:

On your preferred browser, execute the following link which will return a user object that was created in the controller:
- HTTP://localhost:8080/tomcat10-0.0.1-SNAPSHOT/user/read/one

Conclusion
In this tutorial, you have learned how to deploy a Spring Boot REST application to Tomcat 10 by leveraging the default functionality provided by Tomcat 10 to migrate Java EE applications. You have observed how Tomcat 10 migrates the application behind the scene and generates an application that can be run on Tomcat 10.
Frequently asked questions
- What is the difference between using the jakartaee-migration tool and manually deploying a Spring Boot application to Tomcat?
- While the jakartaee-migration tool is faster and easier, manual deployment gives developers more control over the deployment process and can be useful in certain situations. For example, if the application requires specific configurations or customizations to be made to the Tomcat server or if the deployment needs to be integrated with an existing deployment process, manual deployment may be preferred.
- Can I deploy multiple Spring Boot applications to the same Tomcat server?
- Yes, you can deploy multiple Spring Boot applications to the same Tomcat server by deploying them as separate WAR files within the Tomcat
webappsdirectory. Each application should have a unique context path to avoid conflicts. - Can I deploy a Spring Boot application to Tomcat running on a cloud platform like AWS or Azure?
- Yes, you can deploy a Spring Boot application to Tomcat running on a cloud platform like AWS or Azure. Both AWS and Azure offer services for deploying and managing Tomcat servers, such as Elastic Beanstalk on AWS and Azure Web Apps on Azure. These services allow you to easily deploy your Spring Boot application to a Tomcat server in the cloud and manage its scalability, availability, and performance.
- Can I deploy my Spring Boot application to Tomcat with SSL enabled?
- Yes, it is possible to deploy a Spring Boot application to Tomcat with SSL enabled. Tomcat supports SSL/TLS encryption using SSL certificates, and you can configure your Spring Boot application to use HTTPS protocol. You will need to generate an SSL certificate and configure it in Tomcat’s server.xml file, as well as configure your Spring Boot application to use HTTPS.