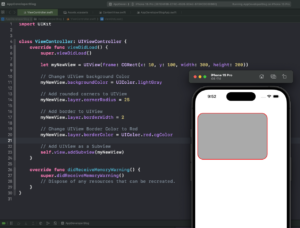
In this tutorial, you will learn how to create a UIView in Swift programmatically. You will also learn how to add UIView as a subview, change its background colour, add a border around it, change the border colour, and make its corners rounded.
A UIView is a rectangular area on the screen that can display content and handle user interactions. You can use UIView to create custom user interface elements for your app.
If you are interested in video lessons on how to write Unit tests and UI tests to test your Swift mobile app, check out this page: Unit Testing Swift Mobile App
Step 1: Creating UIView
To create a UIView, you need to import the UIKit framework, which provides the UIView class and other UI components. You can do this by adding the following line at the top of your Swift file:
import UIKit
Next, you need to create an instance of the UIView class and specify its size and position. You can do this by using the init(frame:) initializer, which takes a CGRect as an argument. A CGRect is a structure that defines a rectangle by its origin (x and y coordinates) and its size (width and height). For example, the following code creates a UIView with a width of 300 points, a height of 200 points, and places its top-left corner at the point (10, 10) in the coordinate system of its superview:
let myNewView = UIView(frame: CGRect(x: 10, y: 100, width: 300, height: 200))
You can add this code inside the viewDidLoad() method of your view controller, which is called when the view controller’s view is loaded into memory. The viewDidLoad() method is a good place to set up your initial UI elements.
Here is the complete code for creating a UIView programmatically:
import UIKit

class ViewController: UIViewController {
    override func viewDidLoad() {
        super.viewDidLoad()

        let myNewView = UIView(frame: CGRect(x: 10, y: 100, width: 300, height: 200))
    }
}
Step 2: Changing UIView Background Color
You can change the background color of the UIView using the backgroundColor property. For instance, you can set it to light gray.
myNewView.backgroundColor = UIColor.lightGray
Step 3: Adding Border Around UIView
To add a border to the UIView, you need to access the layer property and modify the borderWidth attribute.
myNewView.layer.borderWidth = 2
Step 4: Changing UIView Border Color
Similarly, you can change the border color of the UIView by modifying the borderColor attribute of the layer. Note that you need to convert the UIColor to CGColor.
myNewView.layer.borderColor = UIColor.red.cgColor
Step 5: Making UIView Corners Rounded
To round off the corners of the UIView, you can modify the cornerRadius attribute of the layer. The larger the corner radius, the more rounded the corners will be.
myNewView.layer.cornerRadius = 25
Step 6: Adding UIView as a Subview
Finally, you need to add the UIView as a subview to the current view controller’s view.
self.view.addSubview(myNewView)
Complete Code Example
Here is the complete code for creating a UIView programmatically in Swift, changing its background color, adding a border, changing the border color, and making its corners rounded.
import UIKit

class ViewController: UIViewController {
    override func viewDidLoad() {
        super.viewDidLoad()

        let myNewView = UIView(frame: CGRect(x: 10, y: 100, width: 300, height: 200))

        // Change UIView background colour
        myNewView.backgroundColor = UIColor.lightGray

        // Add rounded corners to UIView
        myNewView.layer.cornerRadius = 25

        // Add border to UIView
        myNewView.layer.borderWidth = 2

        // Change UIView Border Color to Red
        myNewView.layer.borderColor = UIColor.red.cgColor

        // Add UIView as a Subview
        self.view.addSubview(myNewView)
    }

    override func didReceiveMemoryWarning() {
        super.didReceiveMemoryWarning()
        // Dispose of any resources that can be recreated.
    }
}
Conclusion
I hope this tutorial was helpful to you. You now know how to create and customize UIView programmatically.
To learn more about Swift and find more Swift code examples and tutorials, please check my Swift Code Examples page.
If you are interested in video lessons on how to write Unit tests and UI tests to test your Swift mobile app, check out this page: Unit Testing Swift Mobile App
Happy learning!
