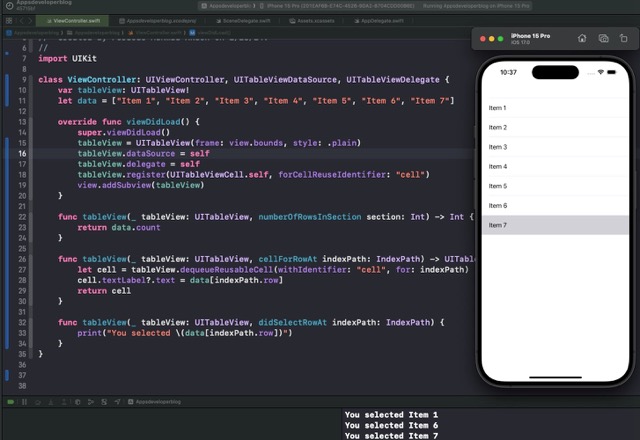
In this tutorial, you will learn how to create UITableView programmatically in Swift.
By the end of this tutorial, you will have a working Swift code example that you can use in your mobile application.
Step 1: Conform to UITableViewDataSource and UITableViewDelegate
To load items into the table view and handle events like the user taps on a table cell, your ViewController needs to conform to both the UITableViewDataSource and UITableViewDelegate protocols. These protocols require you to implement methods that provide the data for the table view and handle events, such as the number of rows in a section, the cell for each row, and actions when a user taps on a cell.
class ViewController: UIViewController, UITableViewDataSource, UITableViewDelegate {
    // Your code here
}
Step 2: Specify the number of rows in a TableView
To load data into the table, you need to tell the table view the number of rows to create. You can do it by implementing the tableView(_:numberOfRowsInSection:) method and specifying the number of rows to configure. Let’s say you have an array of strings as a data source. In this cause the size of this array of items will determine the number of rows to be created in the table view.
let data = ["Item 1", "Item 2", "Item 3", "Item 4", "Item 5", "Item 6", "Item 7"]

func tableView(_ tableView: UITableView, numberOfRowsInSection section: Int) -> Int {
    return data.count
}
Step 3: Set textLabel of UITableViewCell
To display something in the table cell, you will need to work with UITableViewCell. To access table cell, you will need to implement a method called tableView(_:cellForRowAt:).
The tableView(_:cellForRowAt:) method is a fundamental part of the UITableViewDataSource protocol, responsible for creating and configuring the cells that make up the table view. This method is called by the table view for each row in the table, allowing you to specify the content and appearance of each cell.
func tableView(_ tableView: UITableView, cellForRowAt indexPath: IndexPath) -> UITableViewCell {
    let cell = tableView.dequeueReusableCell(withIdentifier: "cell", for: indexPath)
    cell.textLabel?.text = data[indexPath.row]
    return cell
}
Here’s a breakdown of the above code:
- Dequeuing a Cell: The method starts by attempting to dequeue a reusable cell using the
dequeueReusableCell(withIdentifier:for:)method. This method is efficient because it reuses cells that have scrolled off the screen, rather than creating a new cell each time. The identifier “cell” is used to specify which type of cell to dequeue. If no reusable cell is available, a new one is created.
- Configuring the Cell: Once a cell is obtained (either by dequeuing a reusable cell or creating a new one), it’s configured with the data for the current row. This is done by setting the
textLabel.textproperty of the cell to the corresponding item from the data source array. TheindexPath.rowis used to access the correct item in the array.
- Returning the Cell: Finally, you return the configured cell to the table view, which then adds it to the table view’s display.
Step 4: Implement didSelectRowAtIndexPath Function
To handle user taps on table view cells, implement the tableView(_:didSelectRowAt:) delegate method. This method is called when a user taps on a cell, allowing you to perform actions based on the selected row.
func tableView(_ tableView: UITableView, didSelectRowAt indexPath: IndexPath) {
    print("You selected \(data[indexPath.row])")
}
Complete Code Example
Here’s the complete code example based on the steps above.
class ViewController: UIViewController, UITableViewDataSource, UITableViewDelegate {
    var tableView: UITableView!
    let data = ["Item 1", "Item 2", "Item 3", "Item 4", "Item 5", "Item 6", "Item 7"]

    override func viewDidLoad() {
        super.viewDidLoad()
        tableView = UITableView(frame: view.bounds, style: .plain)
        tableView.dataSource = self
        tableView.delegate = self
        tableView.register(UITableViewCell.self, forCellReuseIdentifier: "cell")
        view.addSubview(tableView)
    }

    func tableView(_ tableView: UITableView, numberOfRowsInSection section: Int) -> Int {
        return data.count
    }

    func tableView(_ tableView: UITableView, cellForRowAt indexPath: IndexPath) -> UITableViewCell {
        let cell = tableView.dequeueReusableCell(withIdentifier: "cell", for: indexPath)
        cell.textLabel?.text = data[indexPath.row]
        return cell
    }

    func tableView(_ tableView: UITableView, didSelectRowAt indexPath: IndexPath) {
        print("You selected \(data[indexPath.row])")
    }
}

Conclusion
I hope this tutorial was helpful for you. There are a lot more Swift code examples on this website if you check the Swift Code Examples page.