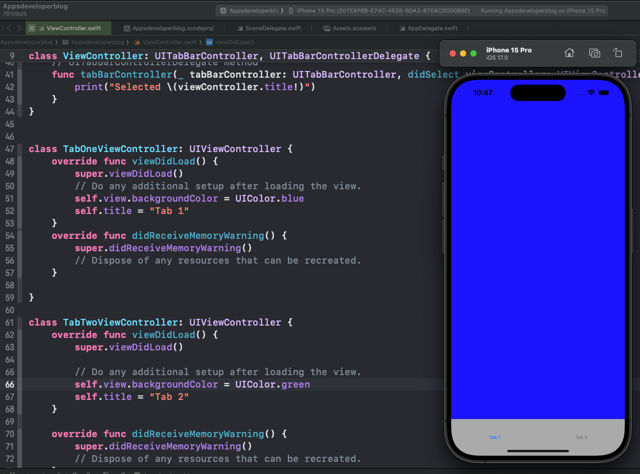
In this tutorial, you will learn how to create a UITabBarController programmatically in Swift.
UITabBarController is a container view controller in UIKit that manages a multi-selection interface, where the selection determines which child view controller to display. It’s typically used to organize 2-5 view controllers in a group.
Here are some key points about UITabBarController:
- It displays tabs at the bottom of the window for selecting between different modes and for displaying the views for that mode.
- Each tab of a tab bar controller interface is associated with a custom view controller. When the user selects a specific tab, the tab bar controller displays the root view of the corresponding view controller, replacing any previous views.
- The type of interface managed in each tab need not be similar in any way. In fact, tab bar interfaces are commonly used either to present different types of information or to present the same information using a completely different style of interface.
- To configure the tabs of a tab bar controller, you assign the view controllers that provide the root view for each tab to the
viewControllersproperty. The order in which you specify the view controllers determines the order in which they appear in the tab bar. - Tab bar items are configured through their corresponding view controller. To associate a tab bar item with a view controller, create a new instance of the
UITabBarItemclass, configure it appropriately for the view controller, and assign it to the view controller’stabBarItemproperty.
By the end of this tutorial, you will have a working Swift code example that you can use in your mobile application.
Step 1: Create ViewController For Tab 1
Your first step will be to create a new UIViewController subclass for your first tab. This view controller will be displayed when the user taps on the first tab of your UITabBarController. Let’s call this view controller TabOneViewController.
import UIKit

class TabOneViewController: UIViewController {
    override func viewDidLoad() {
        super.viewDidLoad()
        // Set the view's background color to blue
        self.view.backgroundColor = UIColor.blue
        // Set the title for the tab
        self.title = "Tab 1"
    }
}
This simple view controller sets the background color of its view to blue and sets the title to “Tab 1”. The title will be displayed above the tab bar when this tab is selected.
Step 2: Create ViewController for Tab 2
Similarly, create another UIViewController subclass for the second tab. This view controller will be displayed when the user taps on the second tab of your UITabBarController. Let’s call this view controller TabTwoViewController.
import UIKit

class TabTwoViewController: UIViewController {
    override func viewDidLoad() {
        super.viewDidLoad()
        // Set the view's background color to green
        self.view.backgroundColor = UIColor.green
        // Set the title for the tab
        self.title = "Tab 2"
    }
}
This view controller sets the background color of its view to green and sets the title to “Tab 2”. The title will be displayed above the tab bar when this tab is selected.
Step 3: Create UITabBarController
Next, you need to create a UITabBarController that will manage the two tabs you just created. This controller will also implement the UITabBarControllerDelegate protocol to handle tab selection events.
import UIKit

class ViewController: UITabBarController, UITabBarControllerDelegate {

    override func viewDidLoad() {
        super.viewDidLoad()

        self.delegate = self
        self.tabBar.backgroundColor = UIColor.lightGray

        // Create Tab one
        let tabOne = TabOneViewController()
        let tabOneBarItem = UITabBarItem(title: "Tab 1", image: UIImage(named: "defaultImage.png"), selectedImage: UIImage(named: "selectedImage.png"))
        tabOne.tabBarItem = tabOneBarItem

        // Create Tab two
        let tabTwo = TabTwoViewController()
        let tabTwoBarItem2 = UITabBarItem(title: "Tab 2", image: UIImage(named: "defaultImage2.png"), selectedImage: UIImage(named: "selectedImage2.png"))

        tabTwo.tabBarItem = tabTwoBarItem2
        self.viewControllers = [tabOne, tabTwo]
    }

    // UITabBarControllerDelegate method
    func tabBarController(_ tabBarController: UITabBarController, didSelect viewController: UIViewController) {
        print("Selected \(viewController.title!)")
    }
}
This UITabBarController subclass sets itself as its delegate to handle tab selection events. It sets the background color of the tab bar to light gray and creates two tabs with titles, images, and selected images. The viewWillAppear(_:) method is where the tabs are set up, and the tabBarController(_:didSelect:) delegate method prints the title of the selected tab.
Complete Code Example
Here’s the complete code for the TabOneViewController, TabTwoViewController, and the UITabBarController subclass.
import UIKit

class ViewController: UITabBarController, UITabBarControllerDelegate {

    override func viewDidLoad() {
        super.viewDidLoad()

        self.delegate = self
        self.tabBar.backgroundColor = UIColor.lightGray

        // Create Tab one
        let tabOne = TabOneViewController()
        let tabOneBarItem = UITabBarItem(title: "Tab 1", image: UIImage(named: "defaultImage.png"), selectedImage: UIImage(named: "selectedImage.png"))
        tabOne.tabBarItem = tabOneBarItem

        // Create Tab two
        let tabTwo = TabTwoViewController()
        let tabTwoBarItem2 = UITabBarItem(title: "Tab 2", image: UIImage(named: "defaultImage2.png"), selectedImage: UIImage(named: "selectedImage2.png"))

        tabTwo.tabBarItem = tabTwoBarItem2
        self.viewControllers = [tabOne, tabTwo]
    }

    // UITabBarControllerDelegate method
    func tabBarController(_ tabBarController: UITabBarController, didSelect viewController: UIViewController) {
        print("Selected \(viewController.title!)")
    }
}


class TabOneViewController: UIViewController {
    override func viewDidLoad() {
        super.viewDidLoad()
        // Do any additional setup after loading the view.
        self.view.backgroundColor = UIColor.blue
        self.title = "Tab 1"
    }
    override func didReceiveMemoryWarning() {
        super.didReceiveMemoryWarning()
        // Dispose of any resources that can be recreated.
    }

}

class TabTwoViewController: UIViewController {
    override func viewDidLoad() {
        super.viewDidLoad()

        // Do any additional setup after loading the view.
        self.view.backgroundColor = UIColor.green
        self.title = "Tab 2"
    }

    override func didReceiveMemoryWarning() {
        super.didReceiveMemoryWarning()
        // Dispose of any resources that can be recreated.
    }
}

Conclusion
I hope this tutorial was helpful for you. There are a lot more Swift code examples on this website if you check the Swift Code Examples page.
Additionally, you might also want to check a list of recent Swift tutorials where you will also find a list of useful resources for iOS mobile app developers.
Thank you for this article!
However, I’d like to recommend putting the code from viewWillAppear to viewDidLoad right before “super.viewDidLoad” call. It makes more sense since you’re supposed to call this method before the view is loaded, plus removes extra unnecessary lines.
Thank you for your suggestion, Egor!