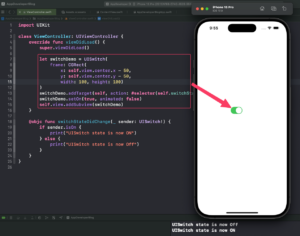
In this tutorial, you will learn how to create and customize UISwitch programmatically in Swift.
Creating and customizing a UISwitch programmatically in Swift involves several steps. Here’s how you can do it:
Step 1: Create a basic UISwitch
First, import the UIKit framework and create a new class that inherits from UIViewController. Inside the viewDidLoad() method, instantiate a new UISwitch object. Set the frame property to define the size and position of the switch on the screen.
import UIKit
class ViewController: UIViewController {
    override func viewDidLoad() {
        super.viewDidLoad()

        let switchDemo = UISwitch(frame: CGRect(x: 150, y: 150, width: 0, height: 0))
        self.view.addSubview(switchDemo)
    }
}
Step 2: Position UISwitch on a View
To position the switch on the view, you need to specify the x and y coordinates along with the width and height in the CGRect method. For instance, if you want to place the switch at the center of the screen, you could use the following code:
let switchDemo = UISwitch(frame: CGRect(x: self.view.center.x - 50, y: self.view.center.y - 50, width: 100, height: 100))
Step 3: Set UISwitch State to On and Off
You can set the state of the switch to either On or Off using the setOn method. For example, to set the switch to On, you would use:
switchDemo.setOn(true, animated: false)
To set it to Off, you would use:
switchDemo.setOn(false, animated: false)
Step 4: Call Custom Function When UISwitch State Changes
To call a custom function when the switch’s state changes, you can use the addTarget method. This method takes three parameters:
- the target object,
- the selector, and
- the event.
The selector is a method that should be called when the event occurs. In this case, the event is .valueChanged, which means the method will be called whenever the switch’s state changes.
switchDemo.addTarget(self, action: #selector(self.switchStateDidChange(_:)), for: .valueChanged)
Then, define the function that will be called when the switch’s state changes:
@objc func switchStateDidChange(_ sender: UISwitch!) {
    if sender.isOn {
        print("UISwitch state is now ON")
    } else {
        print("UISwitch state is now Off")
    }
}
Complete Code Example:
Here’s the complete code for creating and customizing a UISwitch using the above code snippets together:
import UIKit
class ViewController: UIViewController {
    override func viewDidLoad() {
        super.viewDidLoad()

        let switchDemo = UISwitch(frame: CGRect(x: self.view.center.x - 50, y: self.view.center.y - 50, width: 100, height: 100))
        switchDemo.addTarget(self, action: #selector(self.switchStateDidChange(_:)), for: .valueChanged)
        switchDemo.setOn(true, animated: false)
        self.view.addSubview(switchDemo)
    }

    @objc func switchStateDidChange(_ sender: UISwitch!) {
        if sender.isOn {
            print("UISwitch state is now ON")
        } else {
            print("UISwitch state is now Off")
        }
    }
}
Conclusion
If you are interested in video lessons on how to write Unit tests and UI tests to test your Swift mobile app, check out this page: Unit Testing Swift Mobile App
I hope this tutorial was helpful to you. You now know how to create and customize UISwitch programmatically.
To learn more about Swift and to find other code examples, check the following page: Swift Code Examples.
