In this tutorial, we will go over the Confirmation Alert dialog. Many times in your development career you will come across a time when you need to get the app user’s consent before continuing. For example, once a user tries to delete some data, just in case he or she pressed the wrong button, it is recommended to confirm the action first. In order to do this we need to follow the following steps:
- Create a new app in Flutter,
- Create the alert dialog,
- Create UI to display the alert.
1. Create the new app
Go ahead and create a new app Flutter, if you don’t know how to create a project you can refer to the “Hello World App in Flutter” tutorial. Delete all the sample code and leave only the following:
import 'package:flutter/material.dart';

void main() => runApp(MyApp());

/// This Widget is the main application widget.
class MyApp extends StatelessWidget {
  @override
  Widget build(BuildContext context) {
    return MaterialApp(
      home: Home(),
    );
  }
}

class Home extends StatefulWidget {
  @override
  _HomeState createState() => _HomeState();
}

class _HomeState extends State<Home> {
  @override
  Widget build(BuildContext context) {
    return Scaffold(
      appBar: AppBar(
          title: const Text('Confirmation Dialog'),
          backgroundColor: Colors.teal),
      body: Center();
  }
}
2. Create the Alert Dialog
To create the Alert Dialog we will use a Future void which we will call “_showMyDialog“, like so:
Future<void> _showMyDialog() async {
  return showDialog<void>(
    context: context,
    barrierDismissible: false, // user must tap button!
    builder: (BuildContext context) {
      return AlertDialog(
        title: Text('AlertDialog Title'),
        content: SingleChildScrollView(
          child: Column(
            children: <Widget>[
              Text('This is a demo alert dialog.'),
              Text('Would you like to confirm this message?'),
            ],
          ),
        ),
        actions: <Widget>[
          TextButton(
            child: Text('Confirm'),
            onPressed: () {
              print('Confirmed');
              Navigator.of(context).pop();
            },
          ),
          TextButton(
            child: Text('Cancel'),
            onPressed: () {
              Navigator.of(context).pop();
            },
          ),
        ],
      );
    },
  );
}
As you can see we have a Future void function that is asynchronous and that returns an Alert Dialog. The “AlertDialog” widget has properties by default that we can use to display the information we want to display and get the user’s confirmation. In our case we are using the properties:
- title – which is a text widget in our case(but can be an icon, or any widget that you would like to use),
- content – which can also be any widget you would like to use( in our case I used a Column just to display more widgets),
- actions – which can be any button widget, Gesture Detector, Ink Well(in our case I used “TextButton”).
For the actions property, I have two buttons that serve a different purpose, one of them is used to confirm the message and simply prints out “Confirmed” and dismisses the Alert Dialog, and the other one simply dismisses the Alert Dialog or cancels the action.
3. Create the UI
For the UI we sill simply place a Flat Button inside the Center widget and call the “_showMyDialog” void. Have a look at the code below:
import 'package:flutter/material.dart';

void main() => runApp(MyApp());

/// This Widget is the main application widget.
class MyApp extends StatelessWidget {
  @override
  Widget build(BuildContext context) {
    return MaterialApp(
      home: Home(),
    );
  }
}

class Home extends StatefulWidget {
  @override
  _HomeState createState() => _HomeState();
}

class _HomeState extends State<Home> {
  @override
  Widget build(BuildContext context) {
    return Scaffold(
      appBar: AppBar(
          title: const Text('Confirmation Dialog'),
          backgroundColor: Colors.teal),
      body: Center(
        child: FlatButton(
          color: Colors.teal,
          textColor: Colors.white,
          onPressed: () {
            _showMyDialog();
          },
          child: Text('CONFIRM'),
        ),
      ),
    );
  }
}
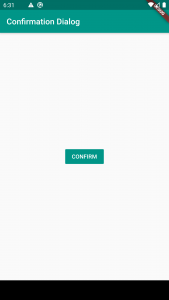
Here what it looks like:

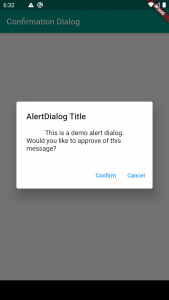
Once you press the button you will get the following:

If you press the “Confirm” button, it will dismiss the Alert Dialog and it will print “Confirmed” in your debug console. If you press “Cancel” it will simply dismiss the Alert Dialog. Here is the full code for the app:
import 'package:flutter/material.dart';

void main() => runApp(MyApp());

/// This Widget is the main application widget.
class MyApp extends StatelessWidget {
  @override
  Widget build(BuildContext context) {
    return MaterialApp(
      home: Home(),
    );
  }
}

class Home extends StatefulWidget {
  @override
  _HomeState createState() => _HomeState();
}

class _HomeState extends State<Home> {
  @override
  Widget build(BuildContext context) {
    return Scaffold(
      appBar: AppBar(
          title: const Text('Confirmation Dialog'),
          backgroundColor: Colors.teal),
      body: Center(
        child: FlatButton(
          color: Colors.teal,
          textColor: Colors.white,
          onPressed: () {
            _showMyDialog();
          },
          child: Text('CONFIRM'),
        ),
      ),
    );
  }

  Future<void> _showMyDialog() async {
    return showDialog<void>(
      context: context,
      barrierDismissible: false, // user must tap button!
      builder: (BuildContext context) {
        return AlertDialog(
          title: Text('AlertDialog Title'),
          content: SingleChildScrollView(
            child: Column(
              children: <Widget>[
                Text('This is a demo alert dialog.'),
                Text('Would you like to approve of this message?'),
              ],
            ),
          ),
          actions: <Widget>[
            TextButton(
              child: Text('Confirm'),
              onPressed: () {
                print('Confirmed');
                Navigator.of(context).pop();
              },
            ),
            TextButton(
              child: Text('Cancel'),
              onPressed: () {
                Navigator.of(context).pop();
              },
            ),
          ],
        );
      },
    );
  }
}
I hope this Flutter tutorial was helpful for you. If you are interested in learning Flutter, please check other Flutter tutorials on this site. Some of them have video tutorials included.