In this article, we will cover the basics of Aspect-Oriented Programming (AOP). You will learn how to use AspectJ to provide different AOP advices to Spring Boot applications to support cross-cutting issues like logging, profiling, caching, and transaction management and finally we will do a practical implementation to record user operations using Spring Boot AOP. The implementation would include logging all triggered repository methods to the console and recording all accessed HTTP request details into the database. So, let’s begin!
Why do we need AOP?
Consider a scenario in which we want to record every API call request and response time, or we want to maintain logs in the RestFul API calls.. Every rest endpoint must explicitly include a persistent logic or logging declaration. In real-world applications, we have plenty of rest services running, and adding logging, or persistent logic statements to each and every call is a hassle. Furthermore, if the code principles change significantly, you’ll need to update the logging message in each method. Here is AOP to help!!
We can use AOP to add common functionality to a variety of different places in our code without affecting existing code.
Introduction to AOP
As per the official documentation, Aspect-Oriented Programming (AOP) complements Object-Oriented Programming (OOP) by providing another way of thinking about program structure. The key unit of modularity in OOP is the class, whereas in AOP the unit of modularity is the aspect. Aspects enable the modularization of concerns such as transaction management that cut across multiple types and objects. In a nutshell, Aspect-Oriented Programming is a method for implementing Cross-Cutting Concerns.
Some common examples of cross-cutting concerns are as under:
- Logging
- Security
- Transaction management
- Auditing,
- Caching
- Internationalization
- Error detection and correction
- Memory management
- Performance monitoring
- Synchronization
AOP Concepts
Before deep-diving into the implementation of AOP, let’s first understand some basic terminologies:
Aspect
It is the modularization of a concern that cuts across multiple classes. We can define aspect by using the @Aspect annotation
Join Point
It is a point in the execution of a program, such as when a method is executed or when an exception is handled. Method execution is always represented by a join point in Spring AOP.
Advice
It is an action taken by an aspect at a particular join point.
Pointcut
It’s a predicate that looks for join points. Advice is associated with a pointcut expression and executes at any join point that the pointcut expression matches.
Target Object
It is an object where the advice is applied. This object will always be a proxied object because Spring AOP uses runtime proxies to implement it.
Types of Advice
Following are the common types of Advice:
-
Before advice
Advice that runs before a join point, but doesn’t have the power to stop the execution flow from continuing to the join point (unless it throws an exception).
-
After running advice
Advice executes after a join point completes normally, such as if a method returns without raising an exception.
-
After throwing advice
Advice that executes when a method exits by throwing an exception.
-
After finally advice
Advice that must execute regardless of the means by which a join point exits (normal or exceptional return).
-
Around advice
Advice that surrounds a join point such as a method invocation. It is the most powerful type of advice, this type of advice is capable to perform a custom behavior before and after the method invocation. It’s also in charge of deciding whether to go to the join point or to skip the suggested method execution by returning a value or throwing an exception.
Implementation to Record User Operations with Spring Boot AOP
In this section, we will make all HTTP Requests triggered sent to a database table for recording and debugging purposes. This would help us in keeping a track of which APIs were triggered, with what request parameters, at which time, and by which user. We will also log the methods names of the Repository package in the console for ease of development and understanding.
To begin with, let’s create a Maven, Spring Boot Project in any of your favorite IDE. Refer to this article for more details.
pom.xml
Following is a pom.xml that contains dependencies for spring boot AOP and relevant database dependencies. In our example, we are working with the Postgres database.
<?xml version="1.0" encoding="UTF-8"?>
<project xmlns="http://maven.apache.org/POM/4.0.0"
         xmlns:xsi="http://www.w3.org/2001/XMLSchema-instance"
         xsi:schemaLocation="http://maven.apache.org/POM/4.0.0 http://maven.apache.org/xsd/maven-4.0.0.xsd">
    <modelVersion>4.0.0</modelVersion>

    <groupId>org.example</groupId>
    <artifactId>AOPExample</artifactId>
    <version>1.0-SNAPSHOT</version>
    <parent>
        <groupId>org.springframework.boot</groupId>
        <artifactId>spring-boot-starter-parent</artifactId>
        <version>2.6.6</version>
        <relativePath/>
        <!-- lookup parent from repository -->
    </parent>

    <properties>
        <maven.compiler.source>11</maven.compiler.source>
        <maven.compiler.target>11</maven.compiler.target>
    </properties>

    <dependencies>
        <dependency>
            <groupId>org.springframework.boot</groupId>
            <artifactId>spring-boot-starter-data-jpa</artifactId>
        </dependency>
        <dependency>
            <groupId>org.springframework.boot</groupId>
            <artifactId>spring-boot-starter-web</artifactId>
        </dependency>
        <dependency>
            <groupId>org.springframework.boot</groupId>
            <artifactId>spring-boot-starter-aop</artifactId>
        </dependency>
        <dependency>
            <groupId>org.postgresql</groupId>
            <artifactId>postgresql</artifactId>
        </dependency>
    </dependencies>

</project>
application.properties
spring.datasource.url: jdbc:postgresql://localhost:5432/test
spring.datasource.username: postgres
spring.datasource.password: root
spring.datasource.driverClassName: org.postgresql.Driver
spring.jpa.database-platform=org.hibernate.dialect.PostgreSQLDialect
spring.jpa.show-sql=false
spring.jpa.hibernate.ddl-auto=create
Create a configuration class
Aspect Class: ApplicationLoggingAspect.java
package org.appsdeveloper.configuration;

import org.appsdeveloper.annotation.Log;
import org.appsdeveloper.model.ApplicationLog;
import org.appsdeveloper.repository.ApplicationLogRepository;
import org.appsdeveloper.service.ApplicationLogService;
import org.aspectj.lang.JoinPoint;
import org.aspectj.lang.ProceedingJoinPoint;
import org.aspectj.lang.annotation.Around;
import org.aspectj.lang.annotation.Aspect;
import org.aspectj.lang.annotation.Before;
import org.aspectj.lang.annotation.Pointcut;
import org.aspectj.lang.reflect.MethodSignature;
import org.springframework.beans.factory.annotation.Autowired;
import org.springframework.context.annotation.Configuration;
import org.springframework.core.LocalVariableTableParameterNameDiscoverer;
import org.springframework.stereotype.Component;
import org.springframework.web.context.request.RequestContextHolder;
import org.springframework.web.context.request.ServletRequestAttributes;

import javax.servlet.http.HttpServletRequest;
import java.lang.reflect.Method;
import java.time.Instant;
import java.time.ZoneId;
import java.util.logging.Logger;

@Aspect
@Configuration
public class ApplicationLoggingAspect {
    @Autowired
    private ApplicationLogService applicationLogService;
    private Logger logger = Logger.getLogger(ApplicationLoggingAspect.class.getName());

    @Pointcut("@annotation(org.appsdeveloper.annotation.Log)")
    public void pointcut() {
    }

    //    @Around("pointcut()")
    @Around("execution(* org.appsdeveloper.rest.*.*(..))")
    public Object around(ProceedingJoinPoint point) {
        Object result = null;
        long beginTime = System.currentTimeMillis();
        try {
            //Execution method
            result = point.proceed();
        } catch (Throwable e) {
            e.printStackTrace();
        }
        //Save log
        saveLog(point, beginTime);
        return result;
    }

    private void saveLog(ProceedingJoinPoint joinPoint, long time) {
        MethodSignature signature = (MethodSignature) joinPoint.getSignature();
        Method method = signature.getMethod();
        ApplicationLog applicationLog = new ApplicationLog();
        String className = joinPoint.getTarget().getClass().getName();
        String methodName = signature.getName();
        applicationLog.setMethod(className + "." + methodName + "()");
        Object[] args = joinPoint.getArgs();
        LocalVariableTableParameterNameDiscoverer u = new LocalVariableTableParameterNameDiscoverer();
        String[] paramNames = u.getParameterNames(method);
        if (args != null && paramNames != null) {
            String params = "";
            for (int i = 0; i < args.length; i++) {
                params += "  " + paramNames[i] + ": " + args[i];
            }
            applicationLog.setParams(params);
        }


        HttpServletRequest request = ((ServletRequestAttributes) RequestContextHolder.getRequestAttributes()).getRequest();
        applicationLog.setEndPoint(request.getServletPath());
        applicationLog.setUsername("Test user");

        applicationLog.setRequestTime(Instant.ofEpochMilli(time)
                .atZone(ZoneId.of("Africa/Tunis")).toLocalDateTime());
        applicationLog.setOperation(request.getMethod());
        applicationLogService.saveApplicationLog(applicationLog);
    }

    @Before("execution(* org.appsdeveloper.repository.*.*(..))")
    public void logMethodCall(JoinPoint jp) {
        String methodName = jp.getSignature().getName();
        logger.info("Before " + methodName);
    }
}
Key points of an Aspect Configuration class:
- @Aspect annotation to work with Spring AOP.
- @Configuration indicates @Bean defining methods and ensures that the Spring container can process the class and generate Spring Beans for use in the application.
- @Pointcut annotation declares a pointcut. Inside the pointcut argument, we have defined a path to the custom annotation we have created using @annotation.
- Around advice is declared by using @Around. The advice receives a ProceedingJoinPoint argument, which is used to call the target function. Proceed calls the target method with the original arguments and returns the result. Here, you can observe I have commented out a line @Around(“pointcut()”) which also works fine. In this way, we can pass a pointcut directly to the @Around annotation. Otherwise, we can tell the around annotation to invoke its method whenever a particular pattern matches. In a nutshell, around advice gives us leverage to add some logic before or after particular method execution.
- In this first example of @Around, we have added a logic to persist a snapshot of the request attributes such as request time, request end-point, HTTP method, request params, username, etc in the database.
- @Before annotation ensures that advice is run before an actual method execution, it is a good solution for logging method details. In our example, it logs whenever any method of an org.appsdeveloper.repository executes.
Create a custom annotation
Following is an example of custom annotation creation:
@Target(ElementType.METHOD)
@Retention(RetentionPolicy.RUNTIME)
public @interface Log {
    String value() default "";
}
- Here we have created a custom annotation using @interface.
- The idea was to use the annotation on some end-points and define its usage in a point cut definition inside an Aspect class.
Create model classes
Entity class for Application Logging
We have defined the following entity class with a few of the attributes for logging purposes:
package org.appsdeveloper.model;

import javax.persistence.*;
import java.io.Serializable;
import java.time.LocalDateTime;

@Entity
public class ApplicationLog implements Serializable {

    @Id
    @GeneratedValue(strategy = GenerationType.AUTO)
    private int id;
    private String username;
    private String operation;
    private String endPoint;
    private String method;
    private String params;
    private LocalDateTime requestTime;

    public ApplicationLog(int id, String username, String operation, String endPoint, String method, String params, LocalDateTime requestTime) {
        this.id = id;
        this.username = username;
        this.operation = operation;
        this.endPoint = endPoint;
        this.method = method;
        this.params = params;
        this.requestTime = requestTime;
    }

    public ApplicationLog() {
    }

    public int getId() {
        return id;
    }

    public void setId(int id) {
        this.id = id;
    }

    public String getUsername() {
        return username;
    }

    public void setUsername(String username) {
        this.username = username;
    }

    public String getOperation() {
        return operation;
    }

    public void setOperation(String operation) {
        this.operation = operation;
    }

    public String getEndPoint() {
        return endPoint;
    }

    public void setEndPoint(String endPoint) {
        this.endPoint = endPoint;
    }

    public String getMethod() {
        return method;
    }

    public void setMethod(String method) {
        this.method = method;
    }

    public String getParams() {
        return params;
    }

    public void setParams(String params) {
        this.params = params;
    }

    public LocalDateTime getRequestTime() {
        return requestTime;
    }

    public void setRequestTime(LocalDateTime requestTime) {
        this.requestTime = requestTime;
    }
}
- @Entity annotation defines that a model class maps to a table.
- For the sake of simplicity, we have kept only a few properties that will be persisted in the database.
Entity class for the demo controller
Following is the sample demo class for the test/demo controller:
package org.appsdeveloper.model;

import javax.persistence.Entity;
import javax.persistence.Id;
import java.io.Serializable;

@Entity
public class Student implements Serializable {
    @Id
    private int id;
    private String firstName;
    private String lastName;
    private String dateOfBirth;

    public int getId() {
        return id;
    }

    public void setId(int id) {
        this.id = id;
    }

    public String getFirstName() {
        return firstName;
    }

    public void setFirstName(String firstName) {
        this.firstName = firstName;
    }

    public String getLastName() {
        return lastName;
    }

    public void setLastName(String lastName) {
        this.lastName = lastName;
    }

    public String getDateOfBirth() {
        return dateOfBirth;
    }

    public void setDateOfBirth(String dateOfBirth) {
        this.dateOfBirth = dateOfBirth;
    }

}
Create a Repository interface
Following is a Repository interface that is responsible to persist application logging data into the database:
package org.appsdeveloper.repository;

import org.appsdeveloper.model.ApplicationLog;
import org.springframework.data.jpa.repository.JpaRepository;
import org.springframework.stereotype.Repository;

@Repository
public interface ApplicationLogRepository extends JpaRepository<ApplicationLog, Long> {
}
Create a Service class
Following is a service class, that ensures the saving of application logs:
package org.appsdeveloper.service;

import org.appsdeveloper.model.ApplicationLog;
import org.appsdeveloper.repository.ApplicationLogRepository;
import org.springframework.beans.factory.annotation.Autowired;
import org.springframework.stereotype.Service;

@Service
public class ApplicationLogService {

    @Autowired
    private ApplicationLogRepository applicationLogRepository;

    public void saveApplicationLog(ApplicationLog applicationLog) {
        applicationLogRepository.save(applicationLog);
    }
}
Create a Controller class
To test the working of our custom aspects, let’s create a demo controller class:
package org.appsdeveloper.rest;

import org.appsdeveloper.annotation.Log;
import org.appsdeveloper.model.Student;
import org.springframework.web.bind.annotation.*;

import java.util.Collections;
import java.util.List;

@RestController
@RequestMapping("/student")
public class StudentController {


    @Log("Executing method 1")
    @PostMapping("/")
    public void add() {
        System.out.println("Adding a student");
    }


    @Log("Executing method 2")
    @GetMapping("/findall")
    public List<Student> getAllStudents() {
        System.out.println("Finding all students");
        return Collections.singletonList(getStudent());
    }

    @Log("Executing method 3")
    @GetMapping("/findbyid/{id}")
    public Student getStudentById(@PathVariable long id) {
        System.out.println("Getting student by id: " + id);
        return getStudent();
    }

    @DeleteMapping("/delete/{id}")
    public void deleteStudentById(@PathVariable long id) {
        System.out.println("Deleting student by id: " + id);
    }

    private Student getStudent() {
        Student student = new Student();
        student.setId(1);
        student.setFirstName("John");
        student.setLastName("Allan");
        student.setDateOfBirth("01/01/2001");
        return student;
    }
}
Create a Main class for Spring Boot Application
package org.appsdeveloper;

import org.springframework.boot.SpringApplication;
import org.springframework.boot.autoconfigure.SpringBootApplication;

@SpringBootApplication
public class DemoApplication {

    public static void main(String[] args) {
        System.out.println("Hello World");
        SpringApplication.run(DemoApplication.class, args);
    }
}
Testing Time!
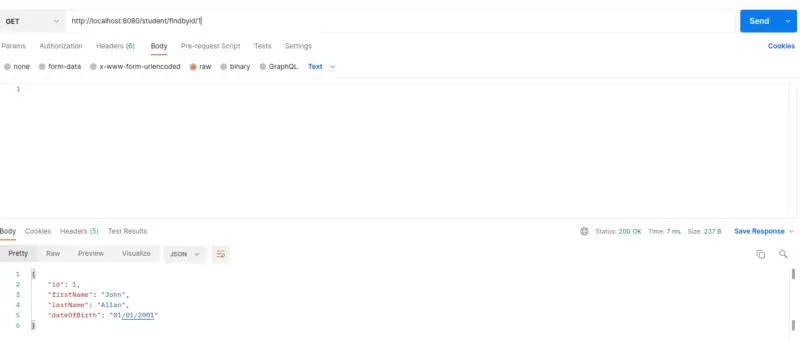
It’s time to test the APIs from the postman. Let’s first trigger /findbyid/{id} end-point:
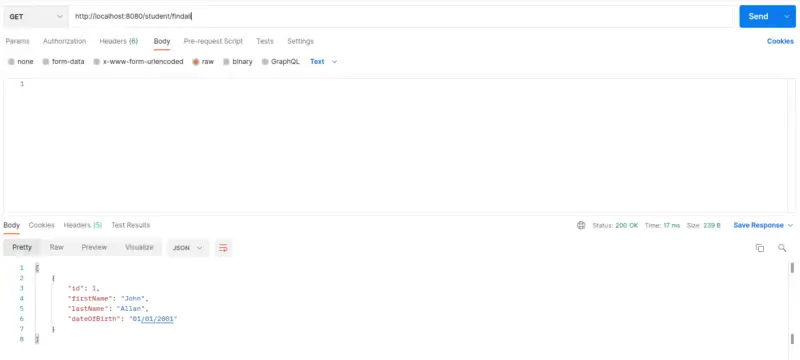
Next, let’s hit /findall API:
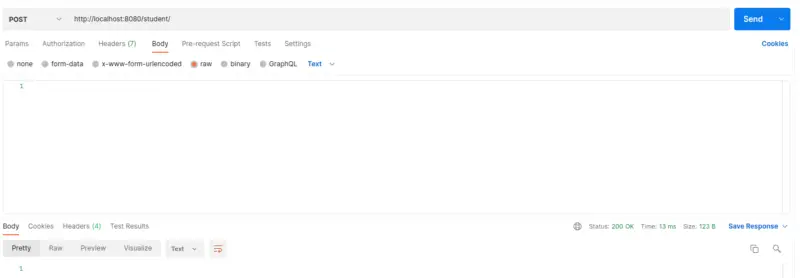
Now, that we have reached the POST endpoint, let’s trigger /student/ end-point:
Finally, let’s try to hit a /delete/{id} end-point:

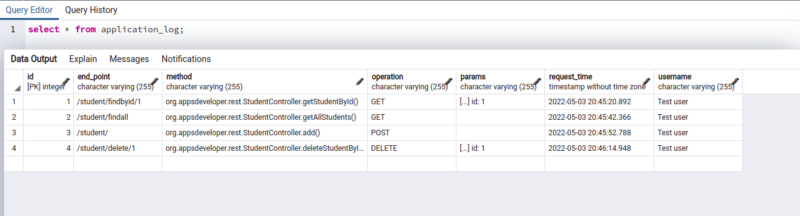
Now that, we have tested all the existing end-points, let’s check out the state of our application_log table in the database. Run the following SQL statement in the database console:
select * from application_log;
The following outcome demonstrates that our aspects are functioning properly and that our persistence of data has been successful.
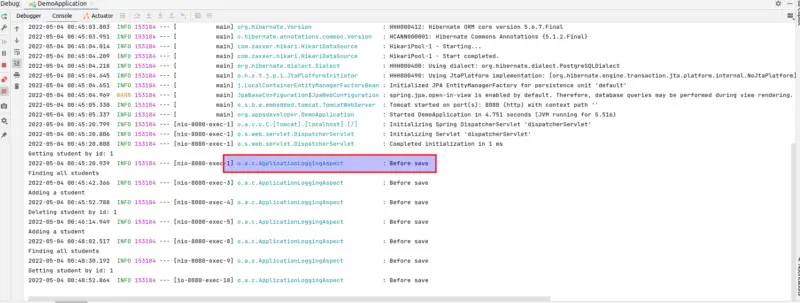
The outcome of the second advice created using @Before annotation
As we can see from the snapshot, logs are published on the console whenever a repository package method is executed.
Conclusion
In this blog post, we have covered the basic concepts of Aspect-Oriented Programming and demonstrated a thorough example of using AOP in a Spring Boot Application. We learned that the fundamental purpose of AOP is to segregate the business logic code from logging, performance statistics, security control, transaction processing, exception handling, and other routines. From the implementation, one can learn how to monitor user operations using custom annotations, how to record user operations in terms of accessing HTTP calls into the database, and how can we log statements in a console window.
If you find this article helpful, don’t forget to share your feedback or thoughts in the comments section.
