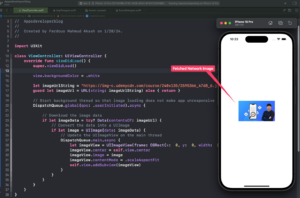
In this tutorial, you will learn how to create UIImageView programmatically and how to load an image from a remote URL. I’ll show you how to create a UIImageView and UIImage programmatically, and teach you how to fetch and display an image from a URL.
Step 1: Creating UIImageView Programmatically
First, let’s create a UIImageView programmatically. UIImageView is a view that displays an image and UIImage will represent an image downloaded from a remote URL.
To create a UIImageView, you instantiate a new UIImageView object and set its frame to determine its size and position. Then, you set its image property to a UIImage instance. Here’s an example of how to create both objects:
// Create a UIImageView with a specific size
let imageView = UIImageView(frame: CGRect(x:  0, y:  0, width:  200, height:  200))
let fetchedImage = UIImage(); // You will set actual image later
Step 2: Loading Image Data from a Remote URL
To load an image from a remote URL, you need to download the image data and convert it into a UIImage. This process should be done on a background queue to avoid blocking the main thread, which keeps your app responsive.
Here’s an example of how to load an image from a URL:
// Define the URL of the image
let imageUrlString = "https://www.appsdeveloperblog.com/wp-content/uploads/2022/06/2595366_47d8_6.jpg"
guard let imageUrl = URL(string: imageUrlString) else { return }

// Start a background task to download the image
DispatchQueue.global(qos: .userInitiated).async {
    // Download the image data
    if let imageData = try? Data(contentsOf: imageUrl) {
        // Convert the data into a UIImage
        if let image = UIImage(data: imageData) {
            // Update the UIImageView on the main thread
            DispatchQueue.main.async {
                imageView.image = image
            }
        }
    }
}
Remember to always perform UI updates on the main thread using DispatchQueue.main.async.
Step 3: Using dispatch_get_global_queue to Start a Background Thread
In the code snippet above, DispatchQueue.global(qos: .userInitiated).async is used to start a background thread. The global() method returns a concurrent queue that you can use to perform tasks in the background. The quality of service (QoS) level .userInitiated indicates that the task is initiated by the user and should be performed quickly.
Step 4: Using dispatch_get_main_queue to Update UI When the Background Thread Completes
After downloading the image data in the background, you need to update the UIImageView with the newly loaded image. Since only the main thread can update the UI, you use DispatchQueue.main.async to schedule the UI update on the main thread. If you want to learn more about background threads read this tutorial.
Step 5: Adding UIImageView as a Subview to the Main View and positioning it Center
To display the UIImageView on the screen, you need to add it as a subview to your view controller’s main view. To center the UIImageView within the main view, set its center property to the center of the main view. Here’s how you can do that:
self.view.addSubview(imageView)
imageView.center = self.view.center
Complete Code Example
Here’s the complete code example that includes all the steps discussed above:
import UIKit

class ViewController: UIViewController {
    override func viewDidLoad() {
        super.viewDidLoad()
        view.backgroundColor = .white
    }

    override func viewWillAppear(_ animated: Bool) {
        let imageUrlString = "https://www.appsdeveloperblog.com/wp-content/uploads/2022/06/2595366_47d8_6.jpg"
        guard let imageUrl = URL(string: imageUrlString) else { return }

        // Start background thread so that image loading does not make app unresponsive
        DispatchQueue.global(qos: .userInitiated).async {

            // Download the image data
            if let imageData = try? Data(contentsOf: imageUrl) {
                // Convert the data into a UIImage
                if let image = UIImage(data: imageData) {
                    // Update the UIImageView on the main thread
                    DispatchQueue.main.async {
                        let imageView = UIImageView(frame: CGRect(x:  0, y:  0, width:  200, height:  200))
                        imageView.center = self.view.center
                        imageView.image = image
                        imageView.contentMode = .scaleAspectFit
                        self.view.addSubview(imageView)
                    }
                }
            }
        }
    }
}

UIImageView Extension Approach
You can achieve the same result as above using the UIImageView extension. This approach makes your code more clear and easy to read. This is another complete example of fetching images from remote URLs.
import UIKit

class ViewController: UIViewController {
    override func viewDidLoad() {
        super.viewDidLoad()
        view.backgroundColor = .white
    }

    override func viewWillAppear(_ animated: Bool) {
        let imageView = UIImageView(frame: CGRect(x:  0, y:  0, width:  200, height:  200))
        let imageURL = URL(string: "https://www.appsdeveloperblog.com/wp-content/uploads/2022/06/2595366_47d8_6.jpg")!

        Task {
            await imageView.setImage(from: imageURL)
        }

        imageView.center = self.view.center
        imageView.contentMode = .scaleAspectFit
        self.view.addSubview(imageView)
    }
}

// Extension for fetching remote image
extension UIImageView {
    func setImage(from url: URL, placeholder: UIImage? = nil) async {
        self.image = placeholder
        do {
            let request = URLRequest(url: url)
            let (data, _) = try await URLSession.shared.data(for: request)
            if let image = UIImage(data: data) {
                DispatchQueue.main.async {
                    self.image = image
                }
            }
        } catch {
            print("Failed to load image: \(error)")
        }
    }
}
The provided code sets up an UIImageView to display an image fetched from a remote URL using Swift’s async/await feature. The UIImageView extension includes an async function setImage(from:placeholder:) that loads the image data from a given URL, converts it to a UIImage, and sets it to the UIImageView.
Overall, this is the modern approach to loading images asynchronously in a UIKit application using Swift’s concurrency model.
Conclusion
If you are interested in video lessons on how to write Unit tests and UI tests to test your Swift mobile app, check out this page: Unit Testing Swift Mobile App
I hope this tutorial was helpful to you. You now know how to create UIImageView programmatically and how to load an image from a remote URL.
To learn more about Swift and find more Swift code examples and tutorials, please check my Swift Code Examples page.
Happy coding!