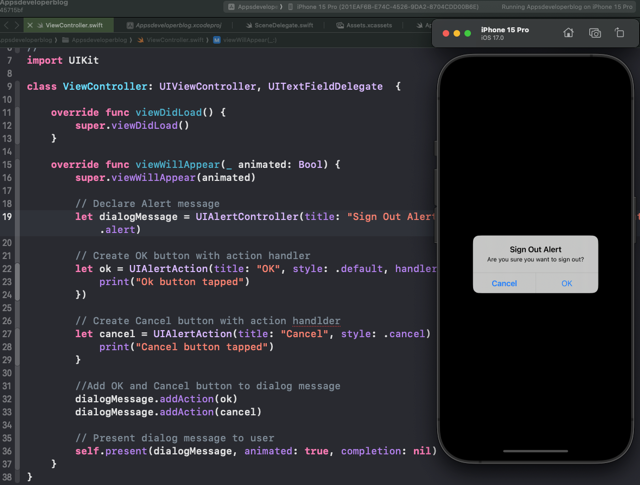
In this tutorial, you will learn how to create UIAlertController with OK and Cancel Buttons in Swift.
By the end of this tutorial, you will have a working Swift code example that you can use in your mobile application.
Step 1: Create UIAlertController with Title and Message to Display
First, you need to declare an instance of UIAlertController with a title and a message. The title is what will be displayed at the top of the alert, and the message will be displayed below the title. You also need to specify the preferred style of the alert, which can be either .alert or .actionSheet. For this tutorial, you’ll use .alert.
Here’s how you can create a UIAlertController:
let dialogMessage = UIAlertController(
                     title: "Sign Out Alert", message: "Are you sure you want to sign out?",
                     preferredStyle: .alert)
This code creates a UIAlertController with the title “Sign Out Alert” and the message “Are you sure you want to sign out?”. The preferred style is set to .alert, which means the alert will appear as a pop-up from the bottom of the screen.
Step 2: Create OK button with action handler
Next, you’ll add an action to the UIAlertController. This action will be represented by a button on the alert. You create a UIAlertAction by specifying a title, a style (such as .default for the OK button), and a handler that defines what should happen when the button is tapped.
let ok = UIAlertAction(title: "OK", style: .default, handler: { (action) -> Void in
    print("Ok button tapped")
})
You create an action with the title “OK”, sets the style to .default, and defines a handler that prints “Ok button tapped” to the console when the button is tapped.
You can then add this action button to the alert controller you created above this way:
dialogMessage.addAction(ok)
Step 3: Create Cancel button with action handler
Similarly, you can add a Cancel button to the UIAlertController. The Cancel button is typically used to dismiss the alert without performing any action. You can create it like this:
let cancel = UIAlertAction(title: "Cancel", style: .cancel) { (action) -> Void in
    print("Cancel button tapped")
}
This code creates a Cancel button with the title “Cancel”. The style is set to .cancel, which is the standard style for cancel buttons. The handler for this button simply prints “Cancel button tapped” to the console.
You can then add this action button to the alert controller you created above this way:
dialogMessage.addAction(cancel)
If you want to learn how to add a text field to UIAlertController then read this tutorial.
Complete Code Example
Here’s the complete code for creating a UIAlertController with an OK and a Cancel button:
import UIKit

class ViewController: UIViewController, UITextFieldDelegate  {

    override func viewDidLoad() {
        super.viewDidLoad()
    }

    override func viewWillAppear(_ animated: Bool) {
        super.viewWillAppear(animated)

        // Declare Alert message
        let dialogMessage = UIAlertController(title: "Sign Out Alert", message: "Are you sure you want to sign out?", preferredStyle: .alert)

        // Create OK button with action handler
        let ok = UIAlertAction(title: "OK", style: .default, handler: { (action) -> Void in
            print("Ok button tapped")
        })

        // Create Cancel button with action handlder
        let cancel = UIAlertAction(title: "Cancel", style: .cancel) { (action) -> Void in
            print("Cancel button tapped")
        }

        //Add OK and Cancel button to dialog message
        dialogMessage.addAction(ok)
        dialogMessage.addAction(cancel)

        // Present dialog message to user
        self.present(dialogMessage, animated: true, completion: nil)
    }
}

Conclusion
I hope this tutorial was helpful for you. There are a lot more Swift code examples on this website if you check the Swift Code Examples page.
Happy learning!