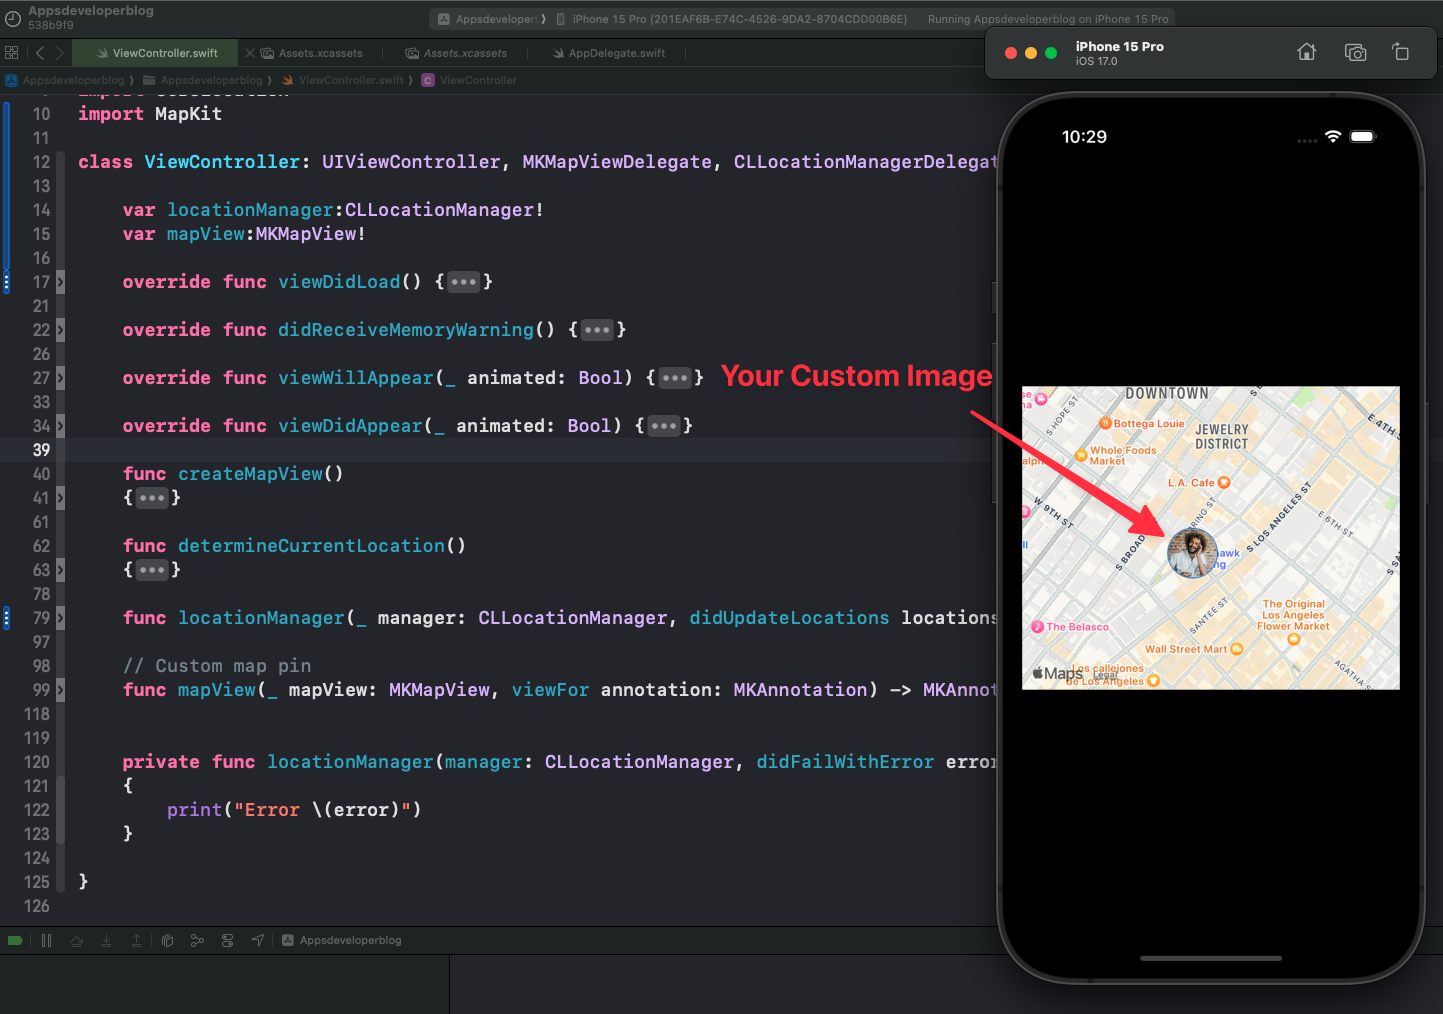
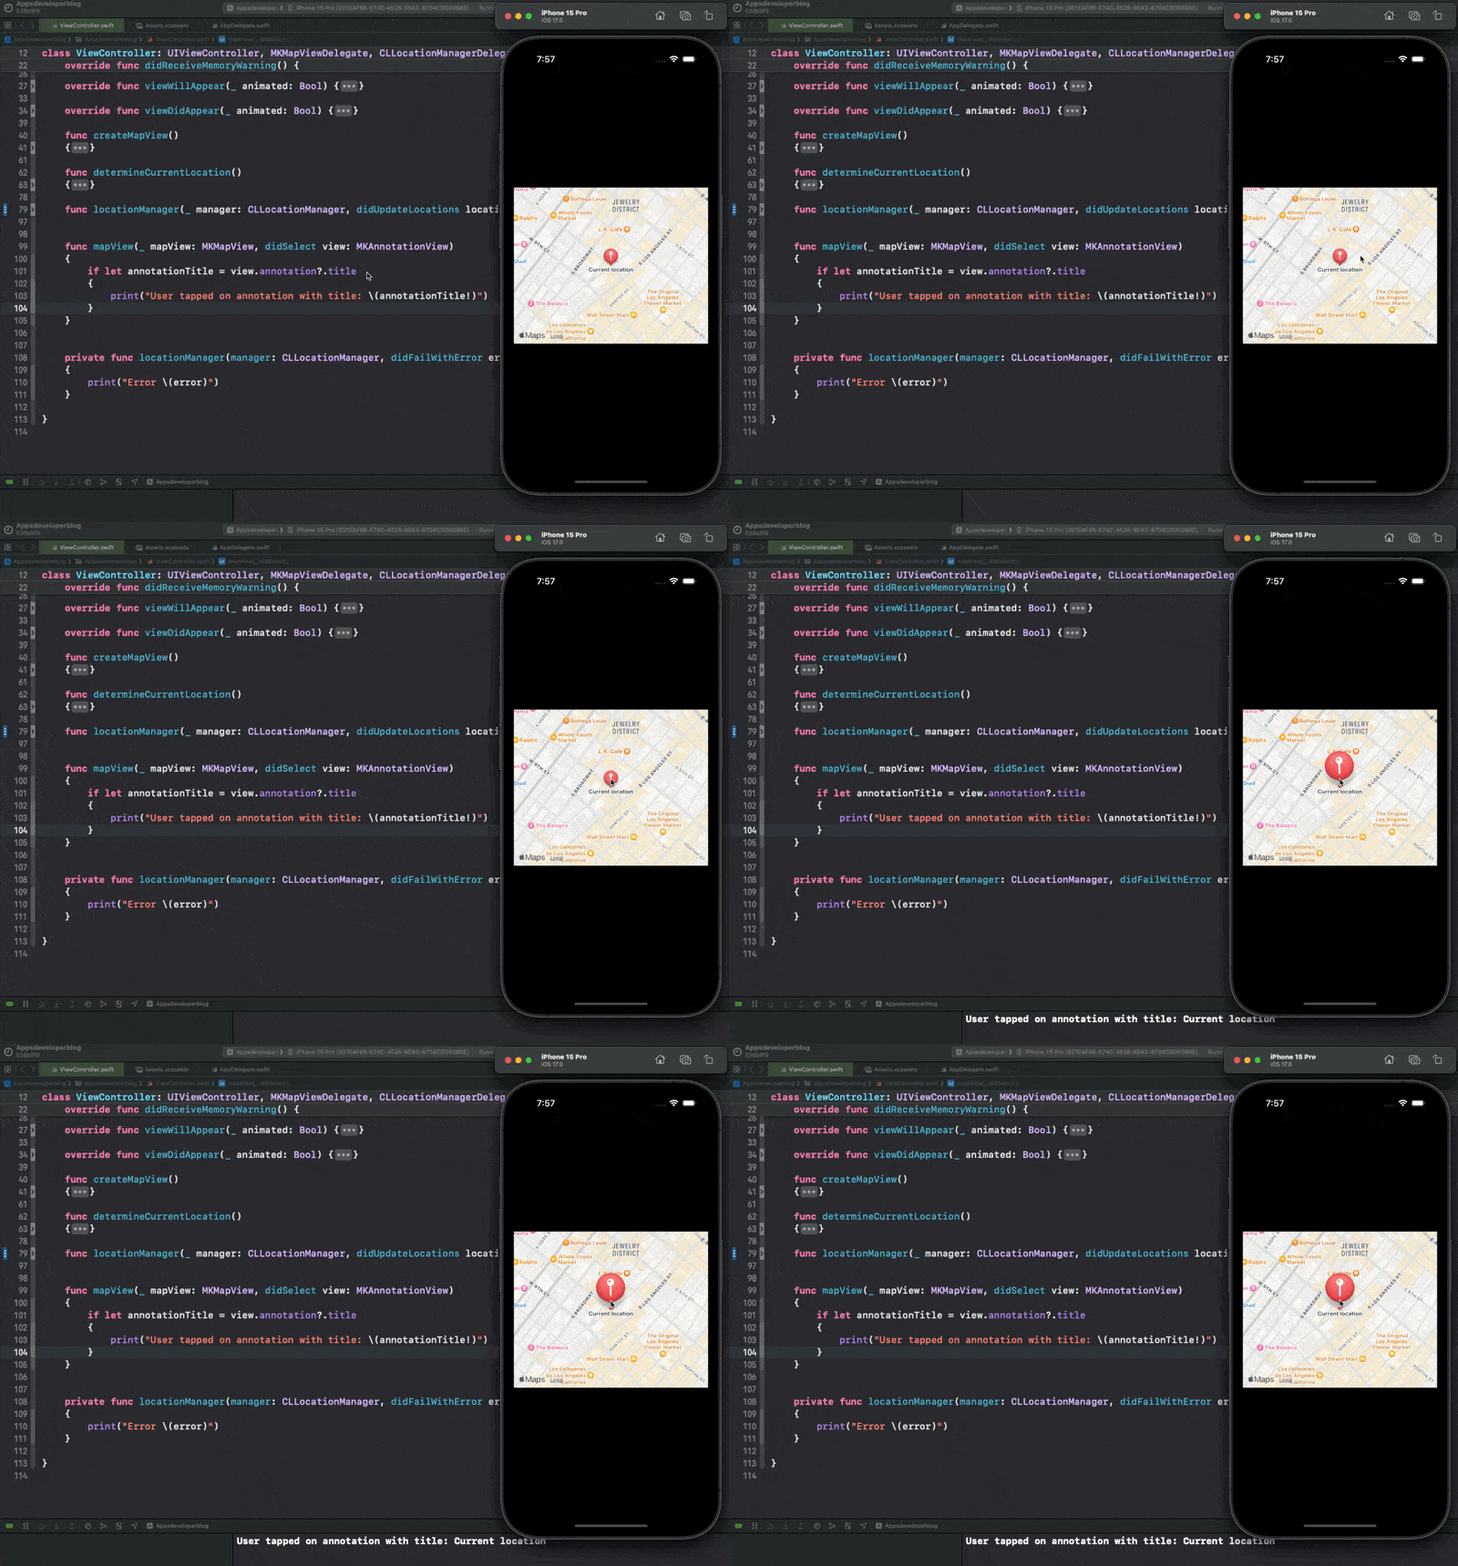
In this tutorial, you will learn how to display a custom pin image on a MapView at the user’s current location. To do that, you will use the MKAnnotationView class. You also learn how to handle a user tap event on MKAnnotationView.
MKAnnotationView is a way to show something on a map, like a pin or a marker, that tells you about a specific place. For example, you can use MKAnnotationView to show the name and picture of a famous landmark or the address and rating of a restaurant.
By the end of this tutorial, you will have a functional example with a map view that determines the user’s current location and drops a custom pin to this position using MKPointAnnotation.
Step 1: Import the CoreLocation & MapKit
First, you need to import the CoreLocation and MapKit frameworks into your Swift file. These frameworks provide the necessary classes and protocols for determining the user’s location and implementing a map view.
import CoreLocation
import MapKit
Step 2: Create MKMapView
Next, you’ll create an instance of MKMapView programmatically. This initializes a new MKMapView object and configures it according to your requirements, such as setting the map type, zoom, and scroll properties.
func createMapView()
    {
        mapView = MKMapView() // Mapview Instance

        let leftMargin:CGFloat = 10
        let topMargin:CGFloat = 60
        let mapWidth:CGFloat = view.frame.size.width-20
        let mapHeight:CGFloat = 300

        mapView.frame = CGRectMake(leftMargin, topMargin, mapWidth, mapHeight)
        mapView.delegate = self

        mapView.mapType = MKMapType.standard
        mapView.isZoomEnabled = true
        mapView.isScrollEnabled = true

        // Or, if needed, we can position map in the center of the view
        mapView.center = view.center

        view.addSubview(mapView)
    }
After creating the MKMapView, add it as a subview to your main view to make the map visible on your screen. Also, set the mapView delegate to self to allow the ViewController to interact with the MKMapView and customize MKAnnotationView to set a custom map pin image.
Step 3: Determine User’s Current Location
To determine the user’s current location, create an instance of CLLocationManager and set its delegate. Then, request location updates and handle the location updates in the delegate method.
func determineCurrentLocation()
    {
        locationManager = CLLocationManager()
        locationManager.delegate = self
        locationManager.desiredAccuracy = kCLLocationAccuracyBest
        locationManager.requestAlwaysAuthorization()

        DispatchQueue.global().async {
            if CLLocationManager.locationServicesEnabled() {
                DispatchQueue.main.async {
                    self.locationManager.startUpdatingLocation()
                }
            }
        }

    }
Use startUpdatingLocation() inside DispatchQueue.main.async to ensure that the UI-related code, which starts the location updates, is executed on the main thread. This is crucial because all UI updates must be performed on the main thread in iOS to avoid unexpected behavior or crashes.
To learn more about different types of dispatch queues, you can check out this tutorial.
Step 4: Set the Current Region on the Map
Once you have the user’s current location, you can set the map’s region to center around this location. This is done by creating an MKCoordinateRegion with the user’s location and a span that defines the zoom level.
func locationManager(_ manager: CLLocationManager, didUpdateLocations locations: [CLLocation]) {
        let userLocation:CLLocation = locations[0] as CLLocation

        // Call stopUpdatingLocation() to stop listening for location updates,
        // other wise this function will be called every time when user location changes.
        //manager.stopUpdatingLocation()

        let center = CLLocationCoordinate2D(latitude: userLocation.coordinate.latitude, longitude: userLocation.coordinate.longitude)
        let region = MKCoordinateRegion(center: center, span: MKCoordinateSpan(latitudeDelta: 0.01, longitudeDelta: 0.01))

        mapView.setRegion(region, animated: true)

        // Drop a pin at user's Current Location
        let myAnnotation: MKPointAnnotation = MKPointAnnotation()
        myAnnotation.coordinate = CLLocationCoordinate2DMake(userLocation.coordinate.latitude, userLocation.coordinate.longitude);
        myAnnotation.title = "Current location"
        mapView.addAnnotation(myAnnotation)
    }
To create a custom pin on the map, you first need to create an MKPointAnnotation and set its coordinate to the user’s location. You can also set a custom title for this annotation and add the annotation to the map view.
Step 5: Implement didSelectAnnotationView to Detect User Event
The didSelectAnnotationView method is part of the MKMapViewDelegate protocol, which is used to handle user interactions with the map view. Specifically, this method is called when the user taps on an annotation view on the map.
To implement this method, you need to define it in your MKMapViewDelegate implementation. This is typically done in your view controller that manages the map view. Here’s how you can do it:
func mapView(_ mapView: MKMapView, didSelect view: MKAnnotationView)
    {
        if let annotationTitle = view.annotation?.title
        {
            print("User tapped on annotation with title: \(annotationTitle!)")
        }
    }
In this function, you are checking if the annotation property of the view is not nil and if it has a title. If both conditions are met, you print a message to the console with the title of the annotation that was tapped.
Step 6: Create MKAnnotationView with Custom Image
To display a custom image for the pin, you need to implement the mapView(_:viewFor:) delegate method. In this method, you create an MKAnnotationView and set its image to your custom image.
func mapView(_ mapView: MKMapView, viewFor annotation: MKAnnotation) -> MKAnnotationView? {
        let identifier = "MyPin"

        if annotation is MKUserLocation {
            return nil
        }

        var annotationView = mapView.dequeueReusableAnnotationView(withIdentifier: identifier)

        if annotationView == nil {
            annotationView = MKAnnotationView(annotation: annotation, reuseIdentifier: identifier)
            annotationView?.canShowCallout = true
            annotationView?.image = UIImage(named: "YouOnMap") // Set your custom image here
        } else {
            annotationView?.annotation = annotation
        }

        return annotationView
    }
This function allows you to customize the appearance and behavior of annotations and set your custom pin image. Change your image name according to your image assets.
Complete Code Example
Below is the complete code example with all the above steps combined.
import UIKit
import CoreLocation
import MapKit

class ViewController: UIViewController, MKMapViewDelegate, CLLocationManagerDelegate {

    var locationManager:CLLocationManager!
    var mapView:MKMapView!

    override func viewDidLoad() {
        super.viewDidLoad()
        // Do any additional setup after loading the view, typically from a nib.
    }

    override func didReceiveMemoryWarning() {
        super.didReceiveMemoryWarning()
        // Dispose of any resources that can be recreated.
    }

    override func viewWillAppear(_ animated: Bool) {
        super.viewWillAppear(animated)

        // Create and Add MapView to our main view
        createMapView()
    }

    override func viewDidAppear(_ animated: Bool) {
        super.viewDidAppear(animated)

        determineCurrentLocation()
    }

    func createMapView()
    {
        mapView = MKMapView()

        let leftMargin:CGFloat = 10
        let topMargin:CGFloat = 60
        let mapWidth:CGFloat = view.frame.size.width-20
        let mapHeight:CGFloat = 300

        mapView.frame = CGRectMake(leftMargin, topMargin, mapWidth, mapHeight)
        mapView.delegate = self

        mapView.mapType = MKMapType.standard
        mapView.isZoomEnabled = true
        mapView.isScrollEnabled = true

        // Or, if needed, we can position map in the center of the view
        mapView.center = view.center

        view.addSubview(mapView)
    }

    func determineCurrentLocation()
    {
        locationManager = CLLocationManager()
        locationManager.delegate = self
        locationManager.desiredAccuracy = kCLLocationAccuracyBest
        locationManager.requestAlwaysAuthorization()

        DispatchQueue.global().async {
            if CLLocationManager.locationServicesEnabled() {
                DispatchQueue.main.async {
                    self.locationManager.startUpdatingLocation()
                }
            }
        }

    }

    func locationManager(_ manager: CLLocationManager, didUpdateLocations locations: [CLLocation]) {
        let userLocation:CLLocation = locations[0] as CLLocation

        // Call stopUpdatingLocation() to stop listening for location updates,
        // other wise this function will be called every time when user location changes.
        //manager.stopUpdatingLocation()

        let center = CLLocationCoordinate2D(latitude: userLocation.coordinate.latitude, longitude: userLocation.coordinate.longitude)
        let region = MKCoordinateRegion(center: center, span: MKCoordinateSpan(latitudeDelta: 0.01, longitudeDelta: 0.01))

        mapView.setRegion(region, animated: true)

        // Drop a pin at user's Current Location
        let myAnnotation: MKPointAnnotation = MKPointAnnotation()
        myAnnotation.coordinate = CLLocationCoordinate2DMake(userLocation.coordinate.latitude, userLocation.coordinate.longitude);
        myAnnotation.title = "Current location"
        mapView.addAnnotation(myAnnotation)
    }

    // Custom map pin
    func mapView(_ mapView: MKMapView, viewFor annotation: MKAnnotation) -> MKAnnotationView? {
        let identifier = "MyPin"

        if annotation is MKUserLocation {
            return nil
        }

        var annotationView = mapView.dequeueReusableAnnotationView(withIdentifier: identifier)

        if annotationView == nil {
            annotationView = MKAnnotationView(annotation: annotation, reuseIdentifier: identifier)
            annotationView?.canShowCallout = true
            annotationView?.image = UIImage(named: "YouOnMap") // Set your custom image here
        } else {
            annotationView?.annotation = annotation
        }

        return annotationView
    }


    private func locationManager(manager: CLLocationManager, didFailWithError error: NSError)
    {
        print("Error \(error)")
    }

}

Conclusion
I hope this tutorial was helpful to you.
To learn more about Swift and to find other code examples, check the following page: Swift Code Examples.
Keep coding!
